
How to Build a Price Scraping Bot with Browserbear
Contents
Searching for product prices online isn’t difficult when you’re looking up a single product a few times. But when you’re dealing with multiple products and changing prices, the manual method can quickly become tedious.
Differences in product pricing influenced by factors such as shifting supply and demand, inflation, and exchange rates. Creating a workflow that scrapes pricing data automatically can be extremely helpful when your goals are…
- Tracking prices
- Monitoring stock
- Observing trends
…and plenty of other processes that involve insights and decisions based on raw pricing data.
This article will go over how to build a browser automation that extracts pricing data. You can then use it to reduce the manual work in other parts of your processes.
What You Will Create
Pricing data can be used for informed decision making and is an important component of many operational and marketing processes. Being able to automatically acquire it is extremely helpful to ensuring you always have reliable data on hand.
At the end of this tutorial, you should have a browser automation task that scrapes pricing data on a schedule, looping as many times as needed. Your output data will be structured and ready to be added to a database, a workflow, or whatever you would like.
All you will need is a Browserbear account and a clear understanding of the data you need to gather.
Why Use Browserbear to Extract Pricing Data?
Browserbear is a nocode tool that can be used to automate your browser. You can use it to perform actions you would otherwise manually carry out, such as clicking, entering text, downloading files, and more.

When it comes to data extraction, Browserbear is extremely helpful because it:
- Allows you to scrape multiple sources and compile data in a database
- Can be easily integrated with third-party apps
- Retrieves raw data in a versatile JSON format
- Can be run at any frequency
- Reduces reliance on site notifications
You can automate browser tasks for all types of sites. Pricing information is generally scraped from e-commerce sites in the form of structured data, but the versatility of Browserbear means you can also extract lists, photos, PDF documents, and much more.
How to Build a Browserbear Task that Scrapes Prices
The workflow you build will instruct Browserbear to navigate to a website, then perform actions that extract structured data matching the set requirements. If your target site is a single page without much complexity, this can be done in just a few steps. But if your needs involve clicking through multiple pages or scraping a list of links individually, set up will be slightly more tricky.
We’ll take you through the process of building a price scraping task and how to loop it for multiple pages. This will essentially involve three steps: navigating to your needed content, saving links to all the pages, then going to and extracting data from each individual link.
❗️ Note : This tutorial is built with a specific sample in mind. While you can apply similar principles to most websites, the exact actions will differ depending on how your destination site is structured.
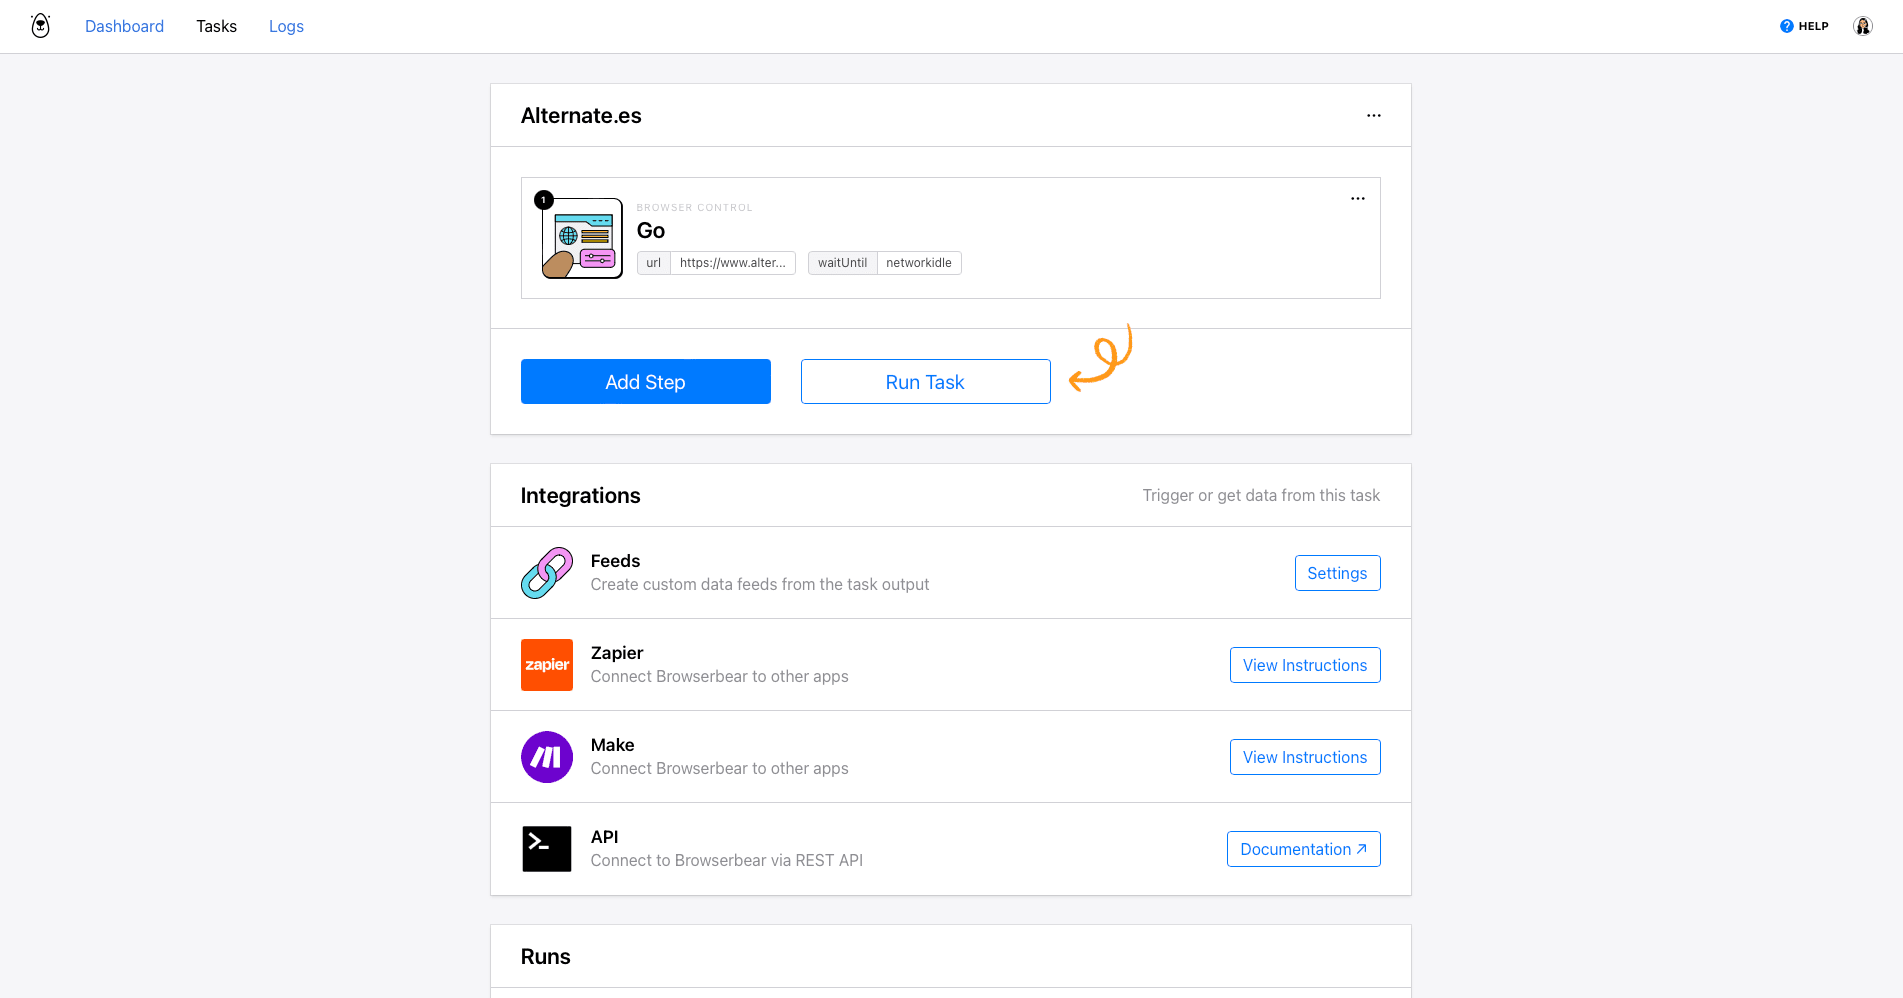
Set Up a Task and Navigate to Prices
Log into your Browserbear account (or create a free trial account if you don’t have one—no credit card required! 🎉). Go to the Tasks tab, then click Create a Task.
You will now be able to insert a starting URL. This could be a home page, a content page, or the e-commerce page, depending on your goals and the site structure.

In this example, we will load the home page of a website so that we can enter search text and execute a search to reveal items that match our specifications.
After clicking Save , you’ll be on a task page where you can add additional steps, run your automation, and view completed runs.
Renaming your task and editing the settings is possible by clicking the three-dot menu next to the title and selecting Edit Task.
Bear Tip 🐻 : Some site bot protection measures can interfere with Browserbear’s ability to interact. If you’re getting blocked, you may have to play around with the user agent, fingerprint, and proxy options in the Edit Task menu until you find something that consistently works for you.
Once you’ve completed setup, return to the task page and set up the following steps:
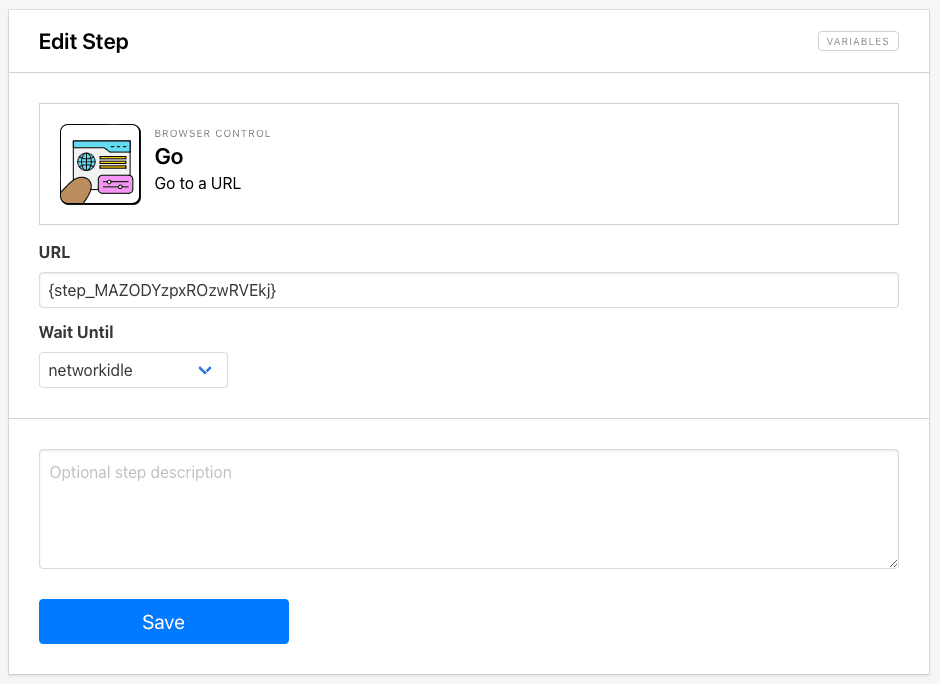
Step 1. Go
The starting URL you placed will already be added as the first step: Go. This can optionally be changed to a dynamic field in Zapier if it suits your use case.

Networkidle is the default wait instructions and the safest setting, but you can also use load or domcontentloaded. This might be recommended if you experience trouble loading the site.
Step 2. Remove Modal
Add a new step and choose Remove Modal as the action. This will attempt to remove any floating modals or cookie consent boxes.
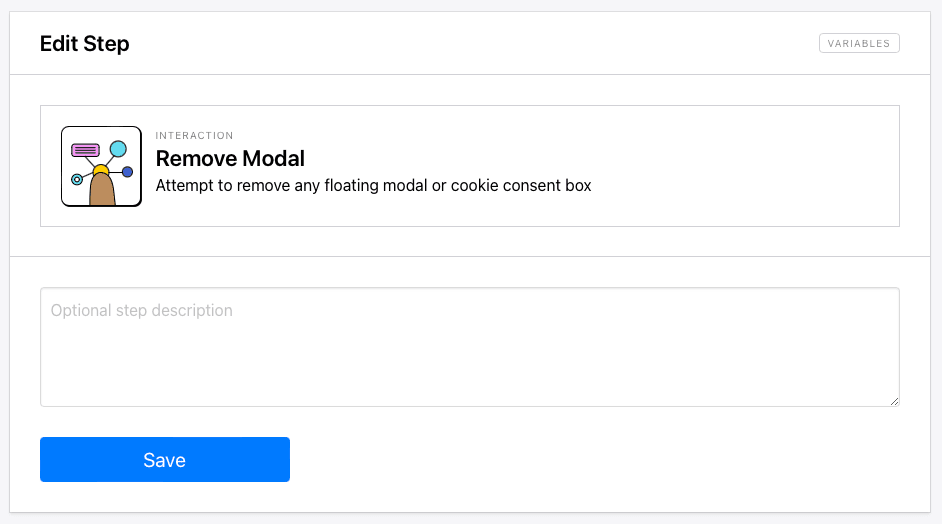
Click Save.
This step may or may not be necessary depending on the site. There are also modals that don’t interfere with the base structure of the site, allowing you to carry out other browser actions regardless of whether or not the modal is removed.
Step 3. Enter Text
The next step is Enter Text. This will allow us to add a value into the search bar so we can filter for products matching our needs.
Use the Browserbear Helper Chrome extension to isolate and generate config for the search bar.
{"xpath":"/html/body/div[4]/header/div[1]/div/nav/div[3]/form/div/input","element":"<input type=\"search\" name=\"q\" class=\"form-control\" onkeyup=\"global.handleSuggestLayer(event, this, {})\" placeholder=\"Búsqueda\">"}
Paste it into the Helper section.
Insert your search value into Input Text.
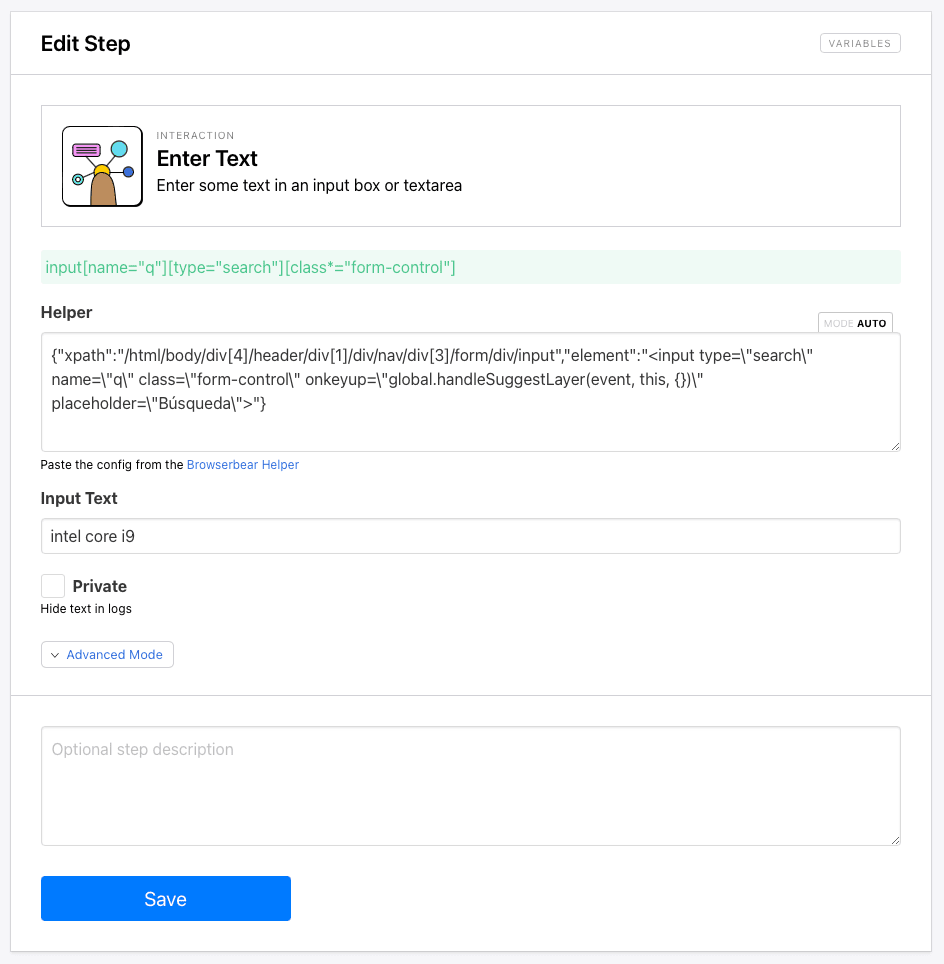
Click Save.
Step 4. Click
Add a new step and choose Click as the action. This will execute the search.
Once again, use the Browserbear Helper extension to generate config for the search button.
{"xpath":"/html/body/div[4]/header/div[1]/div/nav/div[3]/form/div/button","element":"<button title=\"Búsqueda\" type=\"submit\" class=\"btn btn-black\"><i class=\"fas fa-search\" style=\"\"></i></button>"}
Paste it into the Helper section.
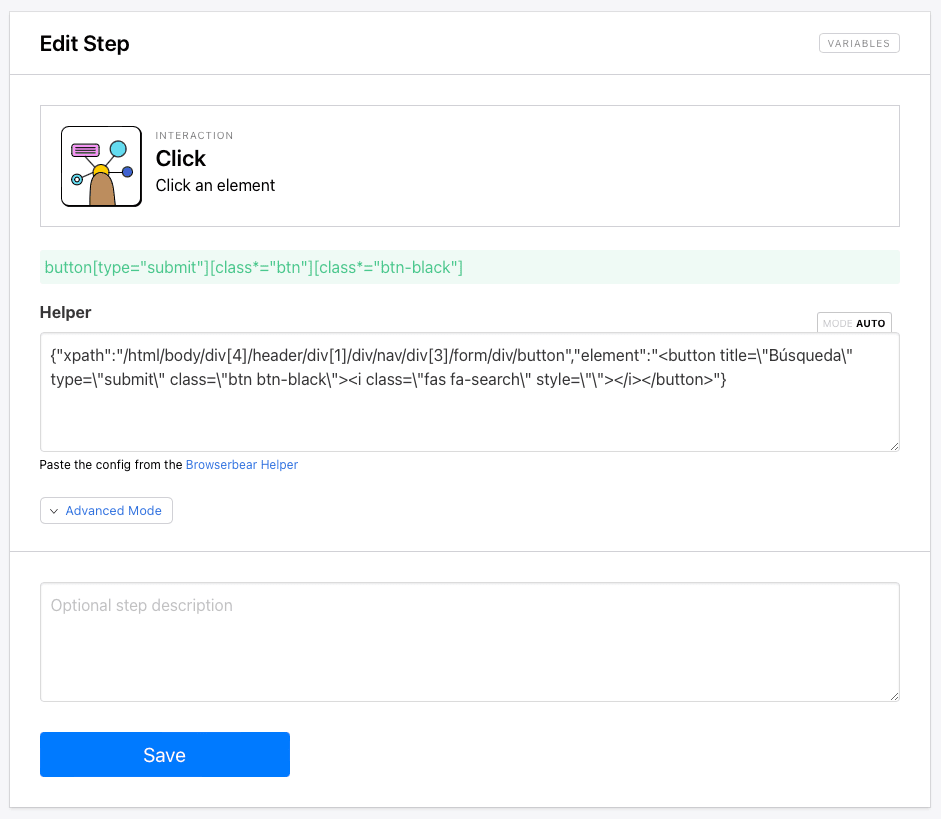
Click Save.
Running the task at this stage should show the site loading, then performing a search matching your input value to reveal a list of items.
Create a Loop to Save Many Item Links
Now, let’s move onto building a loop that extracts all product links matching your search value.
Bear Tip 🐻: If your use case doesn’t involve scraping information from individual links or multiple pages, you can skip straight to the final step: Save Structured Data.
Step 5. Loop Start
Add a new step to the same task and choose Loop Start as the action.
Select repeat as the loop type and set it to loop the maximum possible number of times that would be appropriate in the scenario. We’ll use 10.
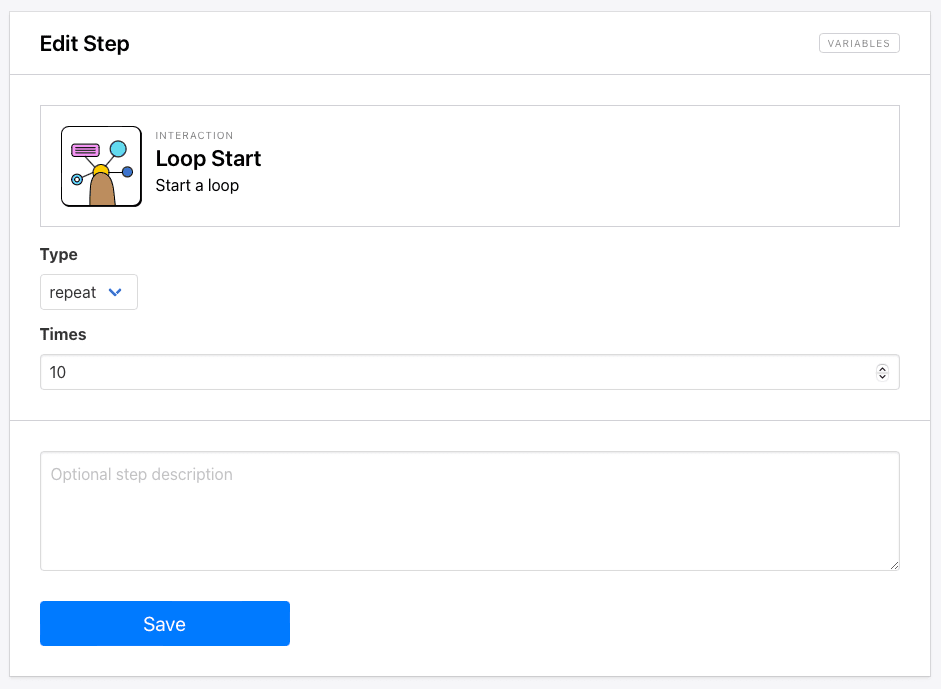
Click Save.
Step 6. Save Attribute
The next step will be a Save Attribute action that saves links to the product pages.
Use the Browserbear Helper extension to generate config for the product container.
/html/body/div[7]/div[5]/div/div/div[2]/div[3]/div/div[2]/a
Choose href as the attribute you want to save, and check the All box so all links are extracted.
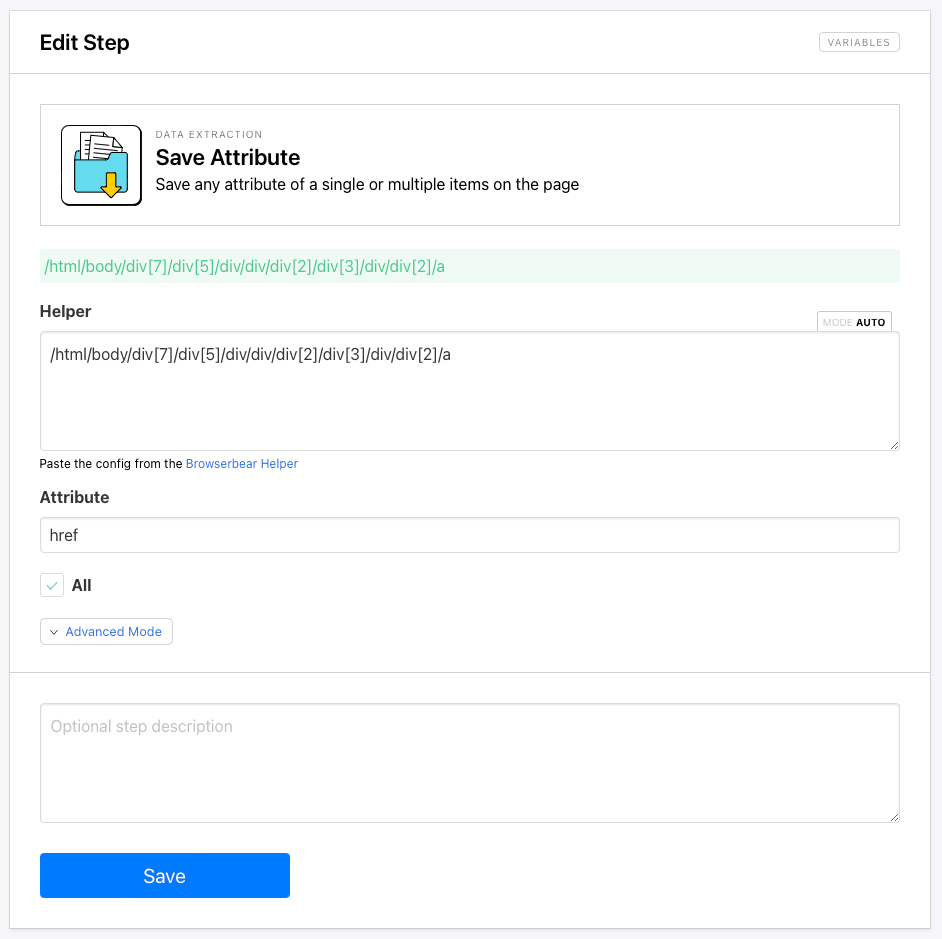
Click Save.
You might want to test the task at this point to ensure the links are being successfully extracted. If the generated config isn’t yielding expected results, try using your browser’s Inspector tool to retrieve the XPath or CSS selector for that specific element.
In this example, the easiest way to isolate product links was to write an XPath expression that identified the entire product list container, then scrape all links within it.
Step 7. Assert
Add an Assert action to your task. This will check if an element exists, is visible, or contains something specific and can be used as a trigger to end a loop.
Choose an element that changes on the final product page, then generate config for it. We’ll be using the greyed-out button that signals the final product page.
div.mt-2 a.btn.btn-outline-gray.m-1.disabled i.fa-angle-right
Paste the config into the Helper and choose element_exists as the assert type.
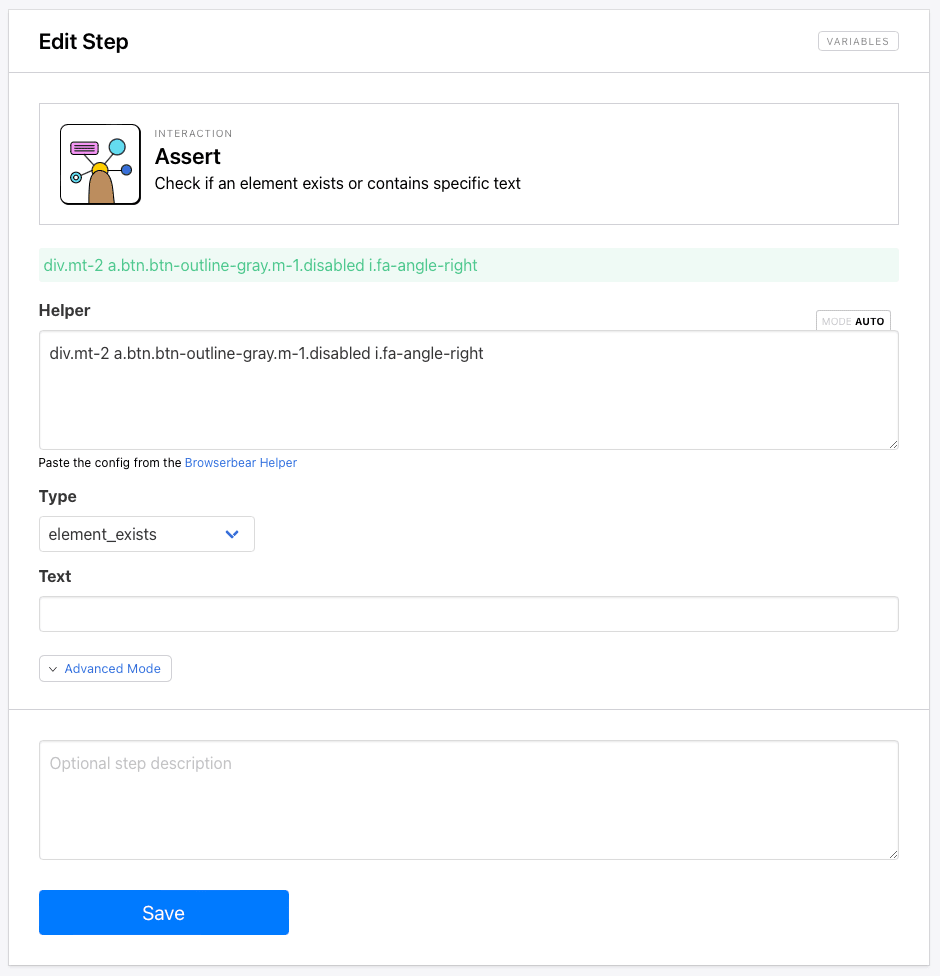
Click Save.
Step 8. Loop Break If
The next action is Loop Break If and will signal the loop to end when the final product page has been reached.
Choose assert as the step that the trigger is based on, then choose True as the output. When the greyed-out button is activated, the loop will end.
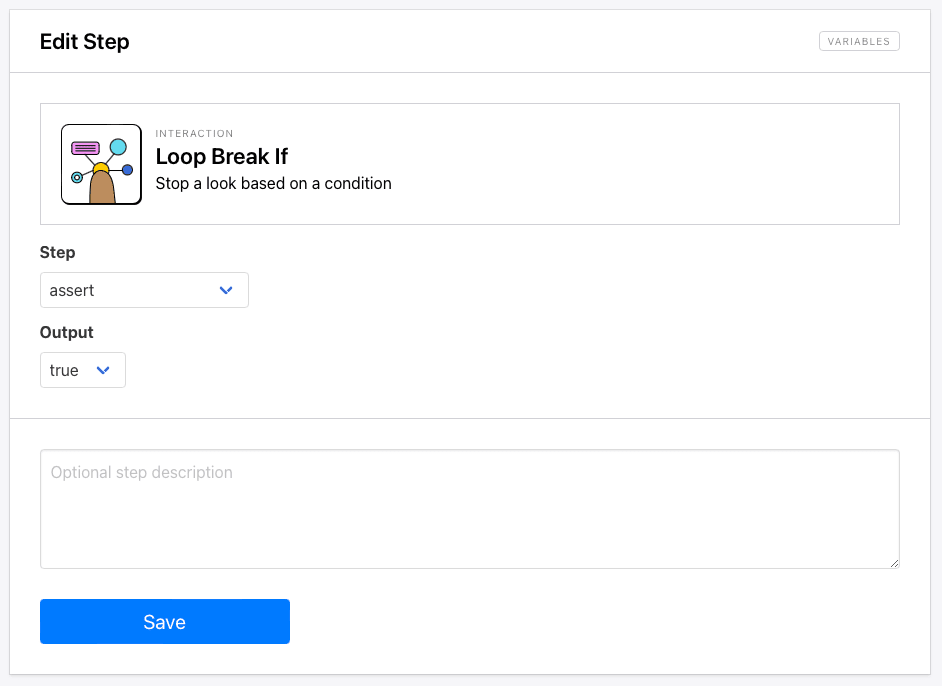
Click Save.
Step 9. Click
Add a new Click action to your task. Now that we’ve established when the loop will end, we need to have an action that clicks through each product page so the links can be saved.
Use the Helper or write your own config for the next button.
div.mt-2 a[aria-label="Página siguiente"]
Paste it into the Helper.
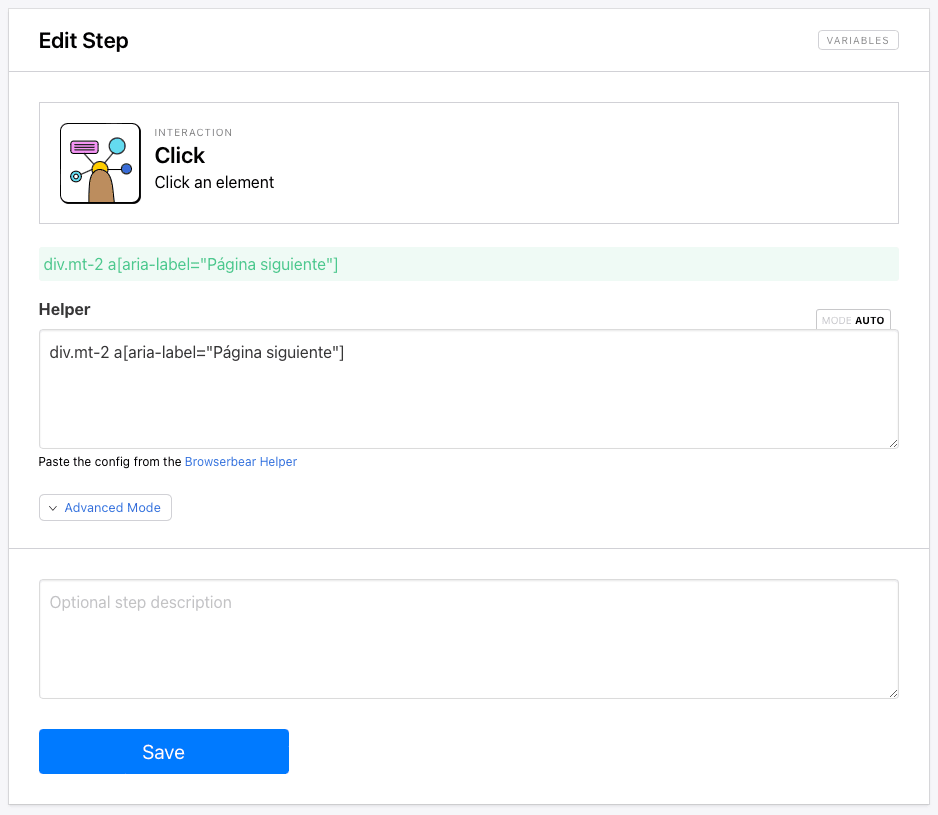
Click Save.
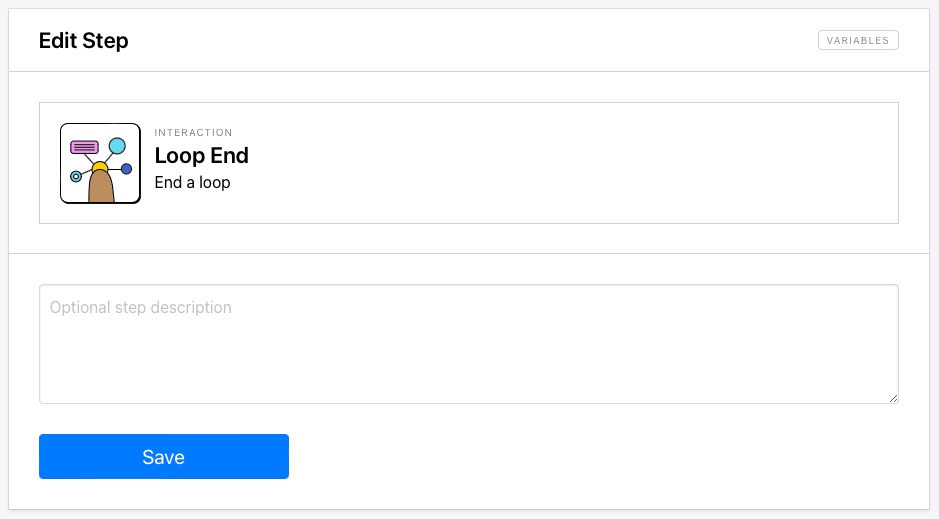
Step 10. Loop End
Add a new step to your task and choose Loop End as the action. This simply signals the end of the loop so any preceding actions are not involved.
At this point, a test should show the site loading and performing a search, then clicking through each page of search results and extracting links you can see in the task log.
Create a Loop to Scrape Data From Each Link
All that’s left to do is create a final loop that loads each product page, then scrapes the information needed.
Step 11. Loop Start
Add a new step to the same task and choose Loop Start as the action.
This time, we will use data as the loop type, which repeats the loop for as many items included in the data set.
Specify the data being looped with the step ID from the Save Attribute step.
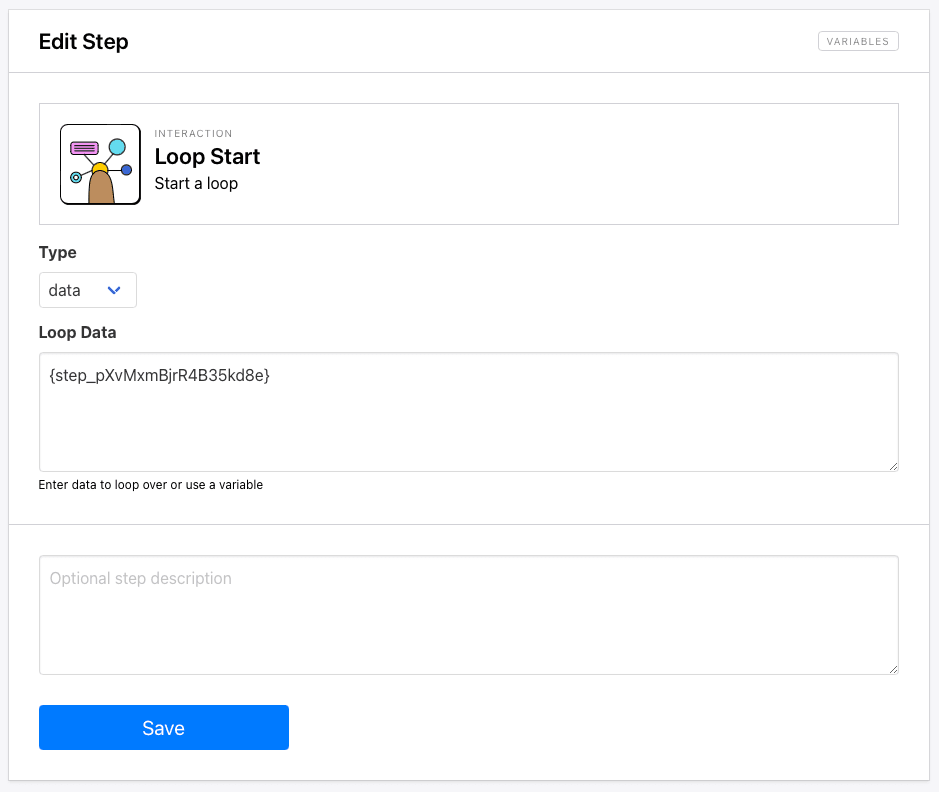
Click Save.
Bear Tip 🐻: You can specify steps in Browserbear in two ways: using the step number or step ID. However, it’s recommended to use step ID (eg.
{step_MAZODYzpxROzwRVEkj}rather than number (eg.{step_6}so the correct step is identified even if the order is changed.
Step 12. Go
Add a Go step to your task. This will load each product page.
Specify the output from the preceding Loop Start step as the URL.
Click Save.
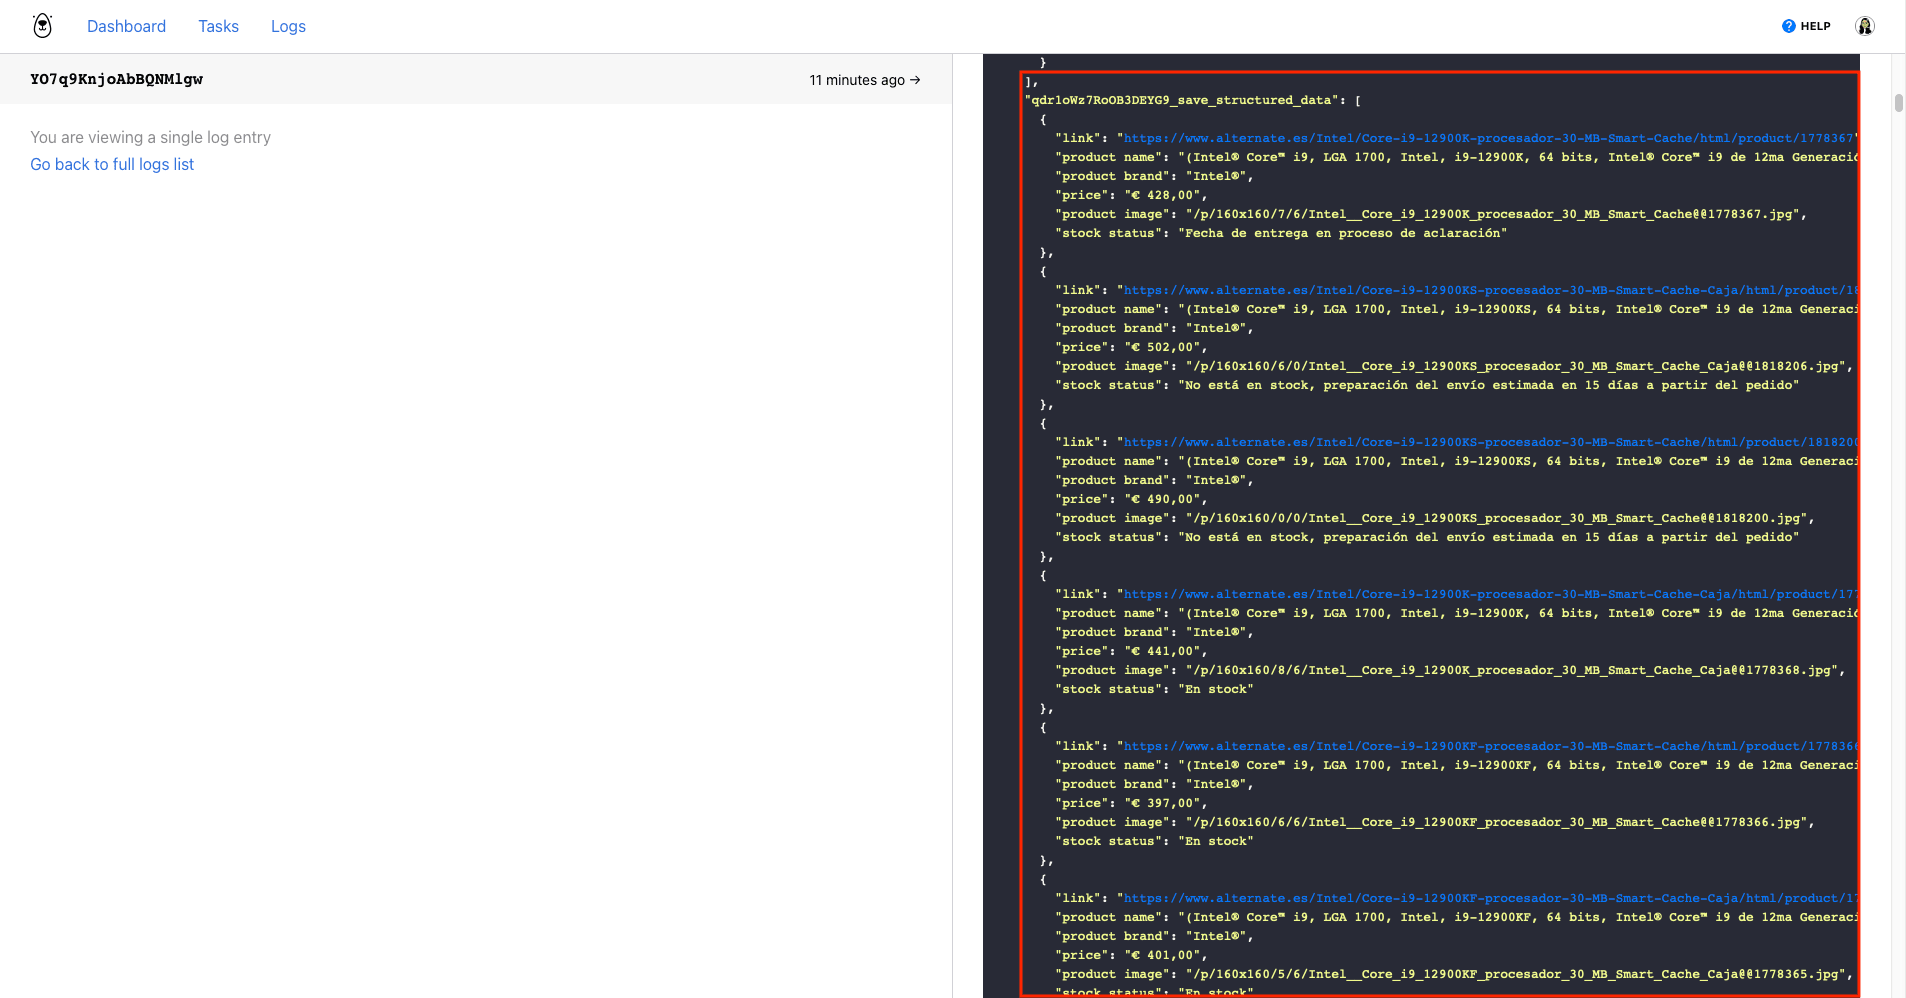
Step 13. Save Structured Data
Add a new step and choose Save Structured Data as the action.
Use the Chrome extension to isolate and generate config for the parent container of the product information. Then, enter the details for each child element with the Data Picker in the Browserbear app.
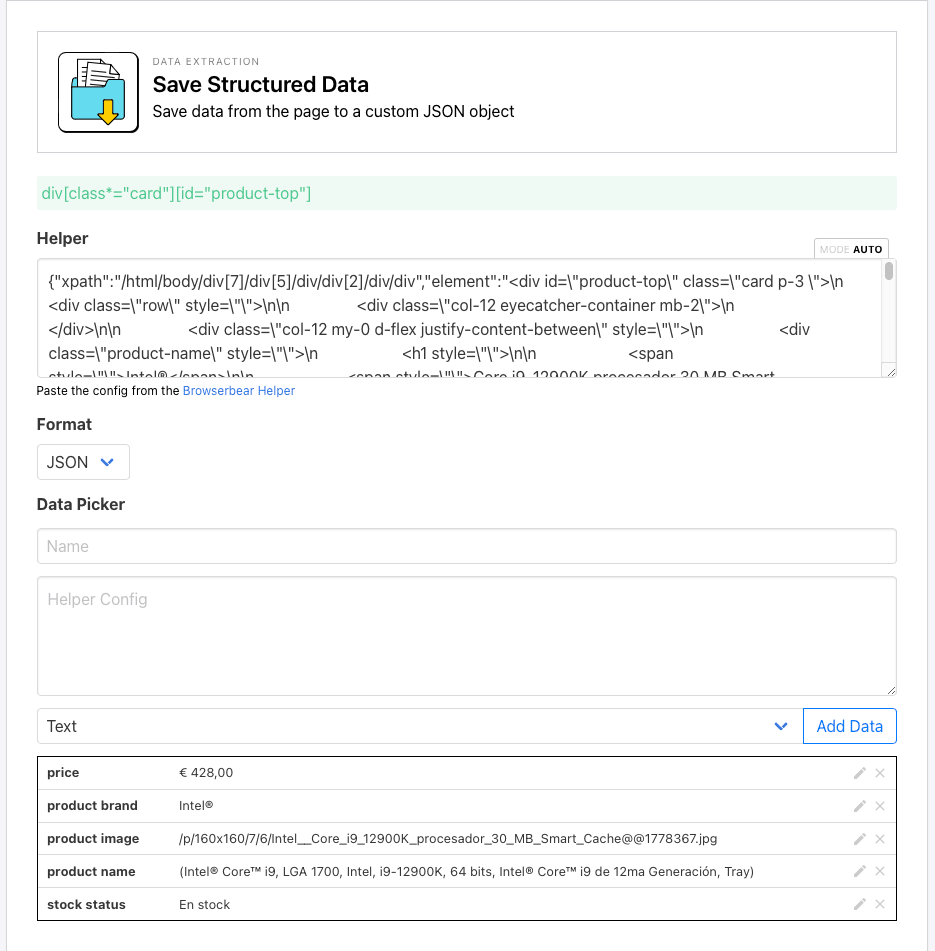
Be sure to click Add Data after defining each child element.
Click Save.
Your workflow will look something like this:
Now, you can test the entire workflow. Keep in mind that if there are many product pages to scrape, the process can take several minutes.
Running the task should yield an array of product pricing information that you can easily route to the storage system of your choice:

And that’s all to it! Putting the task on a schedule will help you gather pricing data as often as you need it. Browserbear’s task settings allow you to schedule once an hour, once a day, or twice a day. You can also use a tool like Zapier to schedule it to the frequency of your choice.
Stay on Top of Industry Pricing with Automation
Having access to pricing data as it changes in real-time can give you a lot of advantages where informed decision making is concerned. Beyond observing trends and market changes, data extraction can help you monitor stock and prices across vendors and sites.
The data you collect can be automated in several ways as well, which we will cover in a coming article.
Want to learn more about scraping data with Browserbear? Check out a few of these articles:
👉 A Nocoder’s Guide to Formatting Scraped Data in Browser Automation
👉 How to Scrape Lists with Browserbear (A No Code Guide)
👉 How to Automatically Scrape Structured Data and Save to Google Sheets
