
How to Scrape Your Latest TripAdvisor Reviews (+ Autogenerate Images!)
Contents
In today’s digital age, social proof plays a pivotal role in decision-making. Whether it's finding the perfect restaurant for a special occasion or choosing a hotel for a memorable vacation, TripAdvisor is a well-known site used to read user-generated reviews. It isn’t just for would-be customers, either; the platform offers a wealth of data that brands can use for market research, reputation management, and more.
As useful as it may be, manually extracting and storing reviews consumes valuable time brand managers and marketers could be spending on other tasks. This is where scraping becomes highly beneficial.
If your restaurant or hotel is getting positive reviews and you'd like to start collecting that data for use elsewhere, we can help you automate the process. In this tutorial, you’ll learn how to scrape your latest TripAdvisor reviews. As a bonus, we'll also go over how you can turn exceptional user-generated content into social media graphics for your content calendar—automatically!
What You Will Create
Scraping your latest TripAdvisor reviews puts valuable information together in one place, ready to be analyzed and repurposed. You can use these insights for market research, reputation management, and even content creation as we will in this article.
The tools you will be using are:
- Airtable : To store scraped TripAdvisor reviews and generated image URLs
- Bannerbear : To autogenerate review images for social
- Browserbear : To scrape TripAdvisor reviews on a schedule
- Zapier : To trigger actions in different programs based on pre-specified commands
By the end of this tutorial, you should have a set of scraped reviews, an Airtable base to store it in, and generated images for your social calendar.
Let’s get started!
How to Scrape TripAdvisor Reviews
There are a good number of web scrapers that can extract reviews from TripAdvisor. But today, we’ll be using Browserbear.
Browserbear is a cloud-based, scalable automation tool that can take repetitive browser tasks off your hands. The intuitive task builder and Chrome Helper extension work together to help you create workflows, identify HTML elements, and integrate with larger projects—all without writing a single line of code.
Create a Browserbear Task to Scrape Reviews
A fairly simple task will instruct Browserbear to navigate to your brand’s TripAdvisor page, and then extract structured data from the reviews section.
Log into your Browserbear account (or create a free trial account if you don’t have one—no credit card required! 🎉). Go to the Tasks tab, then click Create a Task.
You will now be able to insert a starting URL, which will be your brand’s TripAdvisor and should look something like this: https://www.tripadvisor.com/Hotel_Review-xxxxxxx-xxxxxxxxx-Reviews-Brand_Name_Here.html
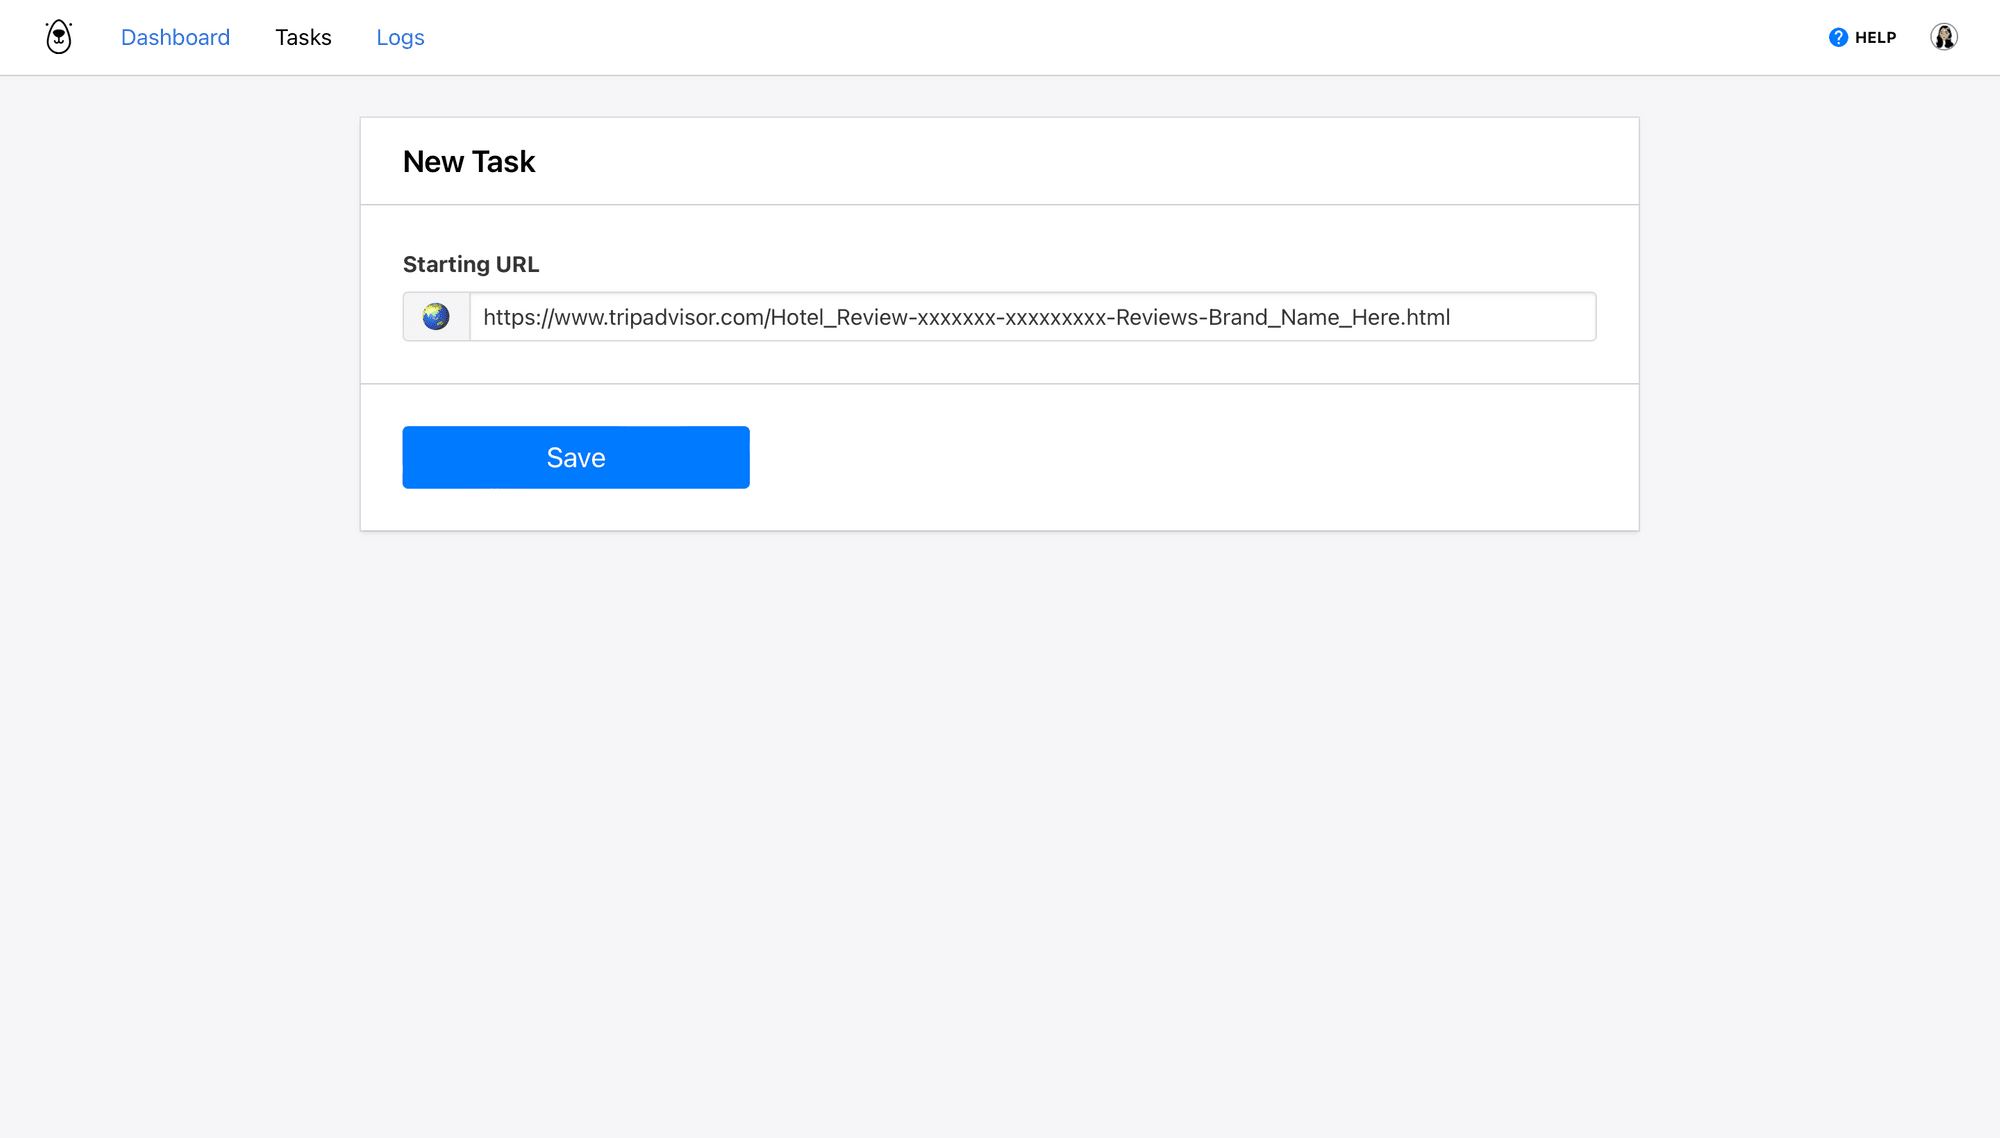
Add a link, then click Save.
You’ll now be on a task page where you can add steps, run your automation, and view completed runs.
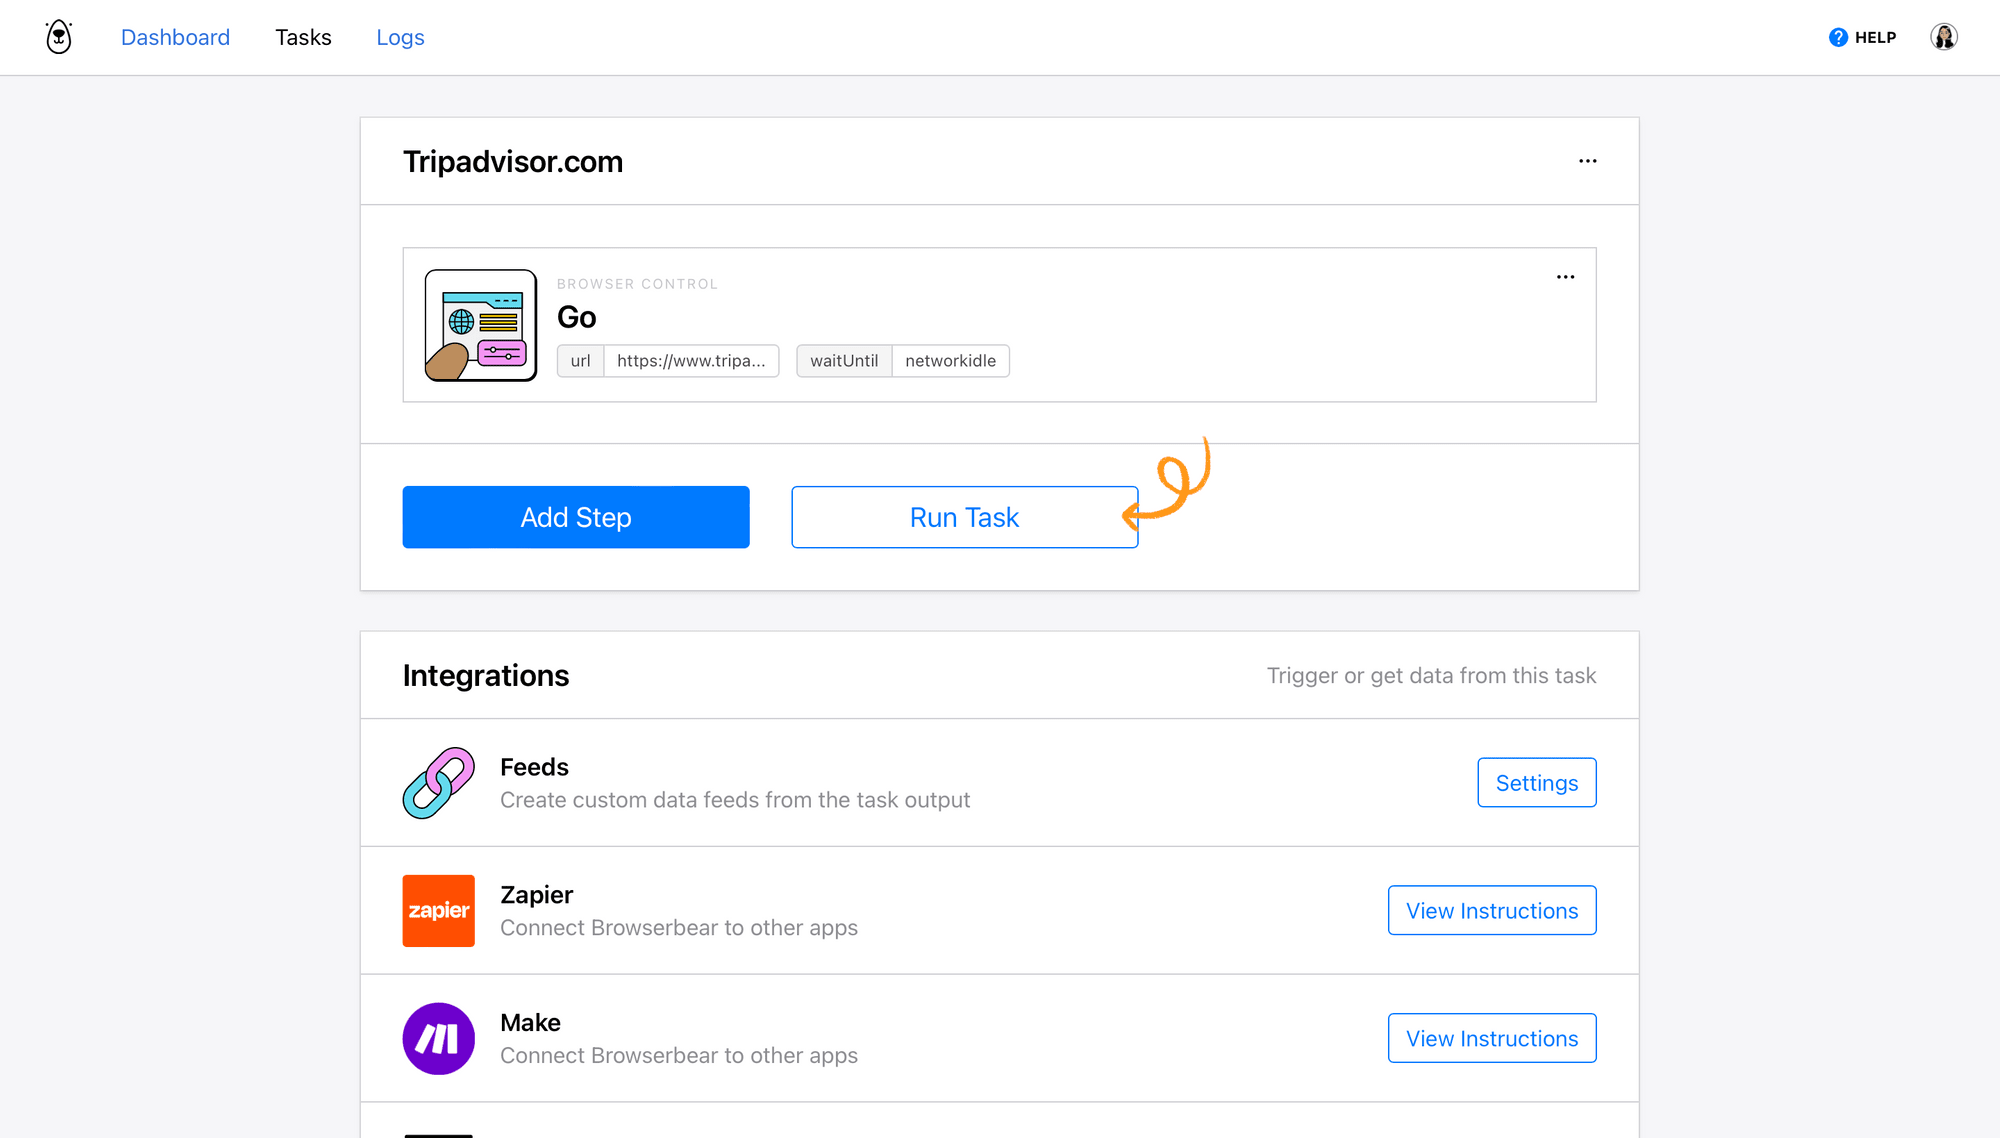
Step 1. Go
The starting URL you placed will already be added as the first step: Go. This can optionally be changed to a dynamic field in Zapier so you can scrape reviews from more than one TripAdvisor page.
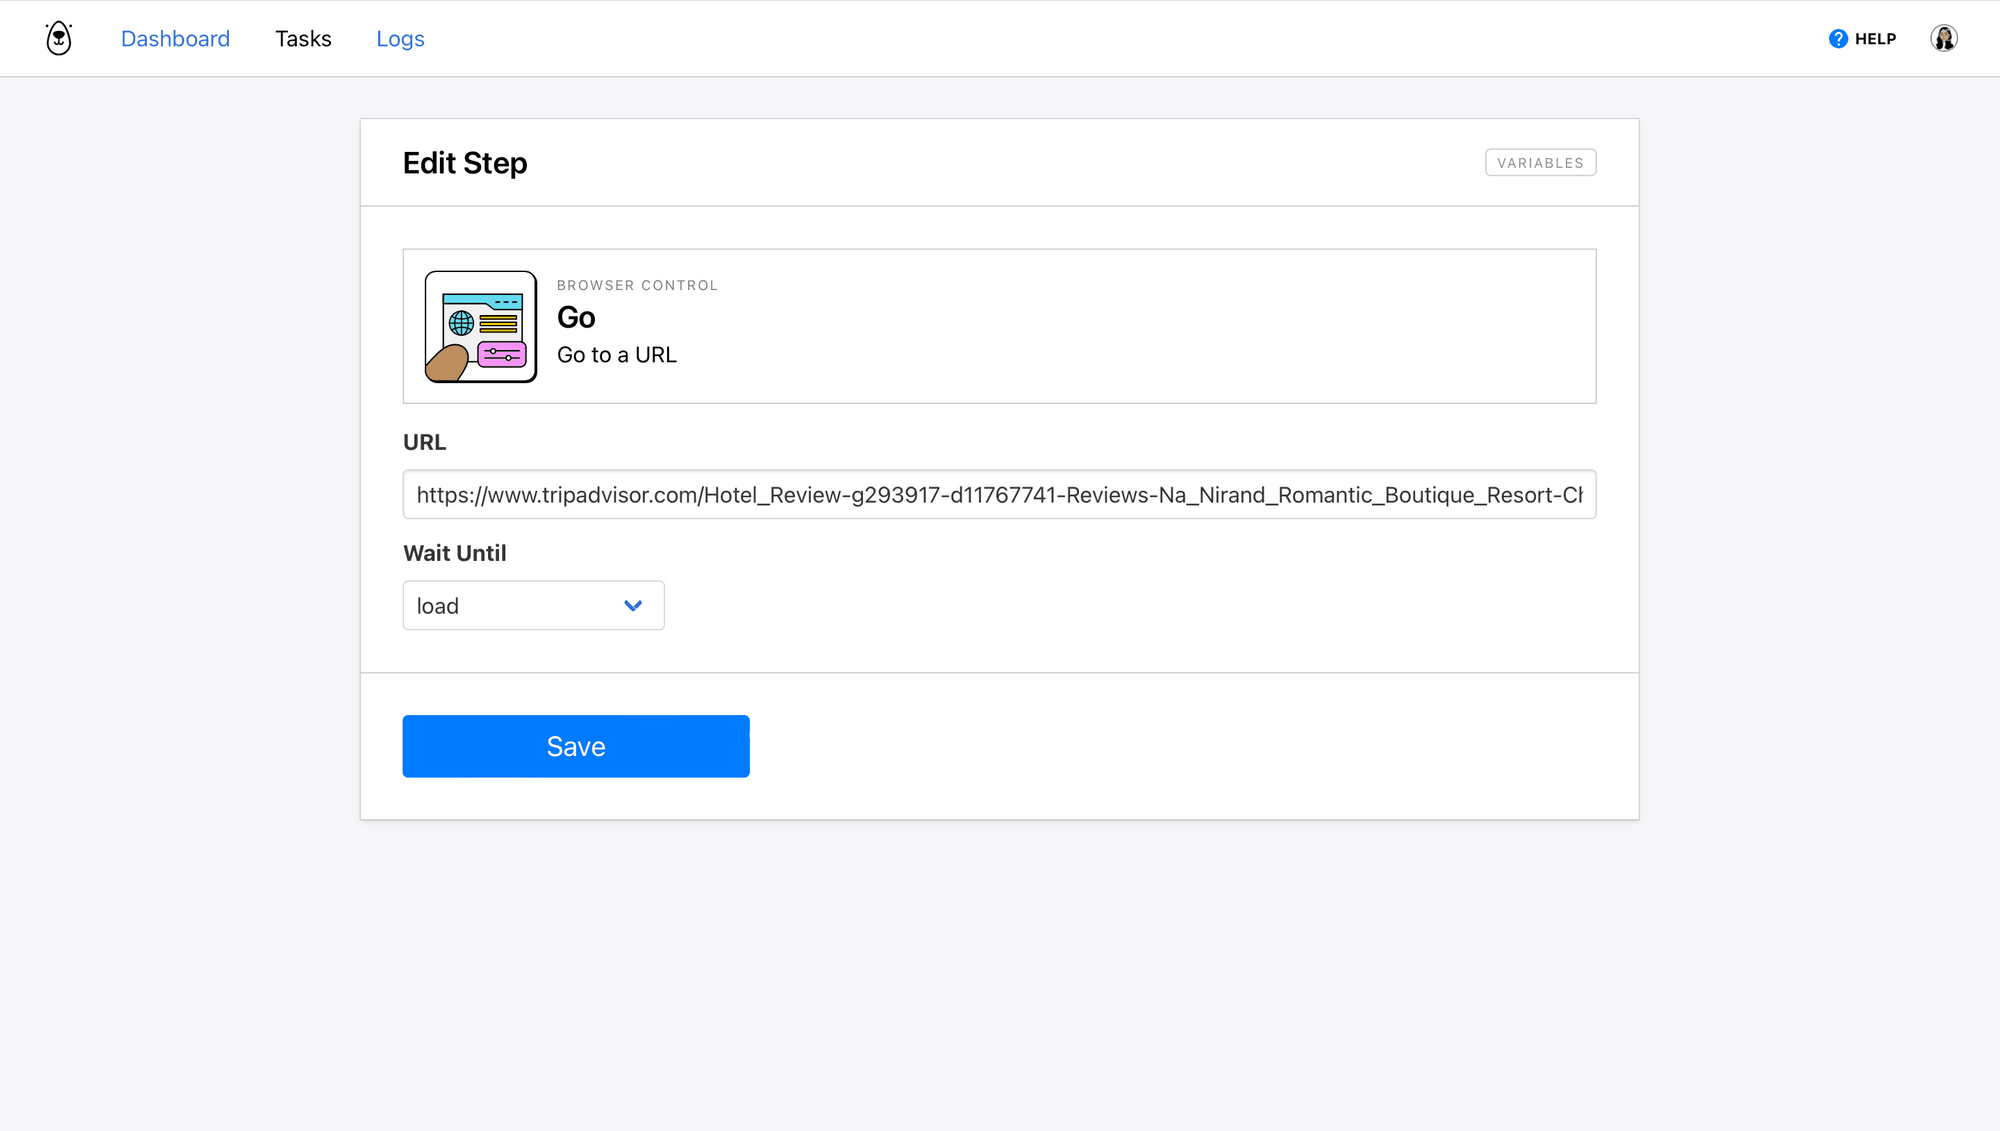
Networkidle is the default wait instructions and the safest setting, but it isn’t necessary for this article. You can use load or domcontentloaded instead.
Step 2. Save Structured Data
Add a new step and choose Save Structured Data as the action.
Use the Browserbear Helper Chrome extension to isolate and generate config for the parent container of a review:
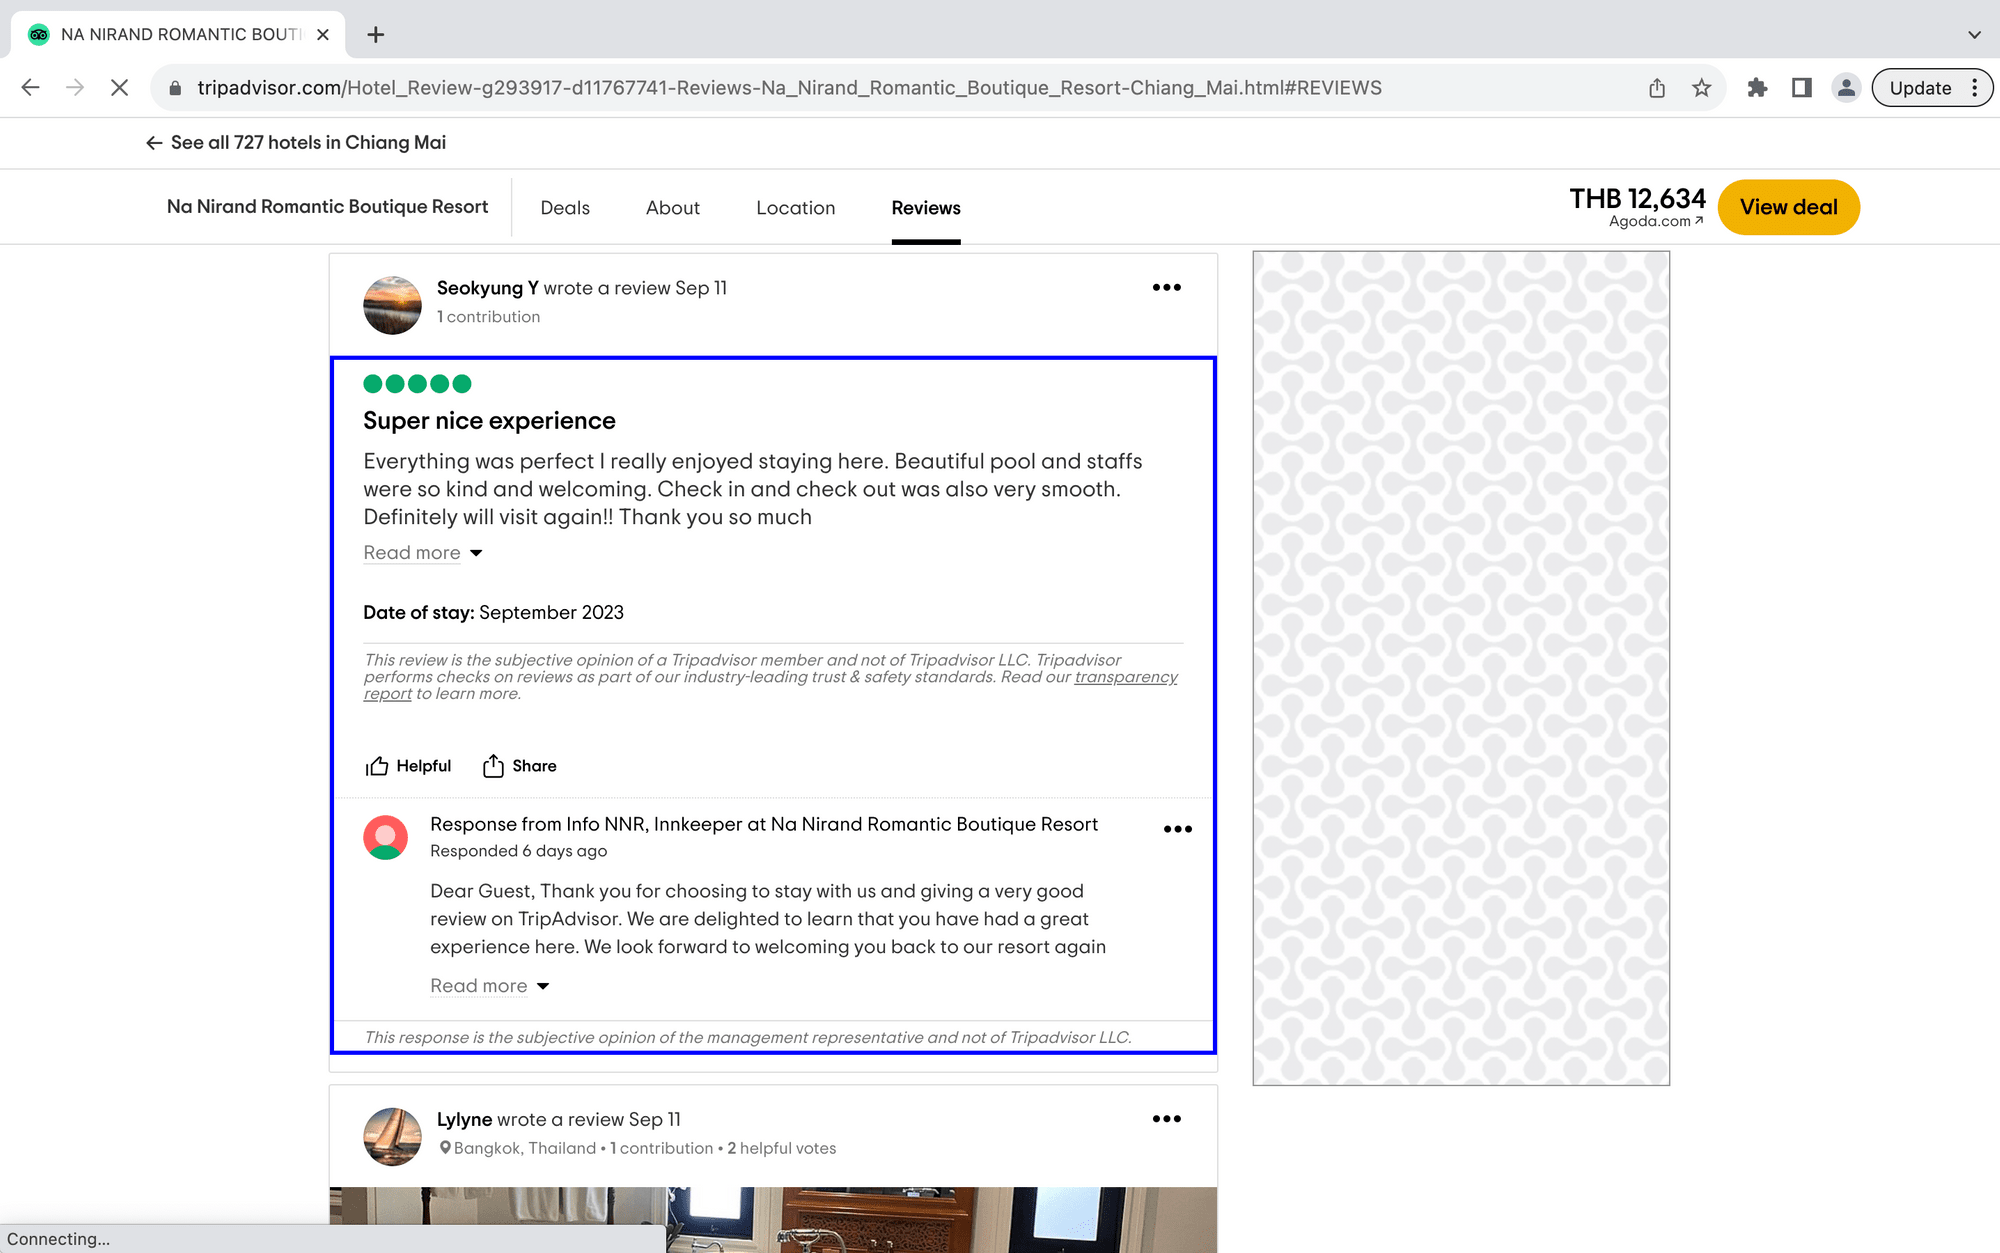
Then, return to the Browserbear app and insert the config into the Helper section:
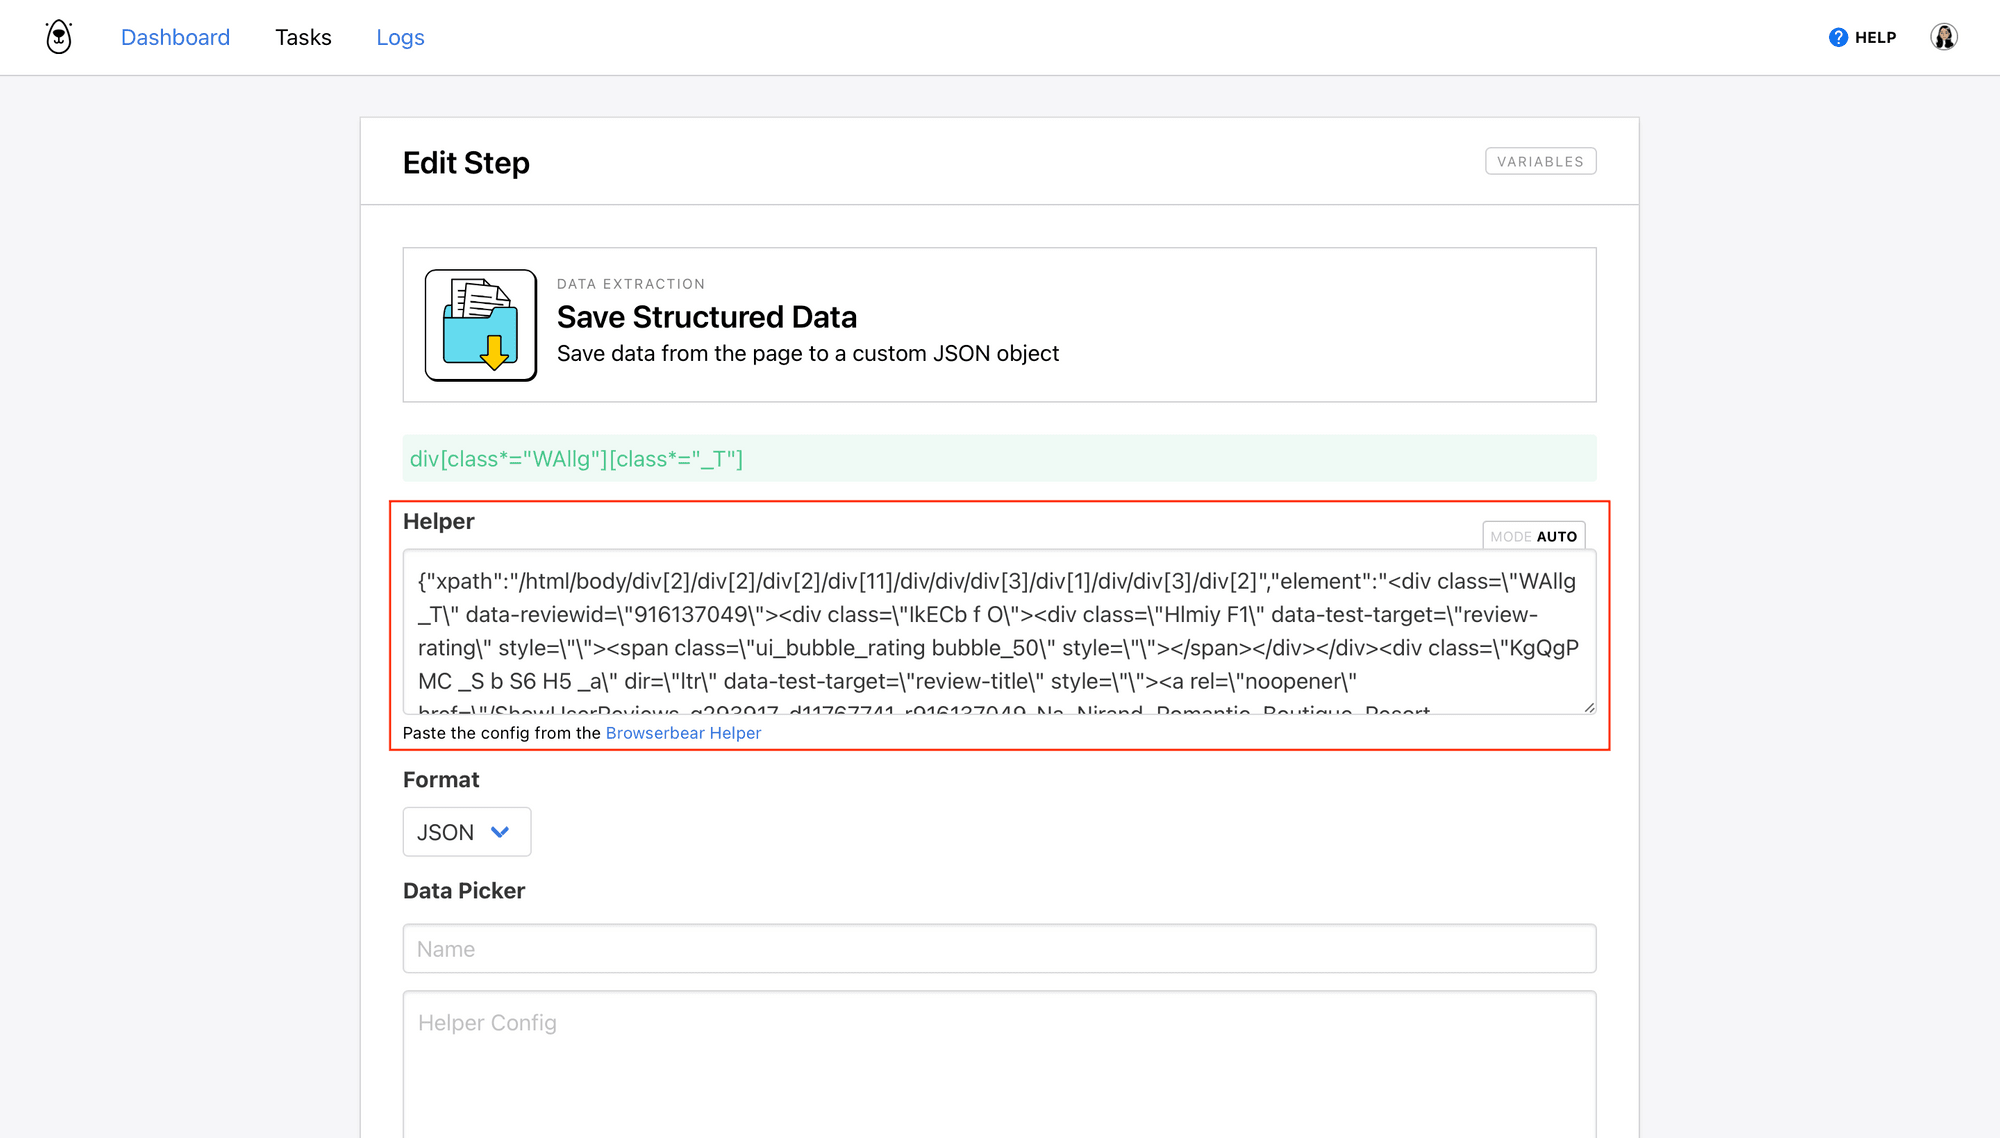
You can then define each HTML element and set it up using the Data Picker.
We used the following:
- Review Header (Text)
- Review Body (Text)
- Date of Stay (Text)
- Rating (Class)

Be sure to click Add Data for every element you set up.
Click Save.
Bear Tip 🐻: Refer to our article A Nocoder’s Guide to the Browserbear Helper (Element Selection) for a more detailed guide on working with helper configs.
Step 3. Save Structured Data
The way TripAdvisor’s site is set up means reviewer details are in a different parent container, so we will have to add an additional data-saving step to extract them.
Add a new step and choose Save Structured Data as the action. Use the Chrome extension to again isolate and retrieve the parent container config:
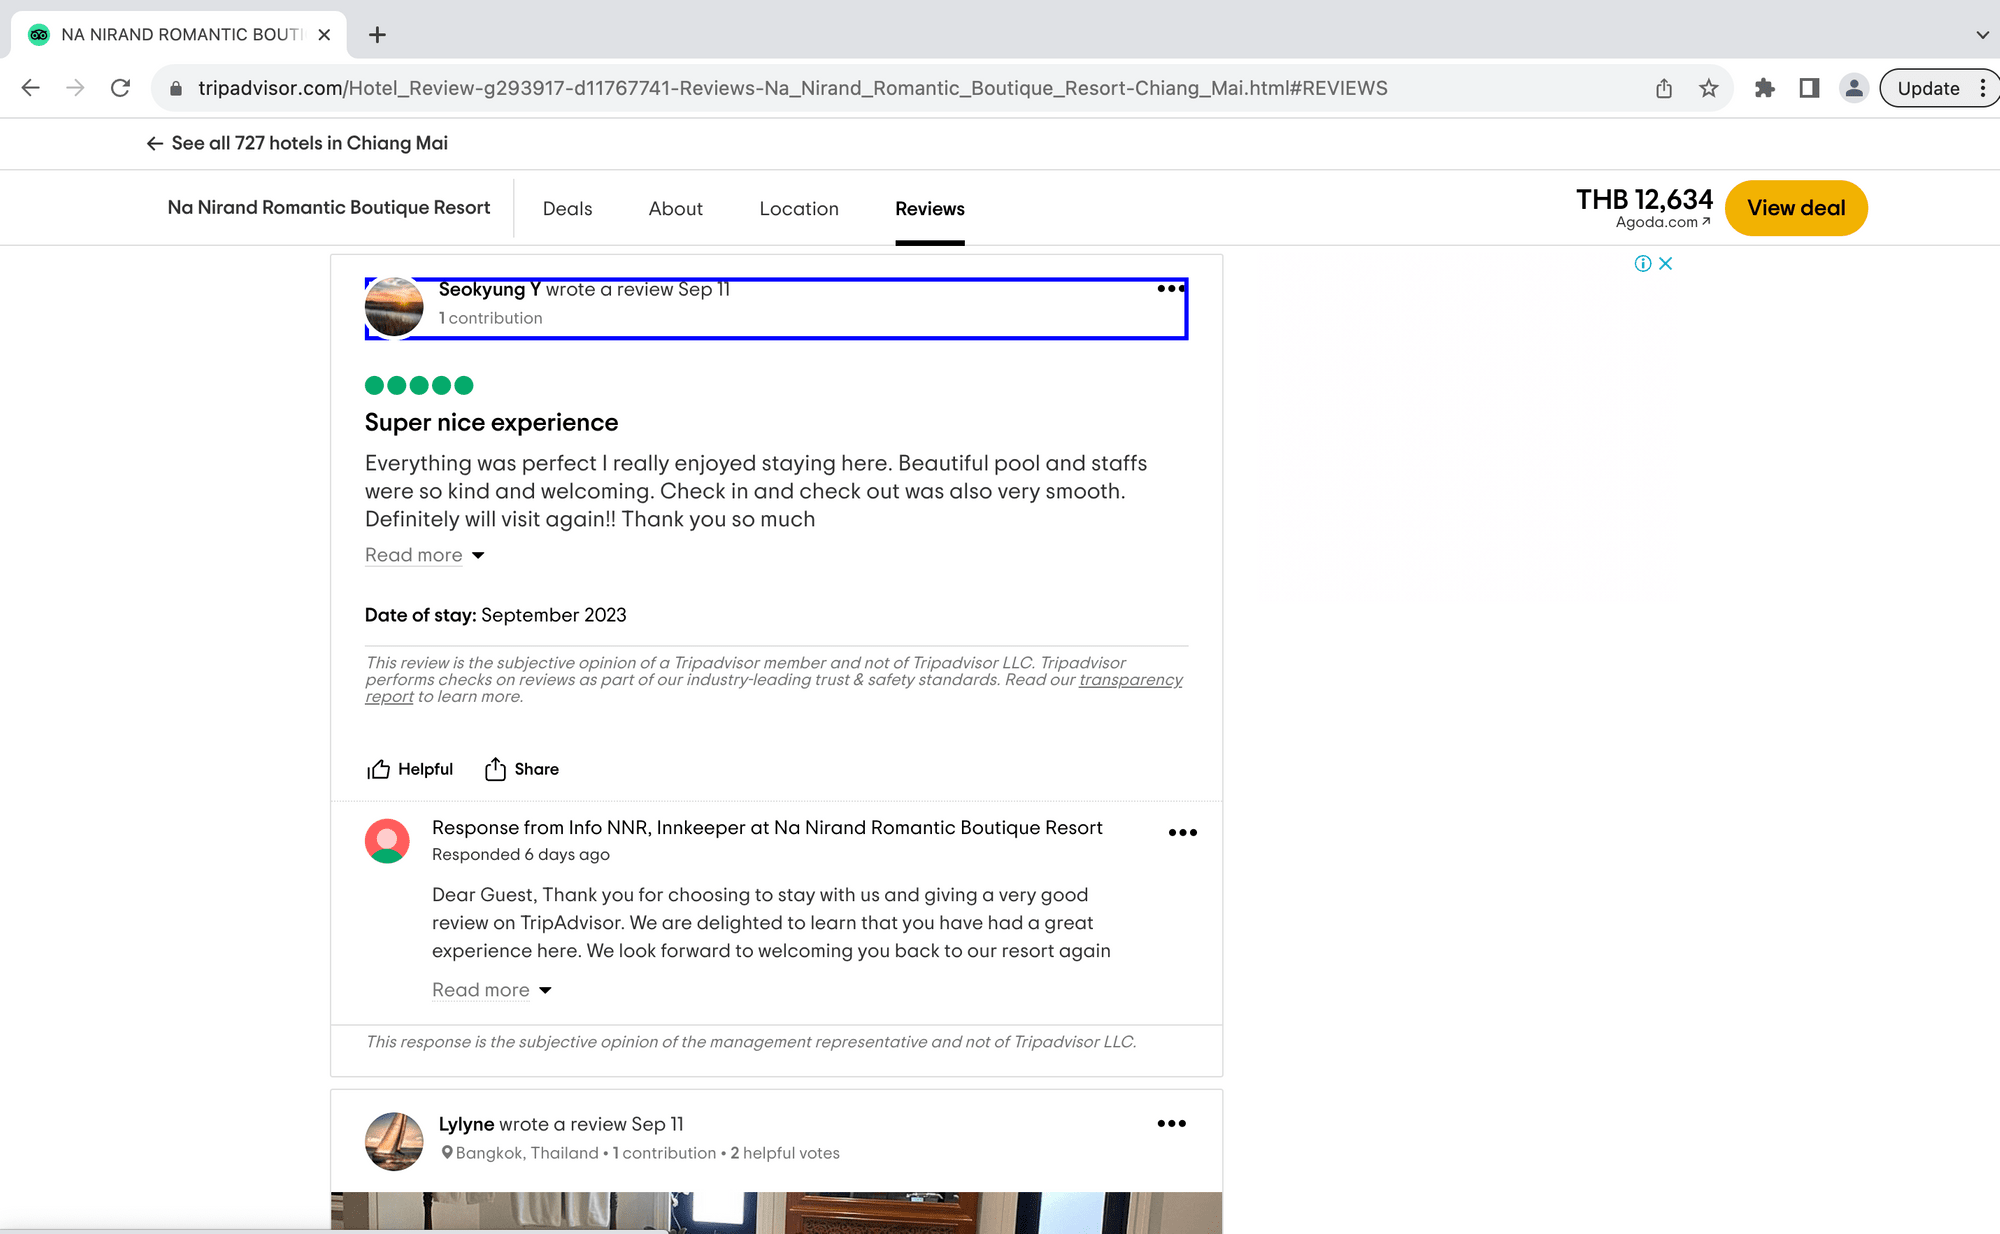
Then, insert the config in the Helper section.
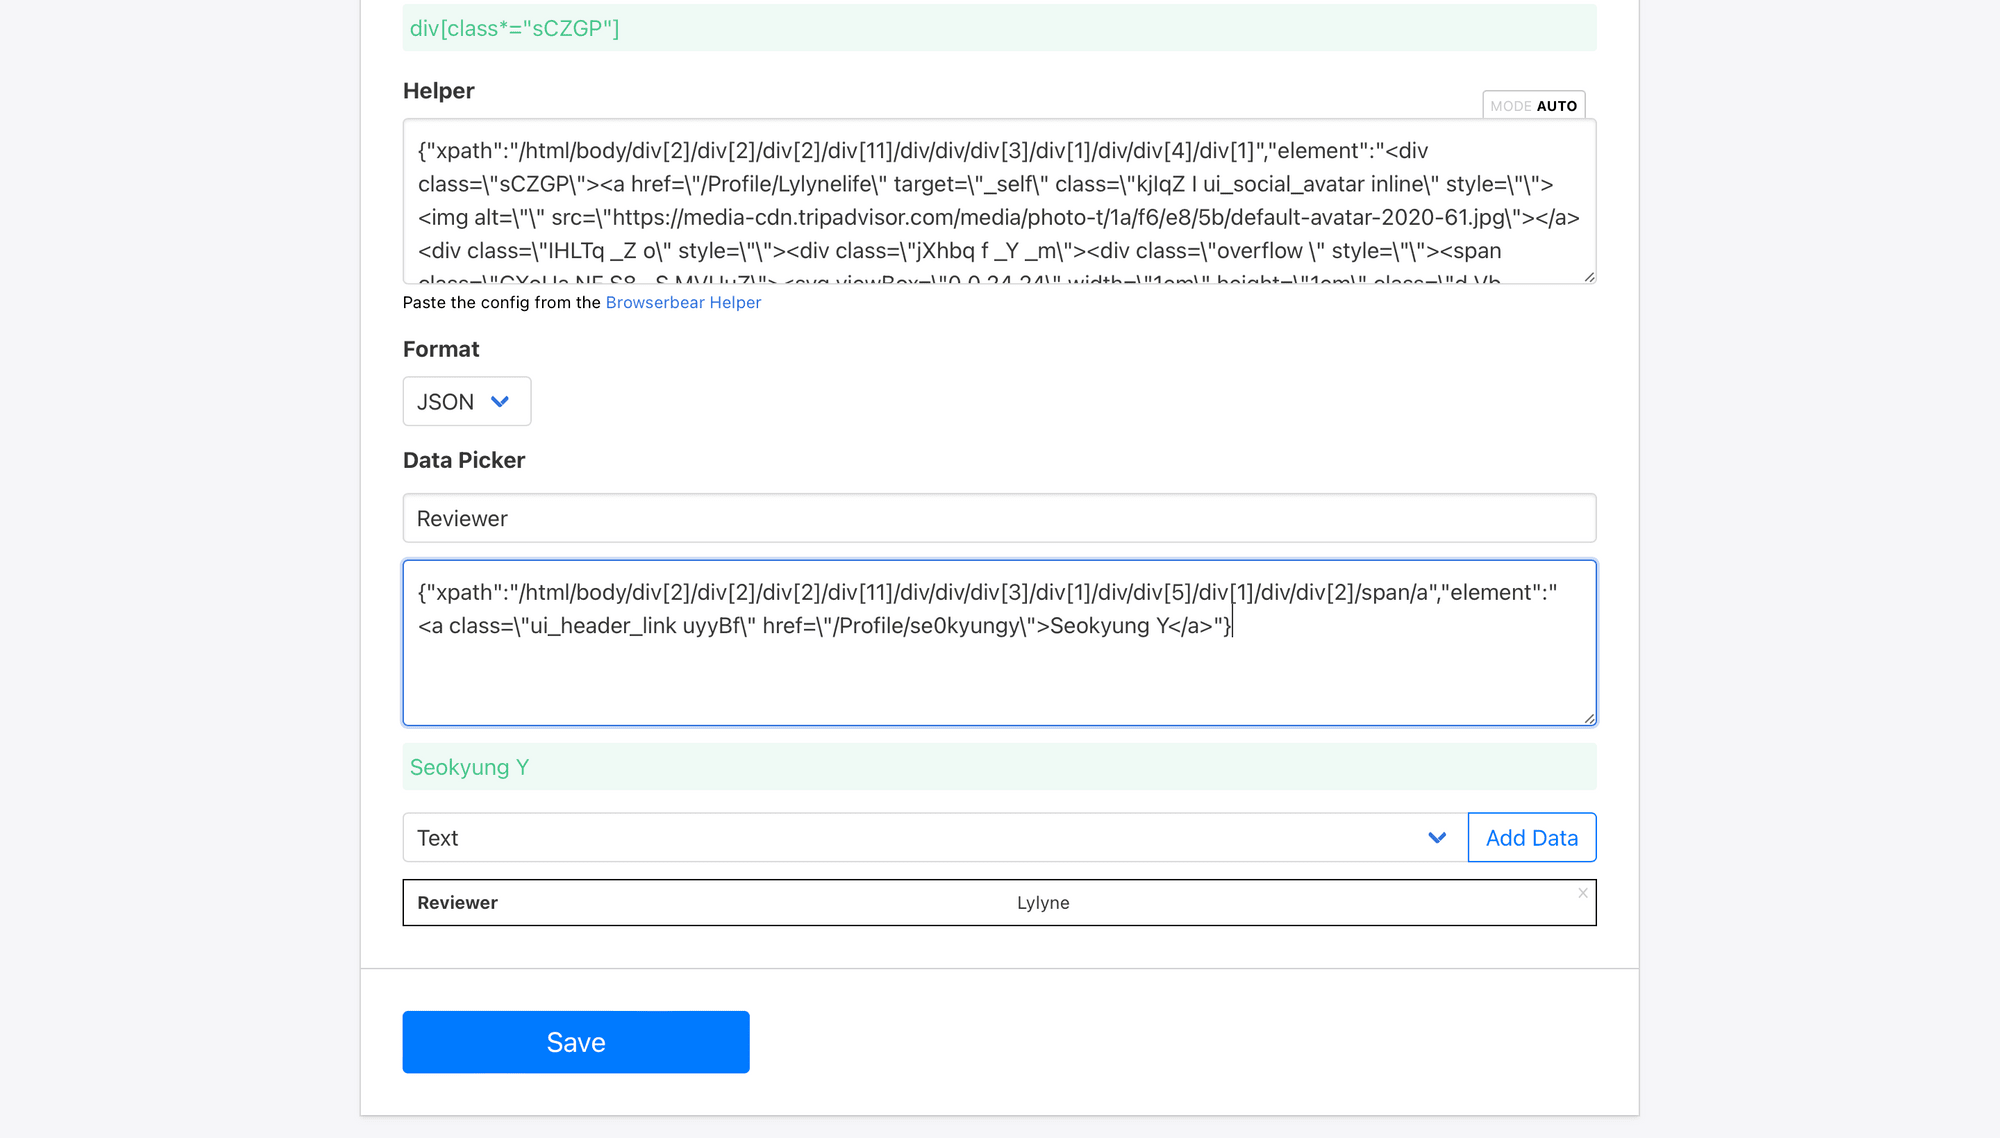
Define each HTML element with the Data Picker.
We used just one:
- Reviewer (Text)
Click Add Data to add any other items you may want to save. When all of the child elements are set up, Save.
Running the task should yield output that includes all the specified data: review headers, bodies, dates of stay, and ratings in one array, and reviewers in another.

Bear Tip 🐻: Working around site HTML changes and bot protection measures are the reality of scraping updated websites, so you may have to play around with steps and settings to produce a workflow that works best for your use case. We found the most consistent results to be with settings Randomize fingerprint and Blank user agent toggled on.
Set up a Zap to Schedule Task Runs
This zap will launch a task run on a schedule so you don’t have to do it manually.
Log into your Zapier account, click + Create Zap , and set up the following events:
Trigger: Every Week in Schedule by Zapier
Choose Schedule by Zapier as the app and Every Week as the event.
Set up the trigger by specifying the frequency at which you would like your automation to run.
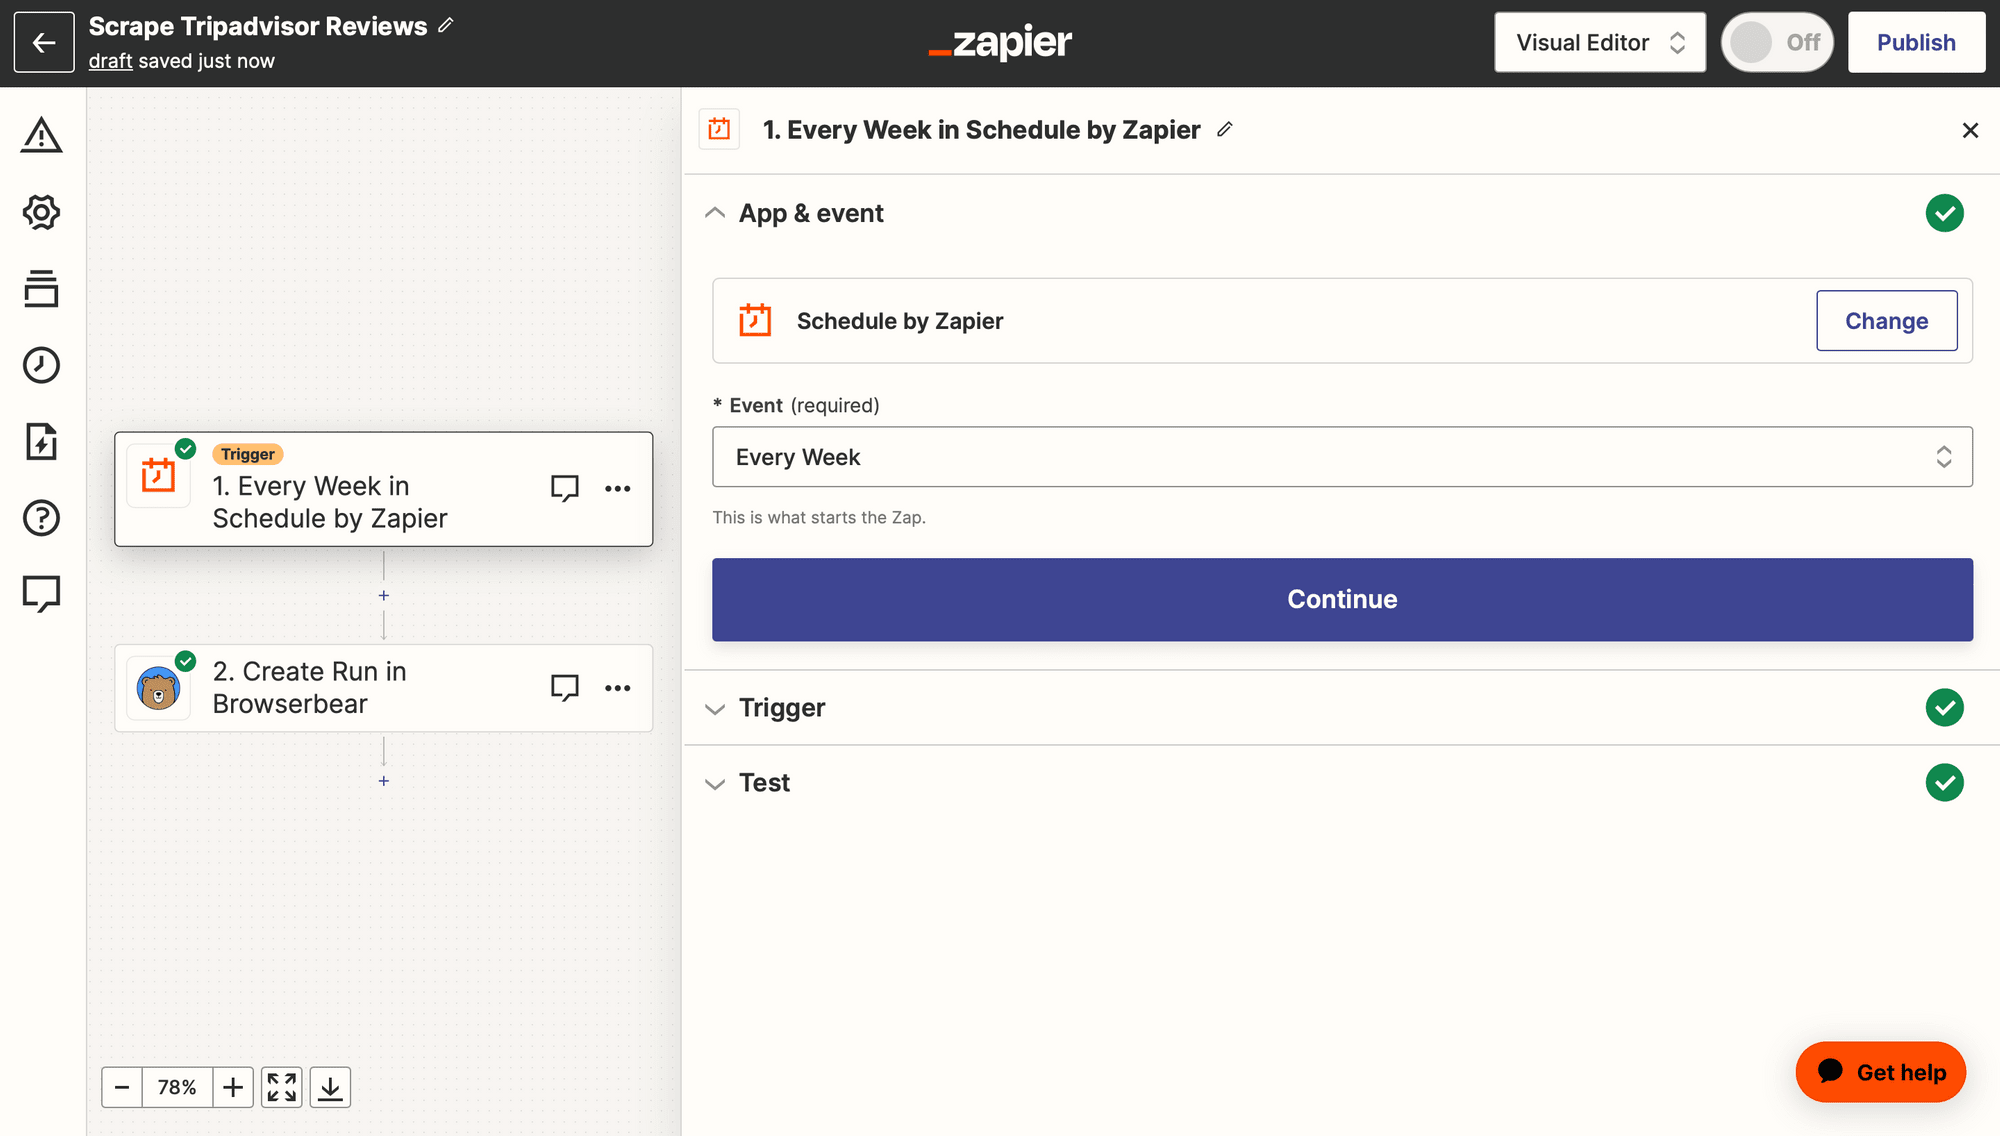
Test the trigger, then continue.
Action: Create Run in Browserbear
Choose Browserbear as the app and Create Run as the event. You’ll need to connect your Browserbear account using your API key.
Select your link-scraping task.
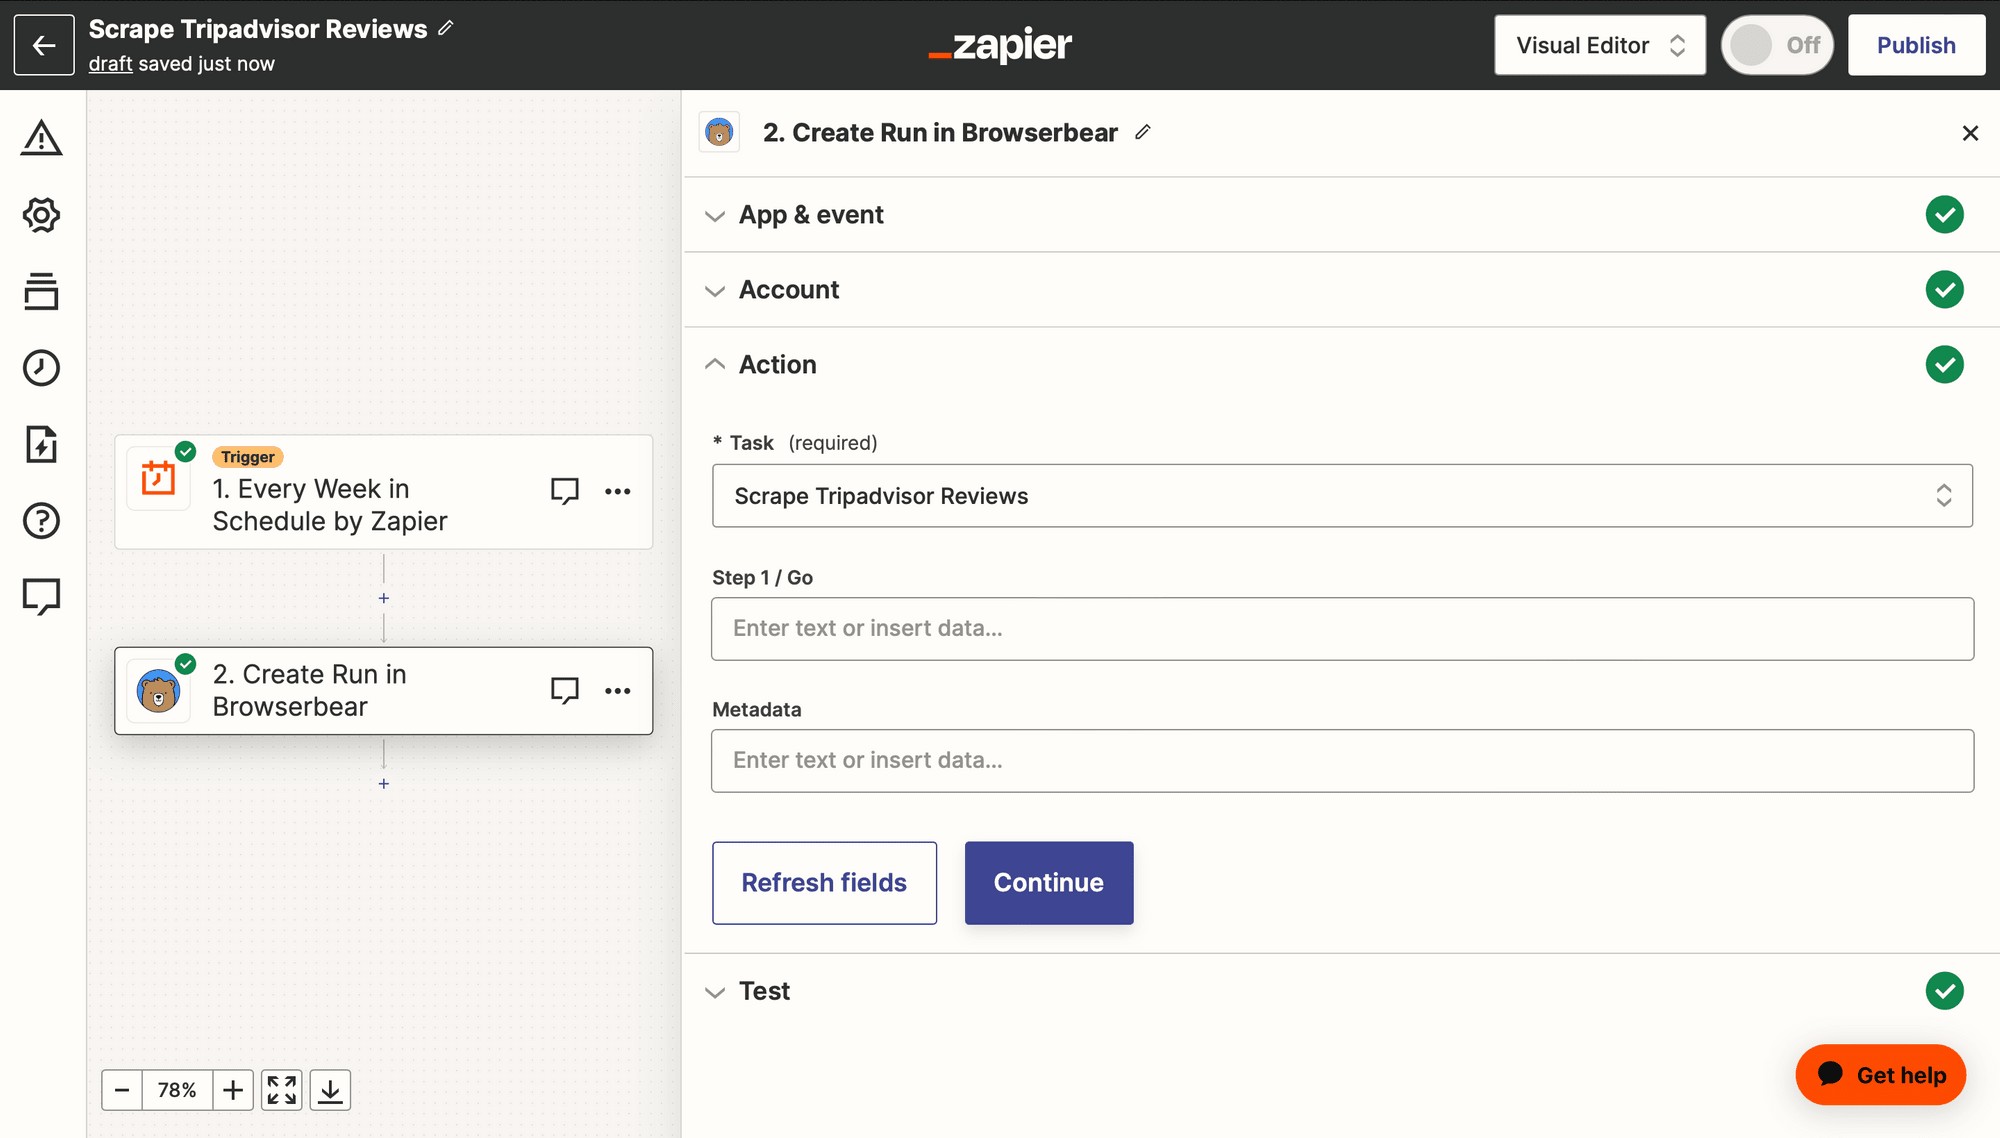
Test the action, then Save.
The results of a task run should now appear in your Browserbear Logs section.
Now if you’re only looking to scrape reviews in a structured format, this is where you stop. But if you’re also looking to store the data in Airtable and set up an automation that generates social content, proceed to the next part of this tutorial!
How to Store Reviews & Autogenerate Graphics
Airtable’s ability to organize by records and fields instead of rows and columns makes it fantastic for structured data. One zap will send extracted data from a completed Browserbear scraping run to be stored in Airtable, and another will generate an image in Bannerbear.
Build an Airtable Base to Store Quotes
An Airtable base with two views will help you store and organize scraped quotes so that only the best are turned into social images.
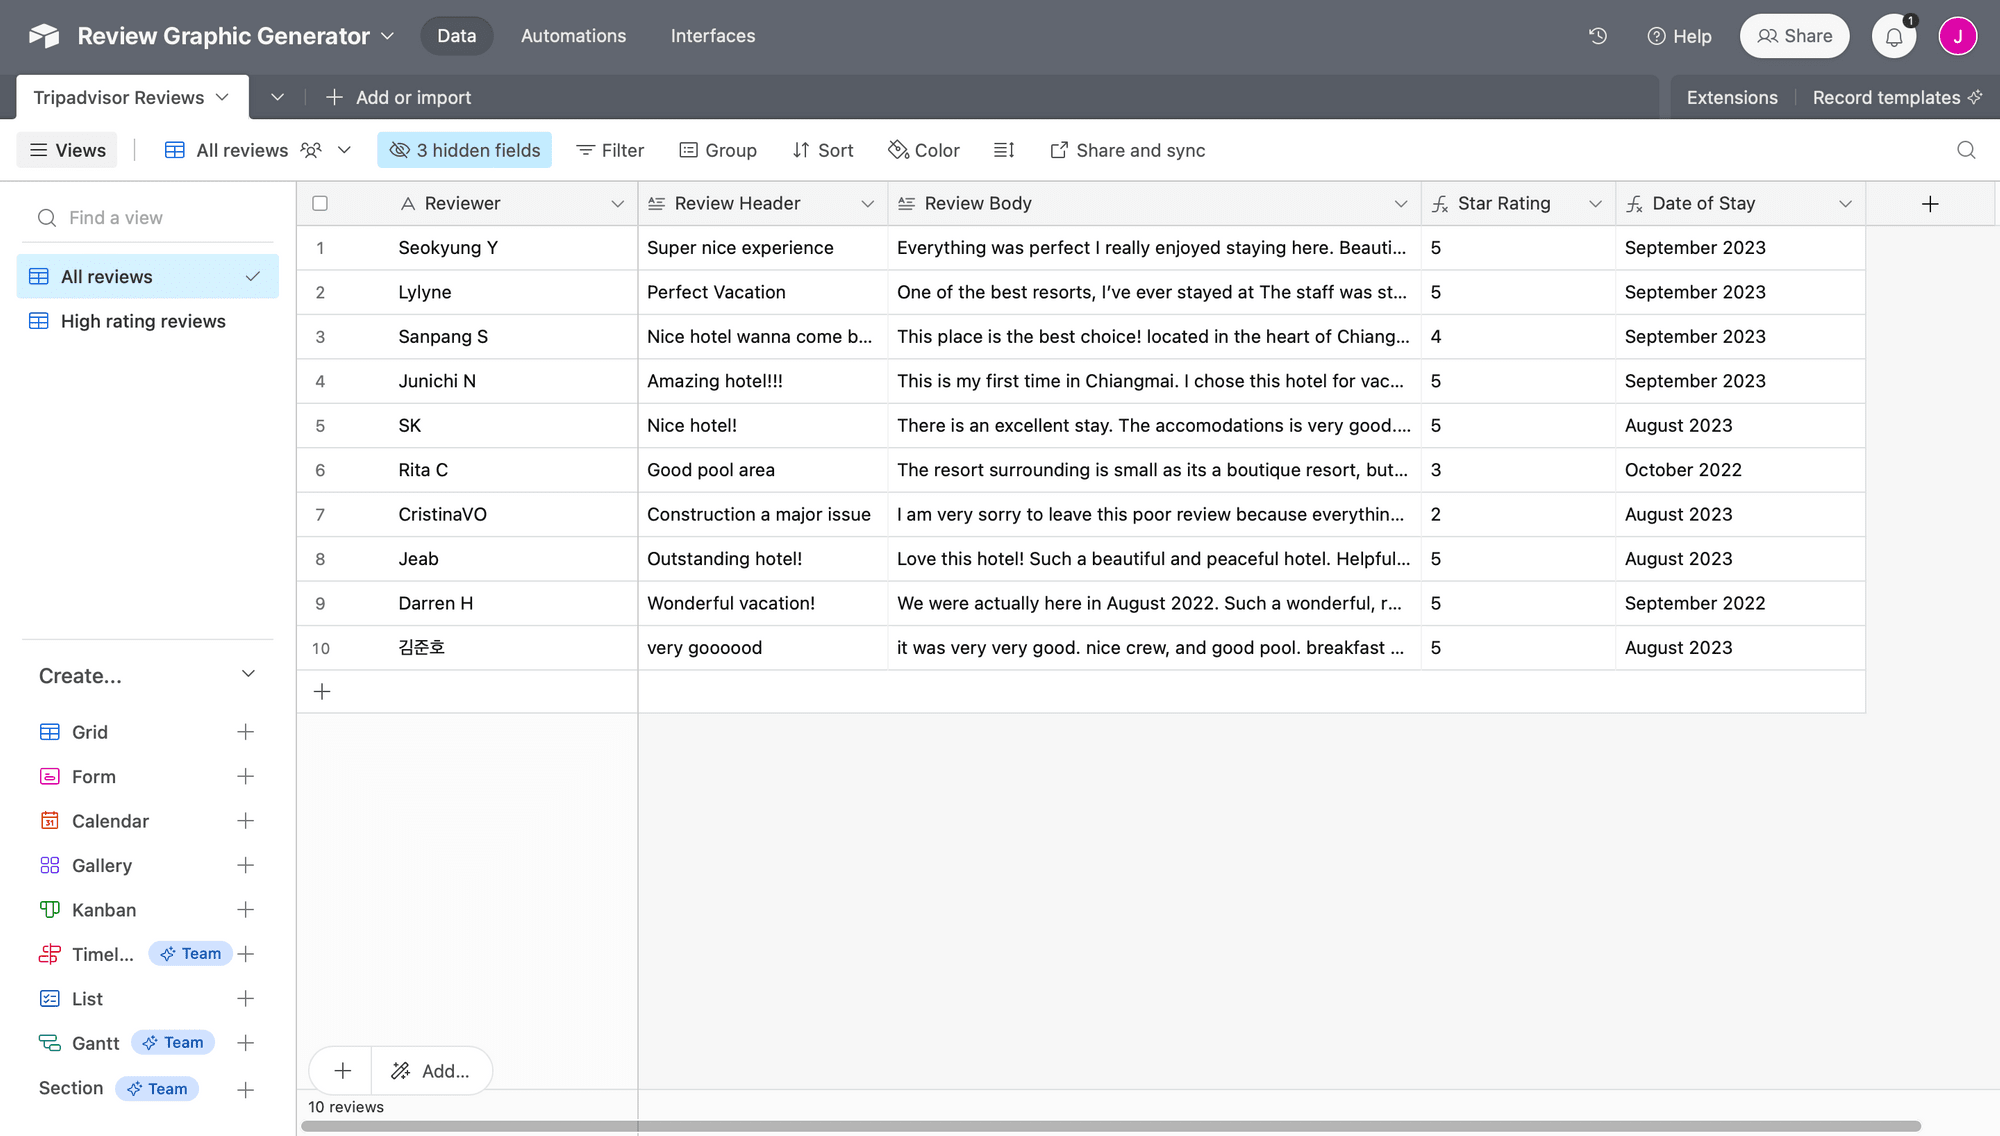
Log into Airtable and create a new base. Add fields for all the review details you’ll be scraping. We’ll be using the following:
- Reviewer
- Review Header
- Review Body
- Star Rating (Raw)
- Date of Stay (Raw)
- Star Rating (as Formula:
REGEX_EXTRACT({Star Rating (Raw)},"ui_bubble_rating bubble_(\\d)(\\d)")) - Date of Stay (as Formula:
SUBSTITUTE({Date of Stay (Raw)},"Date of stay: ","")) - Generated Image URL
All fields with unspecified field types are single-line text types and will be used to receive incoming data from Browserbear.
Hide any non-essential fields. Your full table will look something like this when populated with sample data:
Now, let’s set up a way to filter only for job listings posted in the past week. Click the + symbol next to Grid on the left sidebar to create a new view.
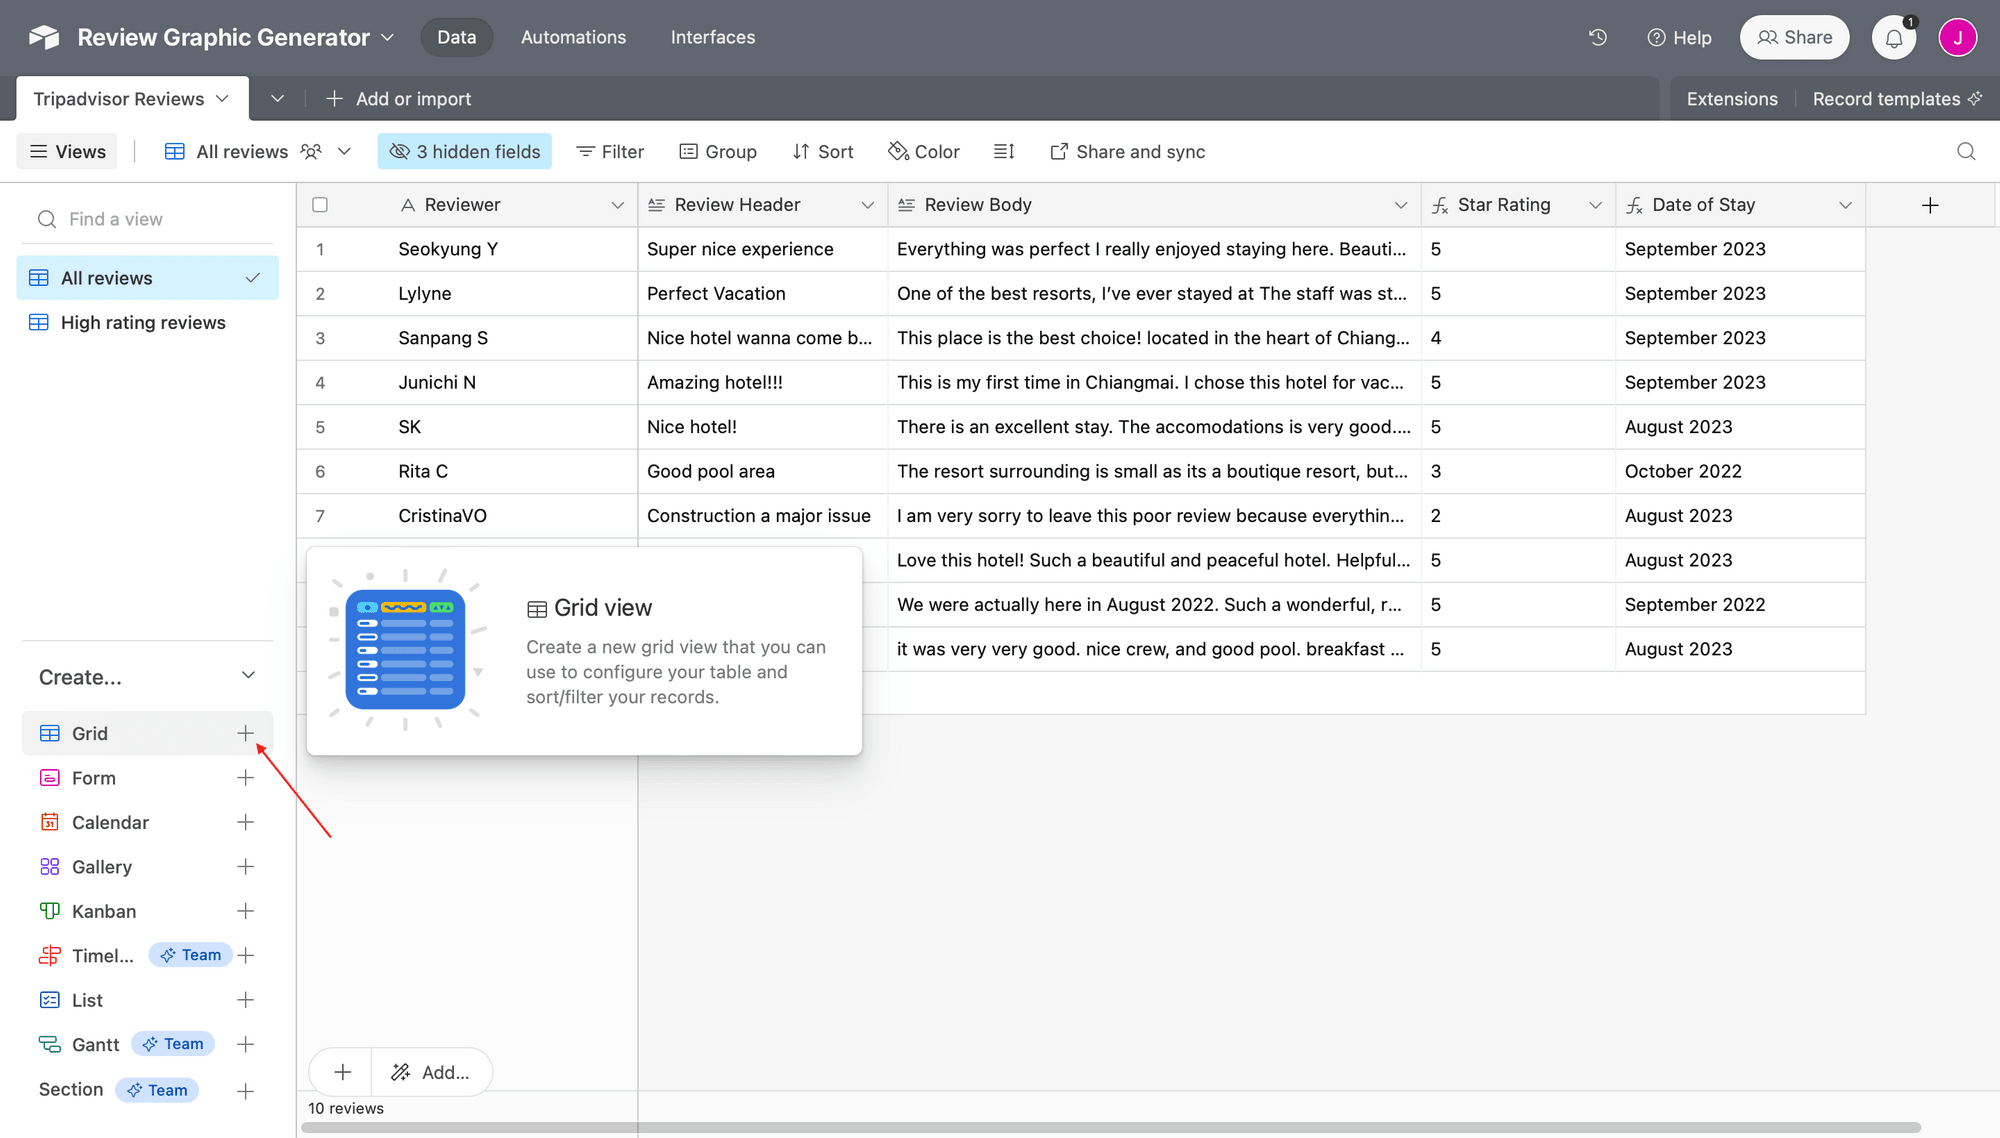
Name it, then add two filters: Where Star Rating is 4 OR Star Rating is 5. This ensures only reviews with high ratings are turned into social content.
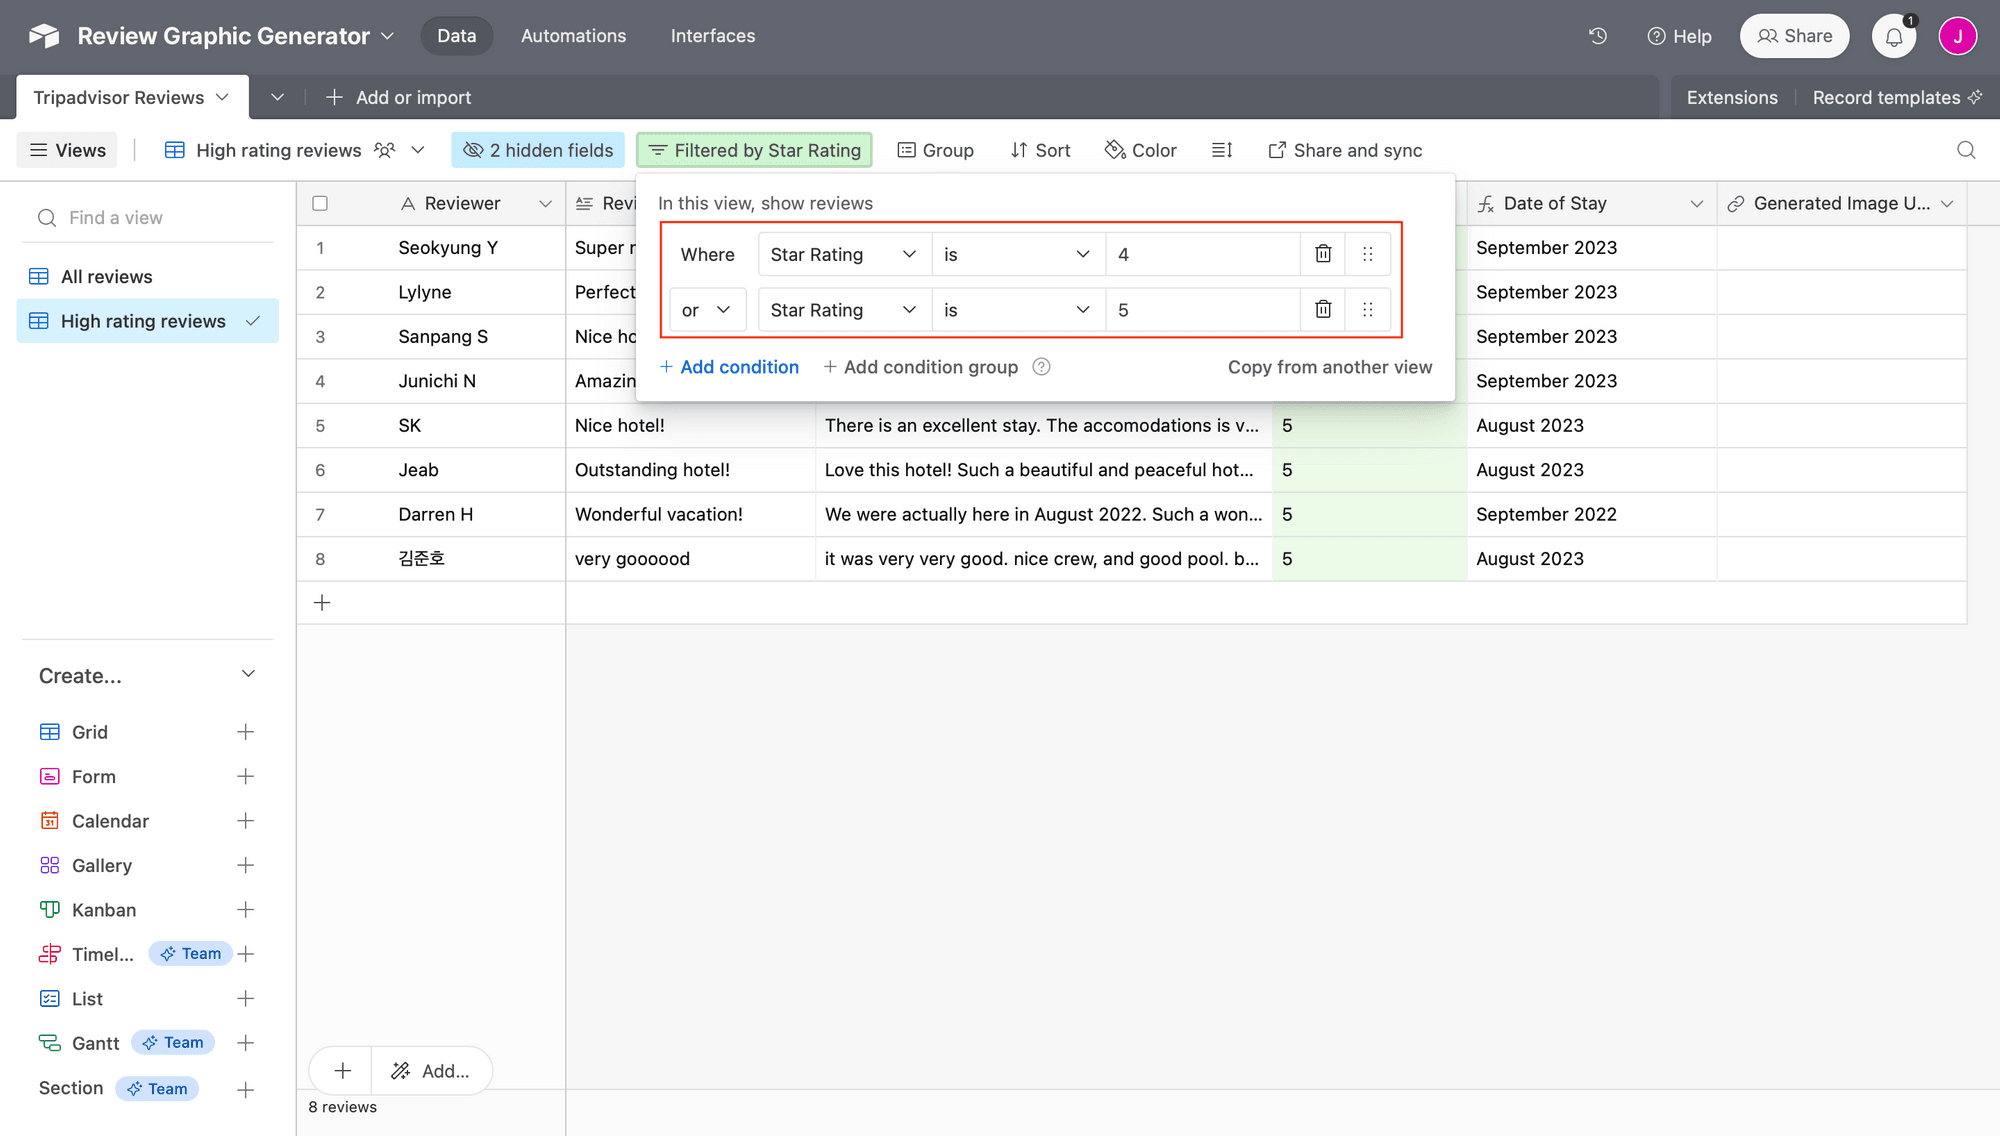
Make sure your changes are saved, then proceed to the next step.
Set up a Zap to Save Quotes
This zap will retrieve the results of completed Browserbear runs, saving it to your Airtable database.
Log into your Zapier account, click + Create Zap , and set up the following events:
Trigger: Run Finished in Browserbear
Choose Browserbear as the app and Run Finished as the event.
Set up the action by selecting the right workspace and task.
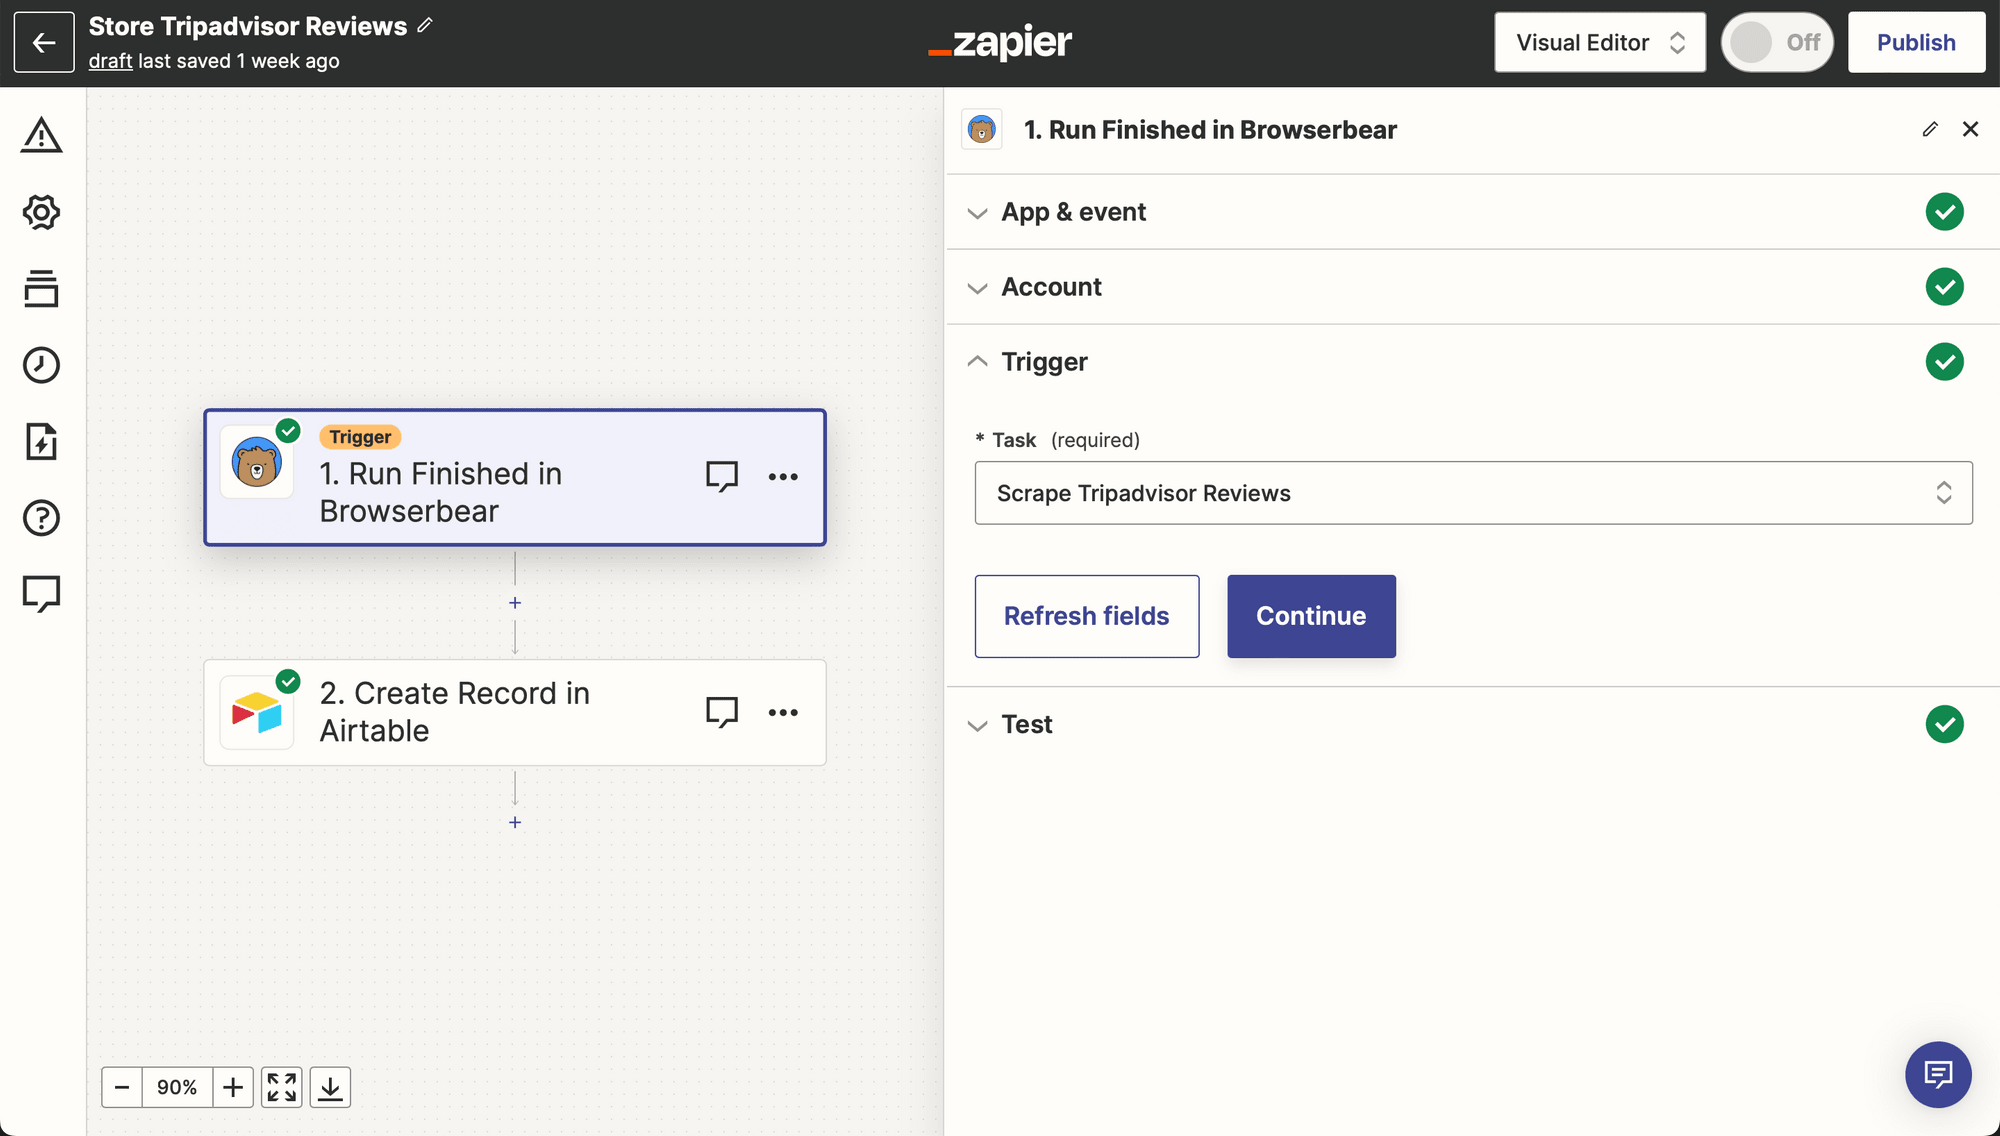
Test the trigger and ensure Zapier can retrieve the results of a successful task run.
Action: Create Record in Airtable
Choose Airtable as the app and Create Record (With Line Item Support) as the event. If you haven’t connected your account yet, do so using the API key found on your Account page.
Set up the action by choosing the right base and table, then mapping the task run outputs to their corresponding Airtable fields.
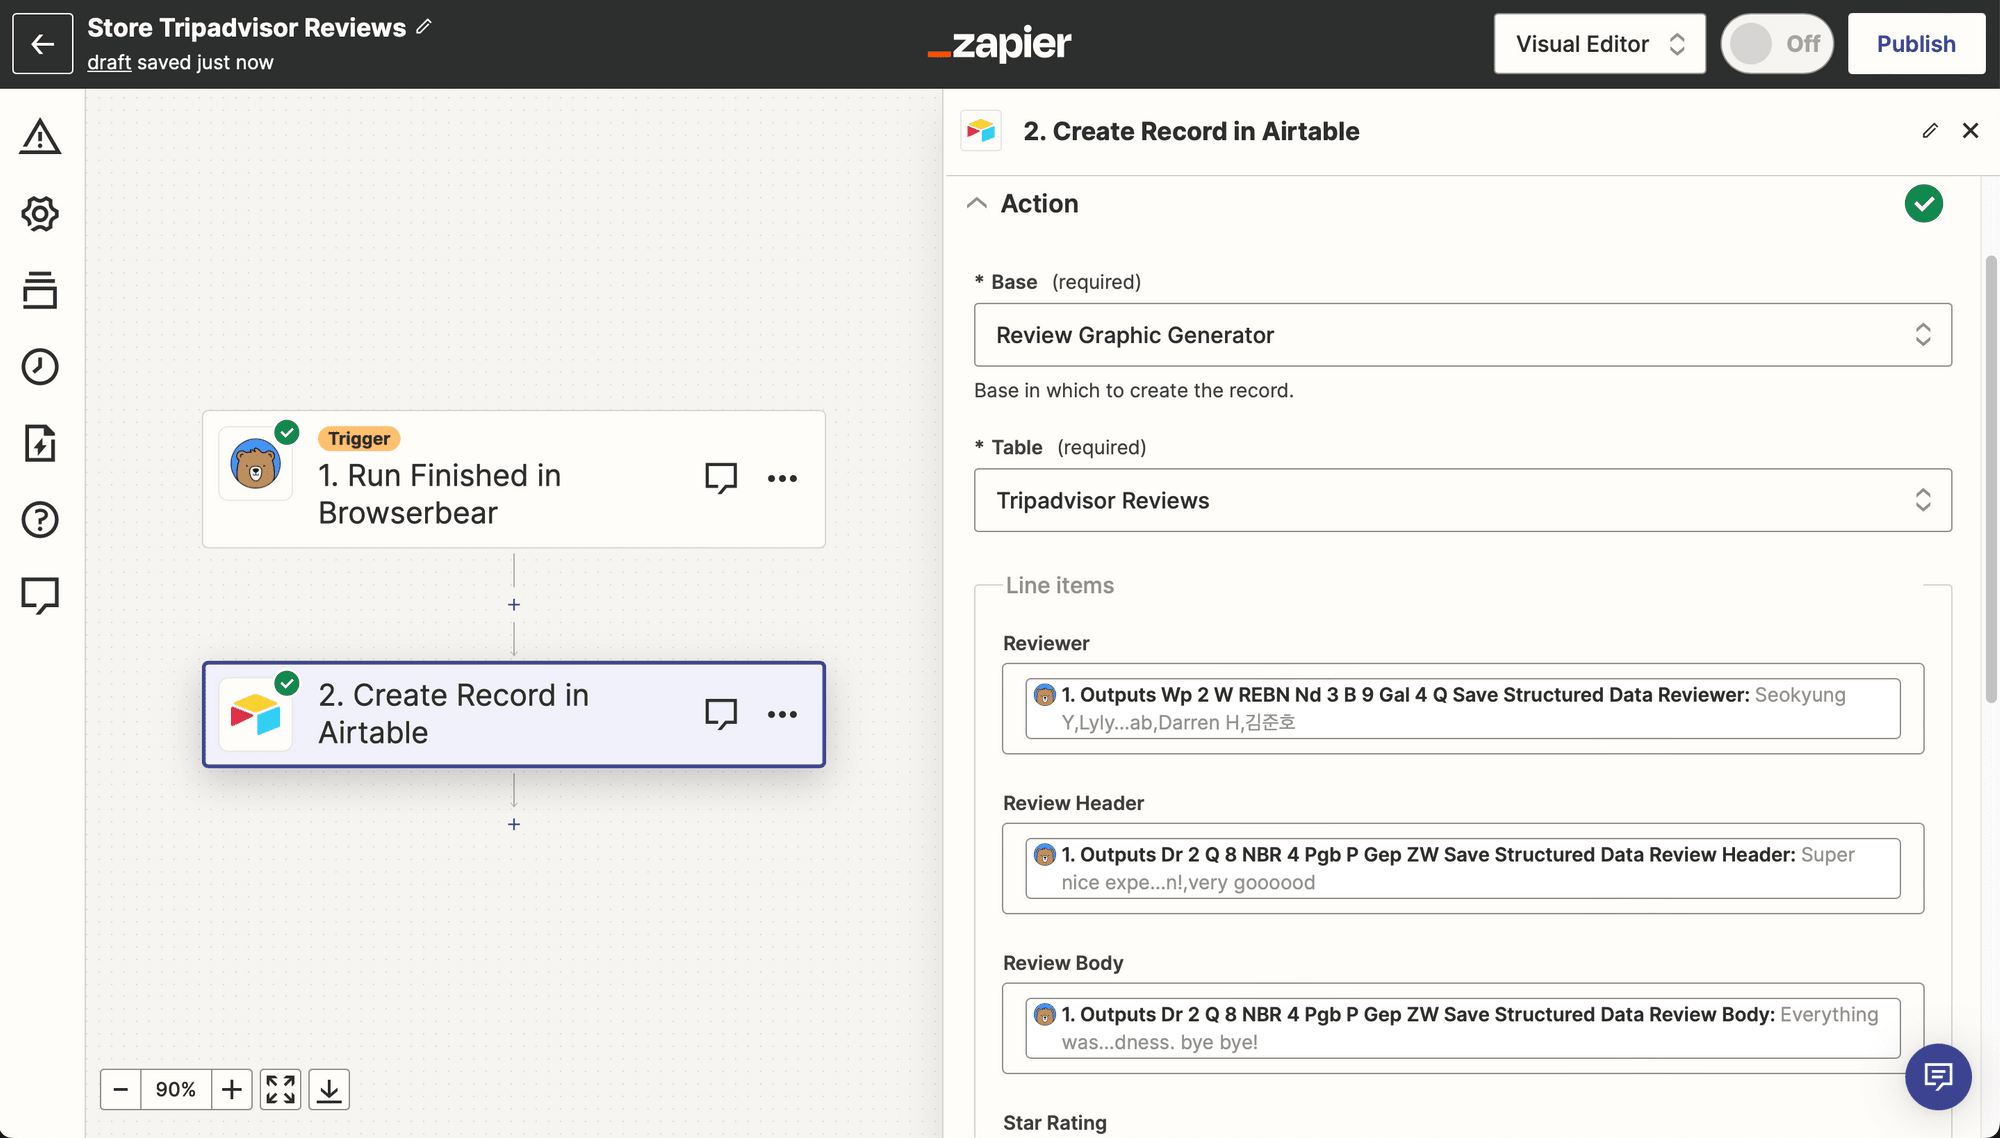
Test the action. You should see a batch of reviews populate your Airtable base.
Bear Tip 🐻: Zapier’s Airtable integration allows you to create a maximum of 10 records in one API request, making it an appealing option for this use case since TripAdvisor displays 10 per page by default. If you would like to extract more, you may have to set up a looping iteration, use multiple API requests, or choose a database without row limitations.
Design a Bannerbear Social Graphic Template
Bannerbear is an image generation API that can quickly create branded graphics from multiple datasets. It takes just a moment to generate dozens, hundreds, or even thousands of photos—you just have to set up an automation to run data through to your template, which we will do today.
Log into your Bannerbear account (or start a free trial) and create a project. You can add a blank template or start from one of ours:


Modify the template any way you want, taking care to ensure you have dynamic fields created for all of the review details you want to capture.
Click Save Template when done.
Bear Tip 🐻: Name the template fields to match your Airtable columns to ensure easier mapping in Zapier.
Set up a Zap to Generate Social Graphics
This zap will generate social graphics from reviews with high ratings, then save the URLs to Airtable so you can easily add them to your content calendar.
Log into your Zapier account, click + Create Zap , and set up the following events:
Trigger: New Record in Airtable
Choose Airtable as the app and New Record as the event.
Set up the action by selecting the right base and table, ensuring you limit views to high ratings only.
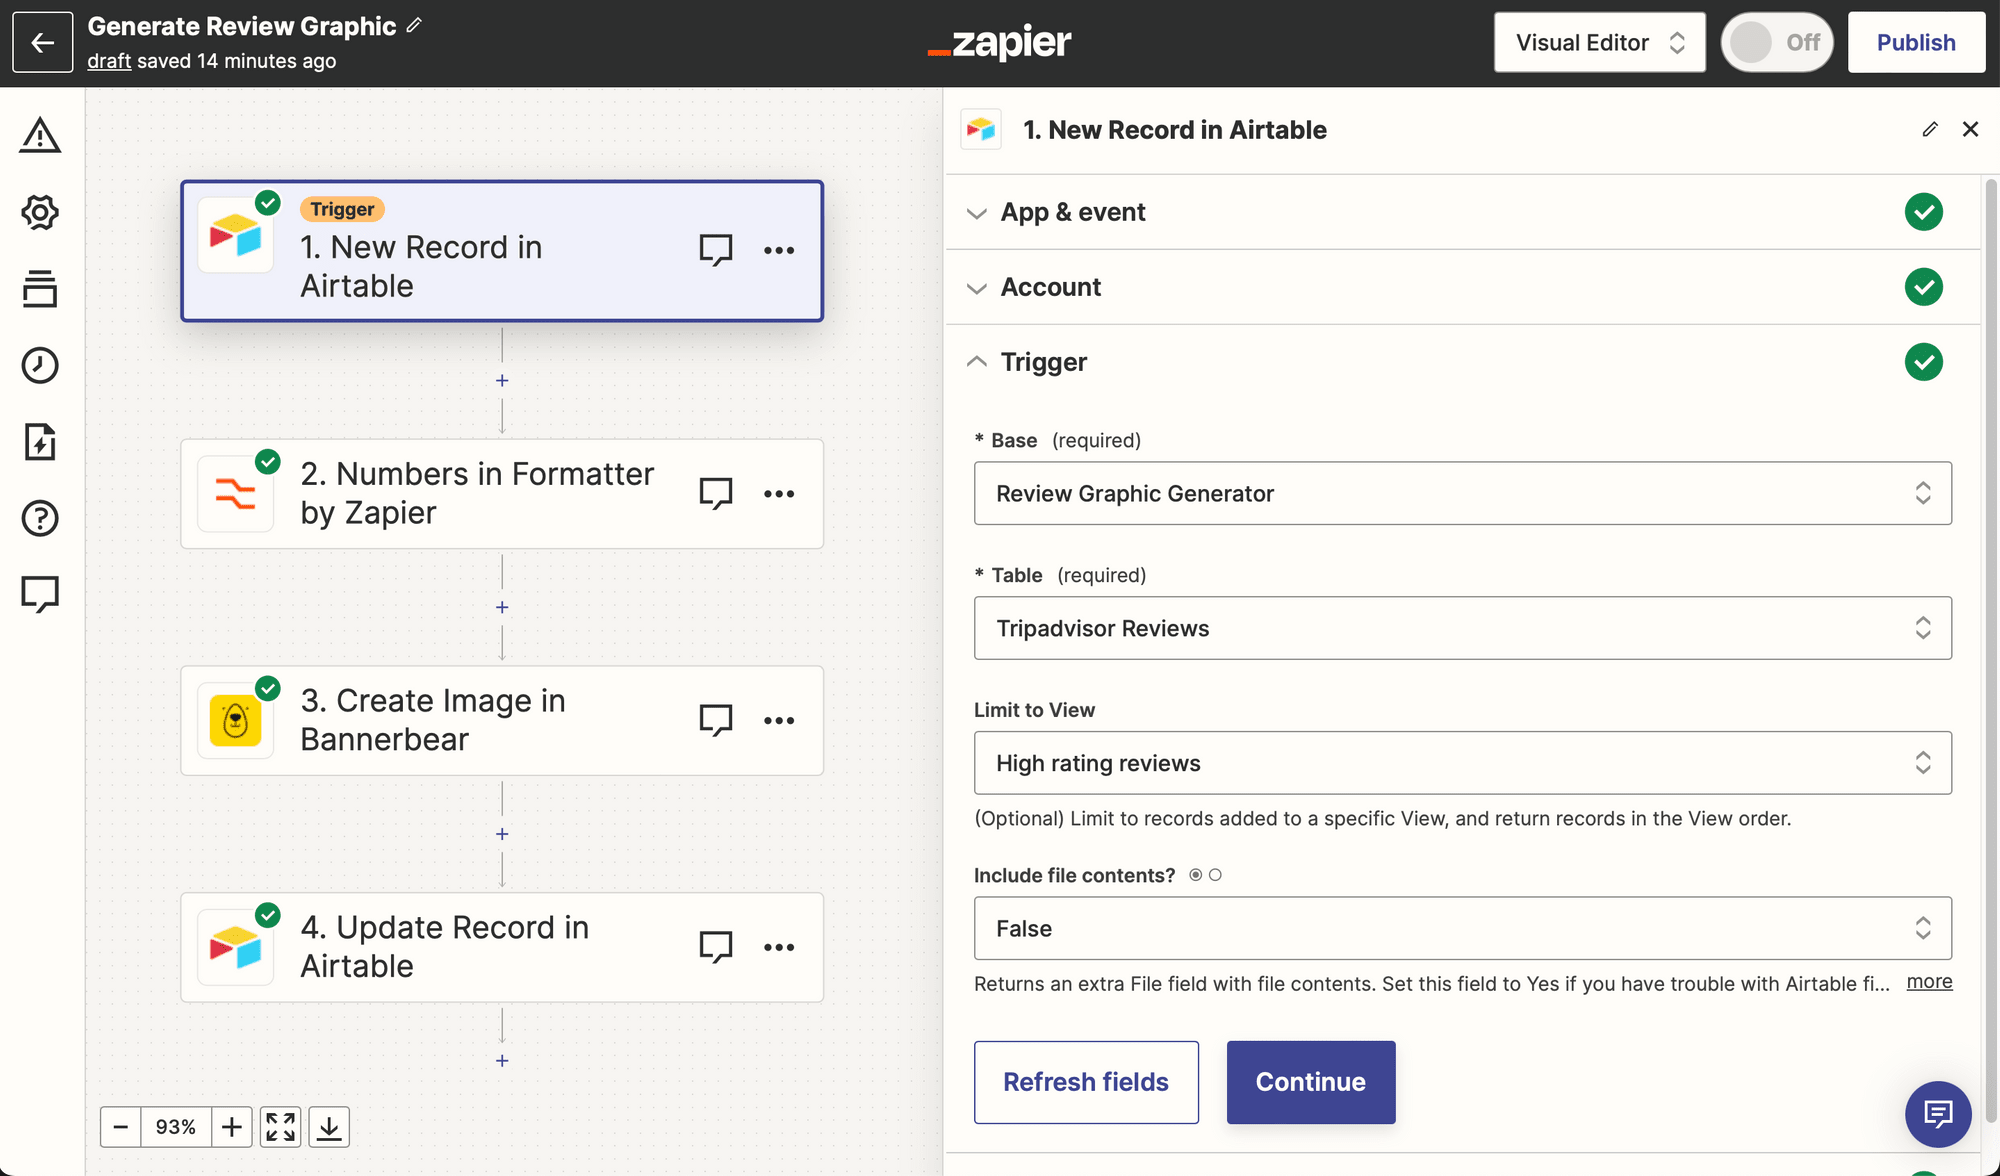
Test the trigger.
Action: Numbers in Formatter by Zapier
Choose Formatter by Zapier as the app and Numbers as the event.
Select Perform Math Operation as the transform type and Multiply as the operation.
Bannerbear uses a numeric scale of 1-100 to display star ratings, so your two values will be the star rating from Airtable and 20.
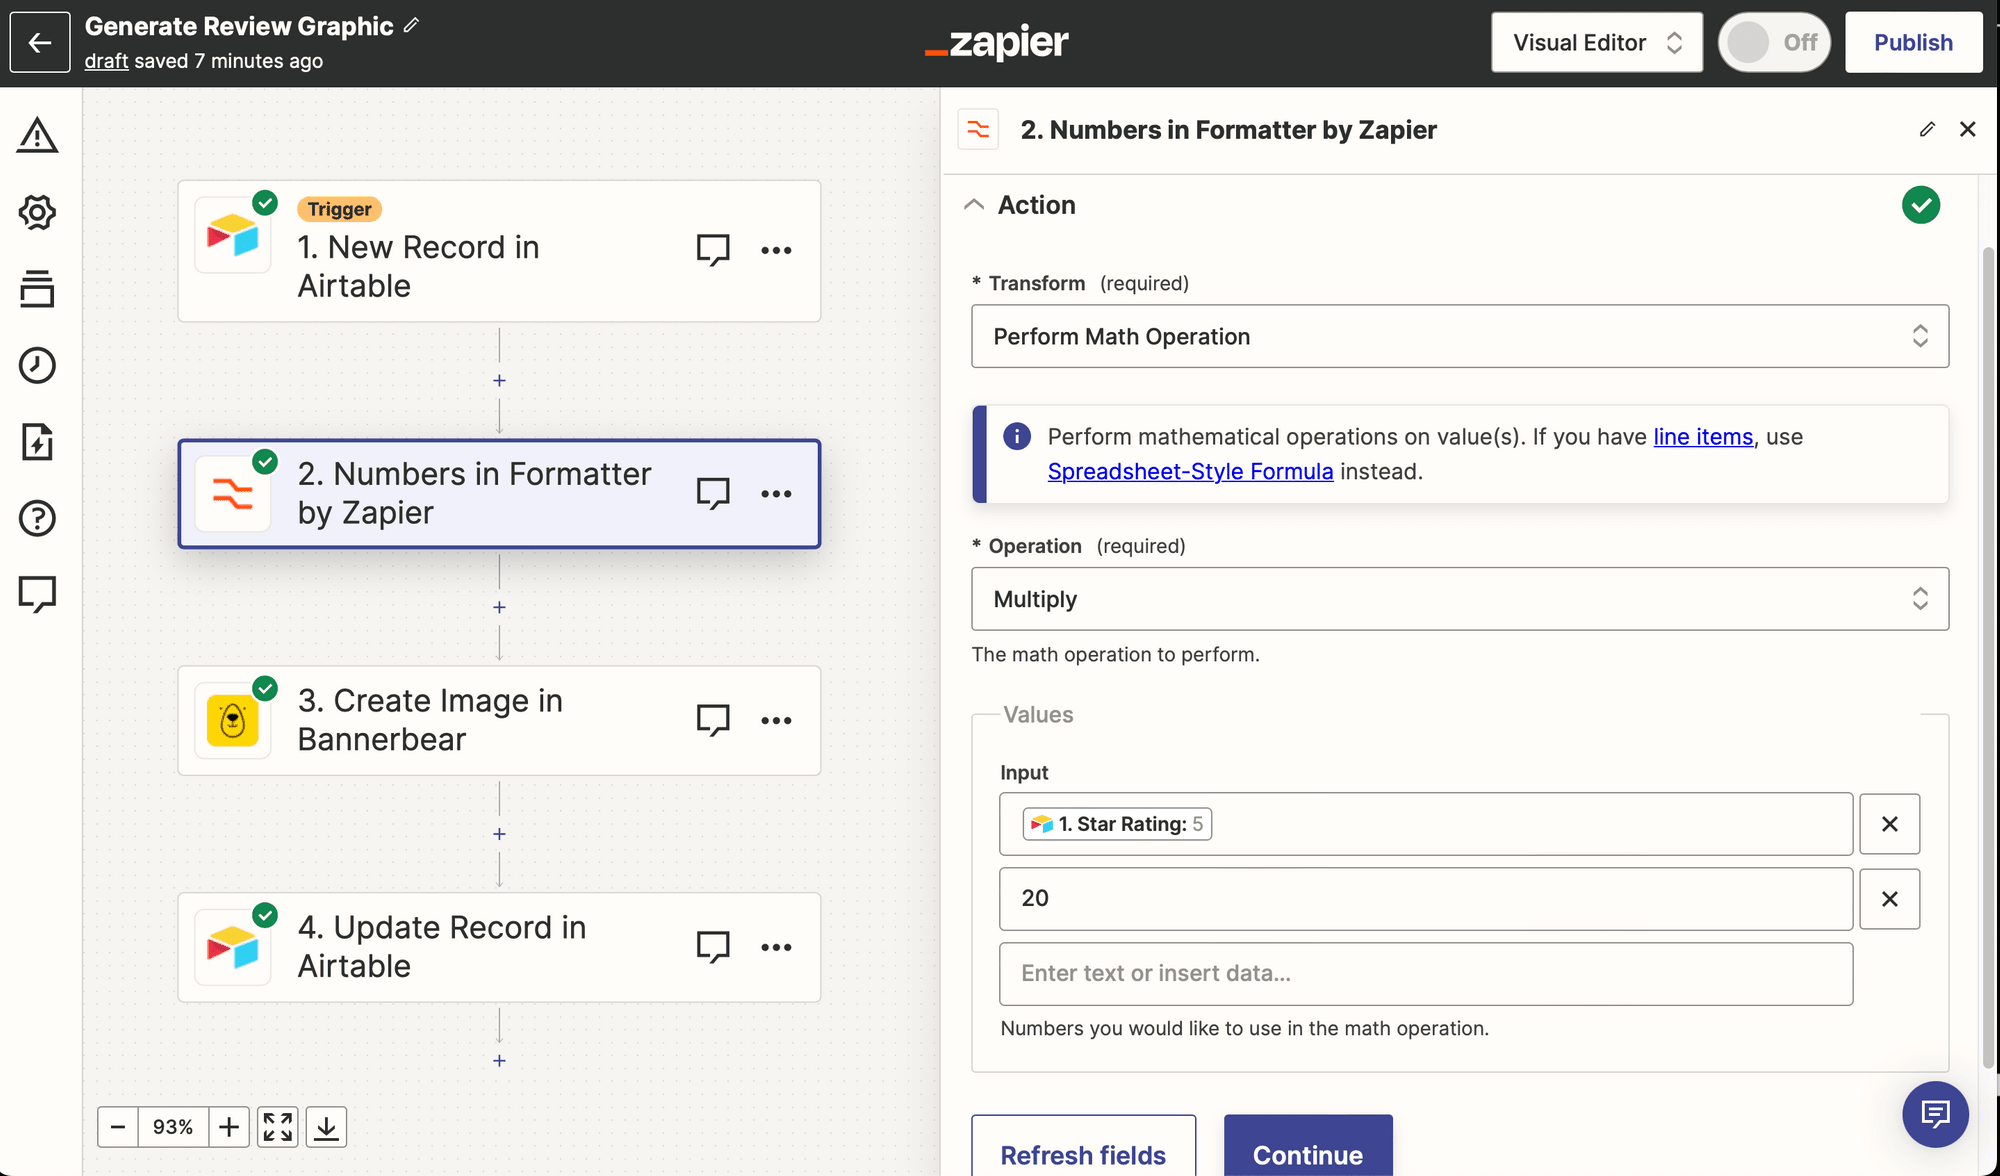
Test the event, then continue.
Bear Tip 🐻: This is the simplest way to format the star rating number to match Bannerbear’s input requirements because Zapier automatically receives it as a number. Performing the operation in Airtable would require you to first convert the string (that resulted from the REGEX extraction formula) to a number.
Action: Create Image in Bannerbear
Choose Bannerbear as the app and Create Image as the event. You will need to connect your account using the key found by clicking the Settings / API Key button of the corresponding project of the Bannerbear app.
Set up the action by selecting your template and mapping each review detail to its corresponding fields. Remember to save the Airtable ID as metadata.
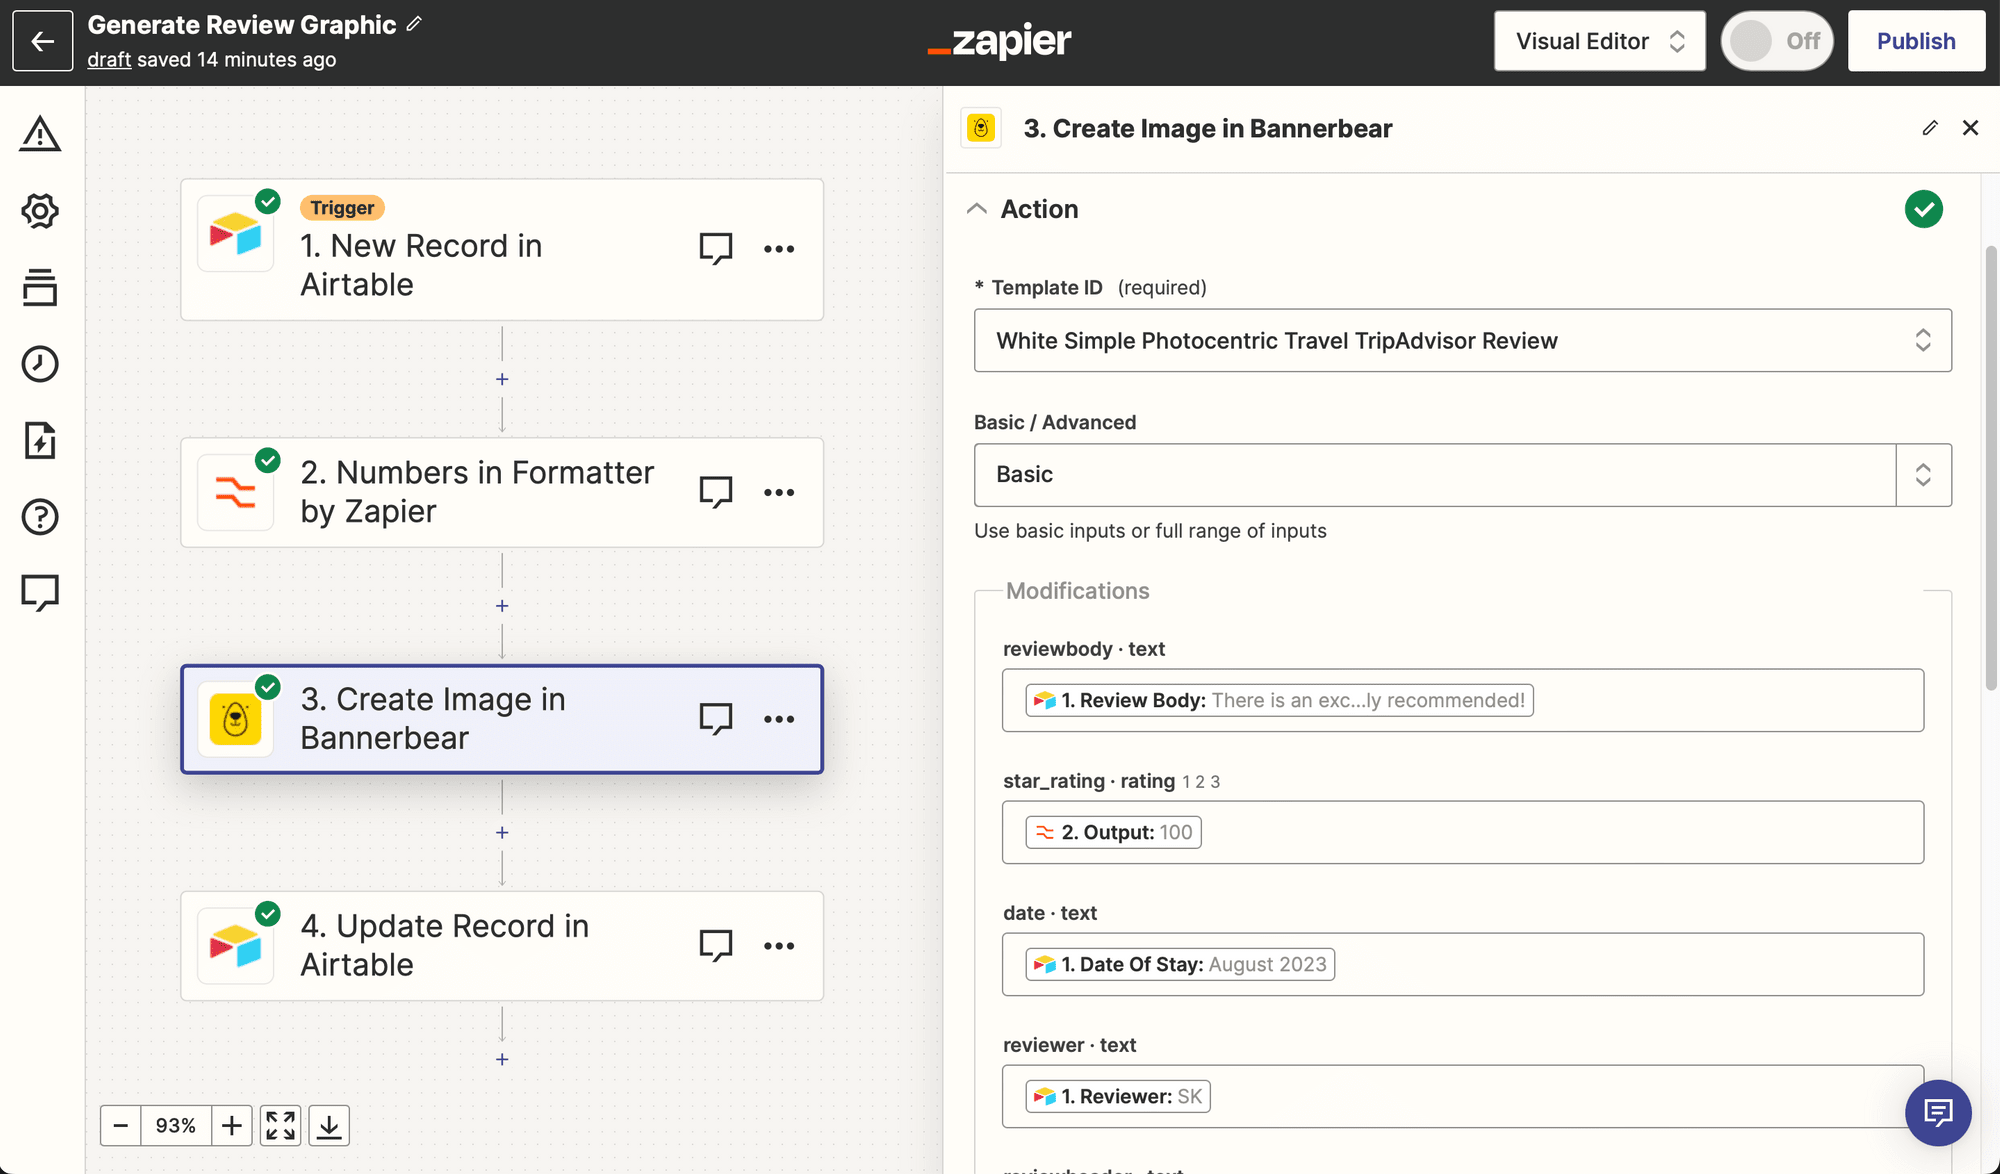
Test the event to ensure an image is generated.
Action: Update Record in Airtable
Choose Airtable as the app and Update Record as the event.
Set up the action by selecting the right base and table, then using the same Airtable ID used as metadata as the Record updating field.
Insert the generated image URL from the previous step into its corresponding field.
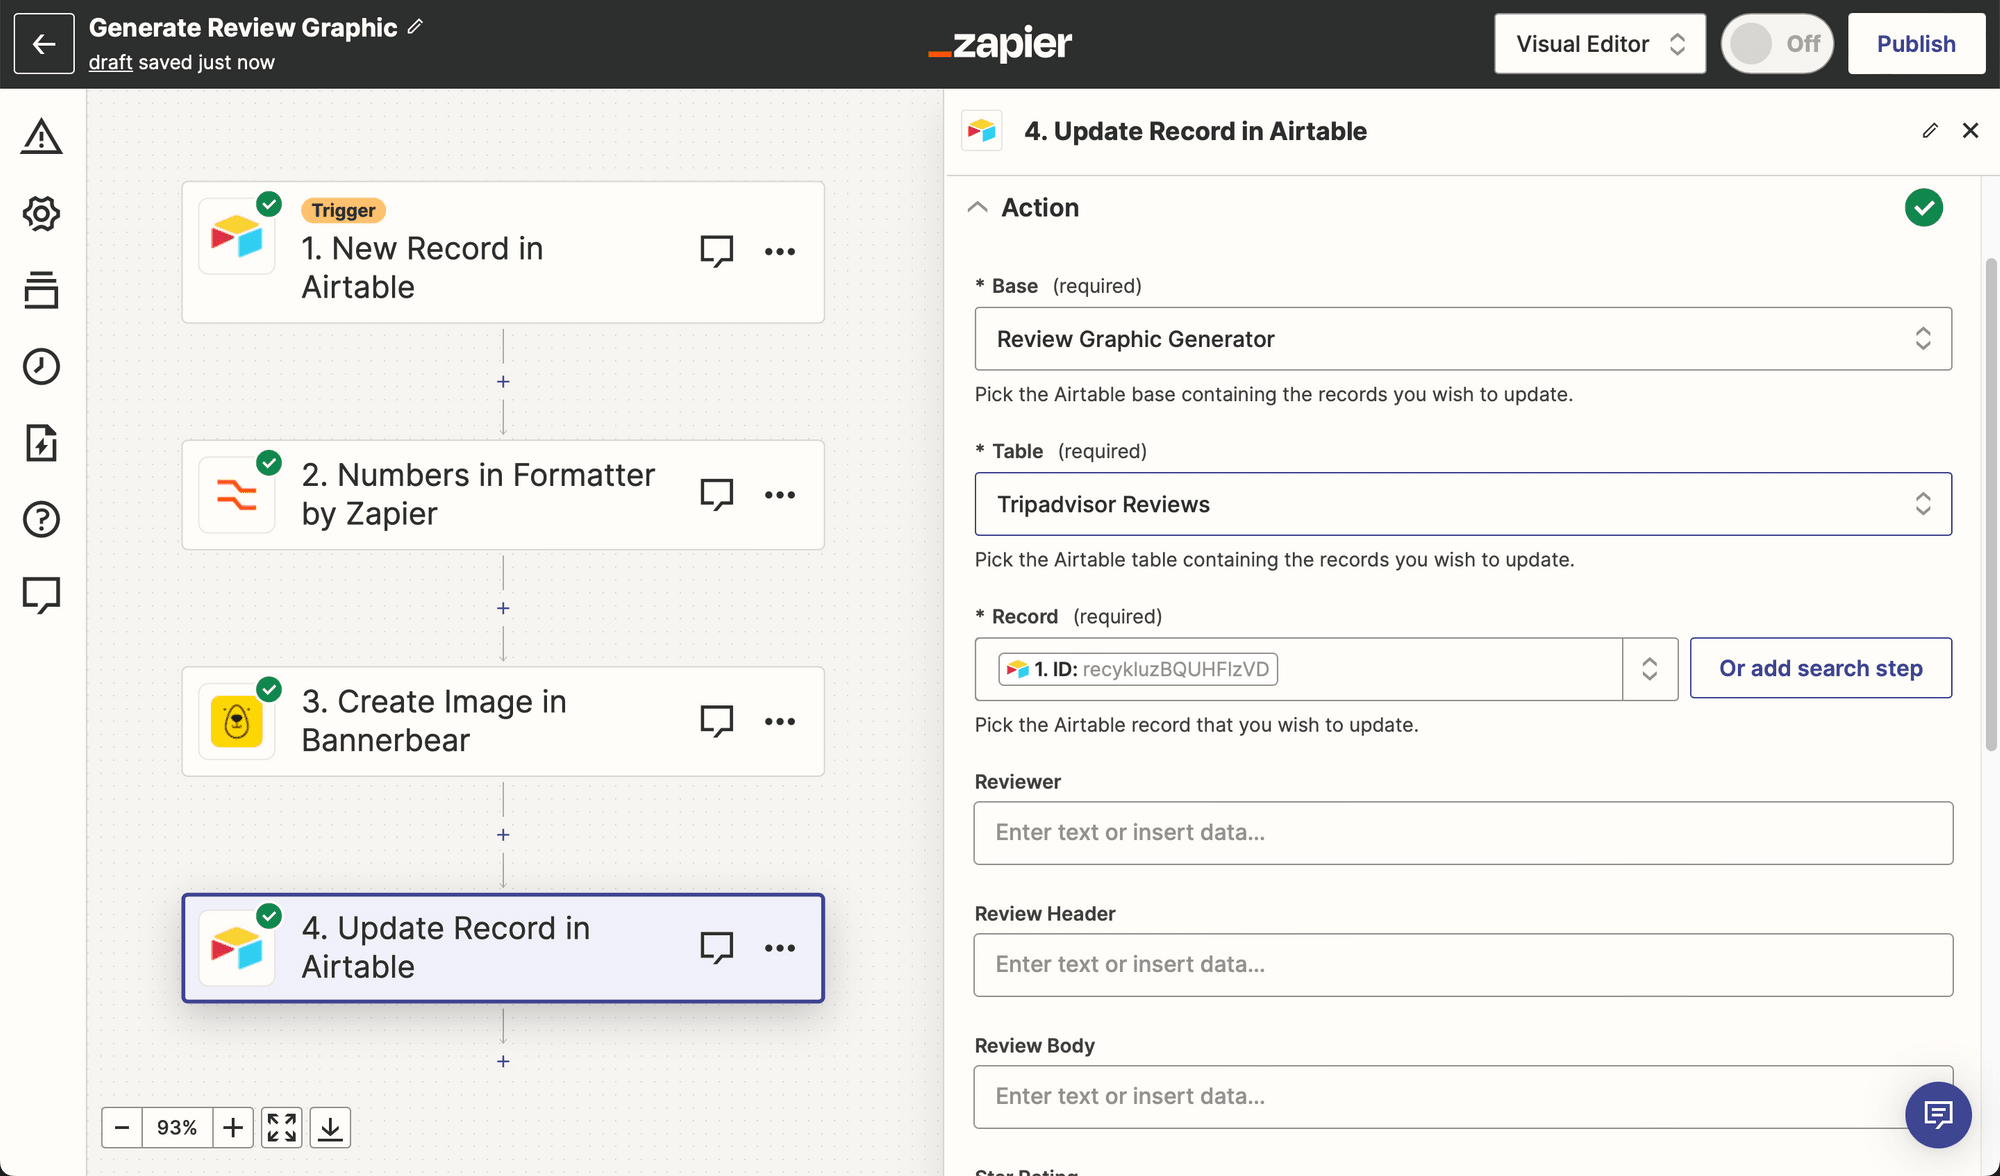
Test the action. You should see a record populate itself with the URL.
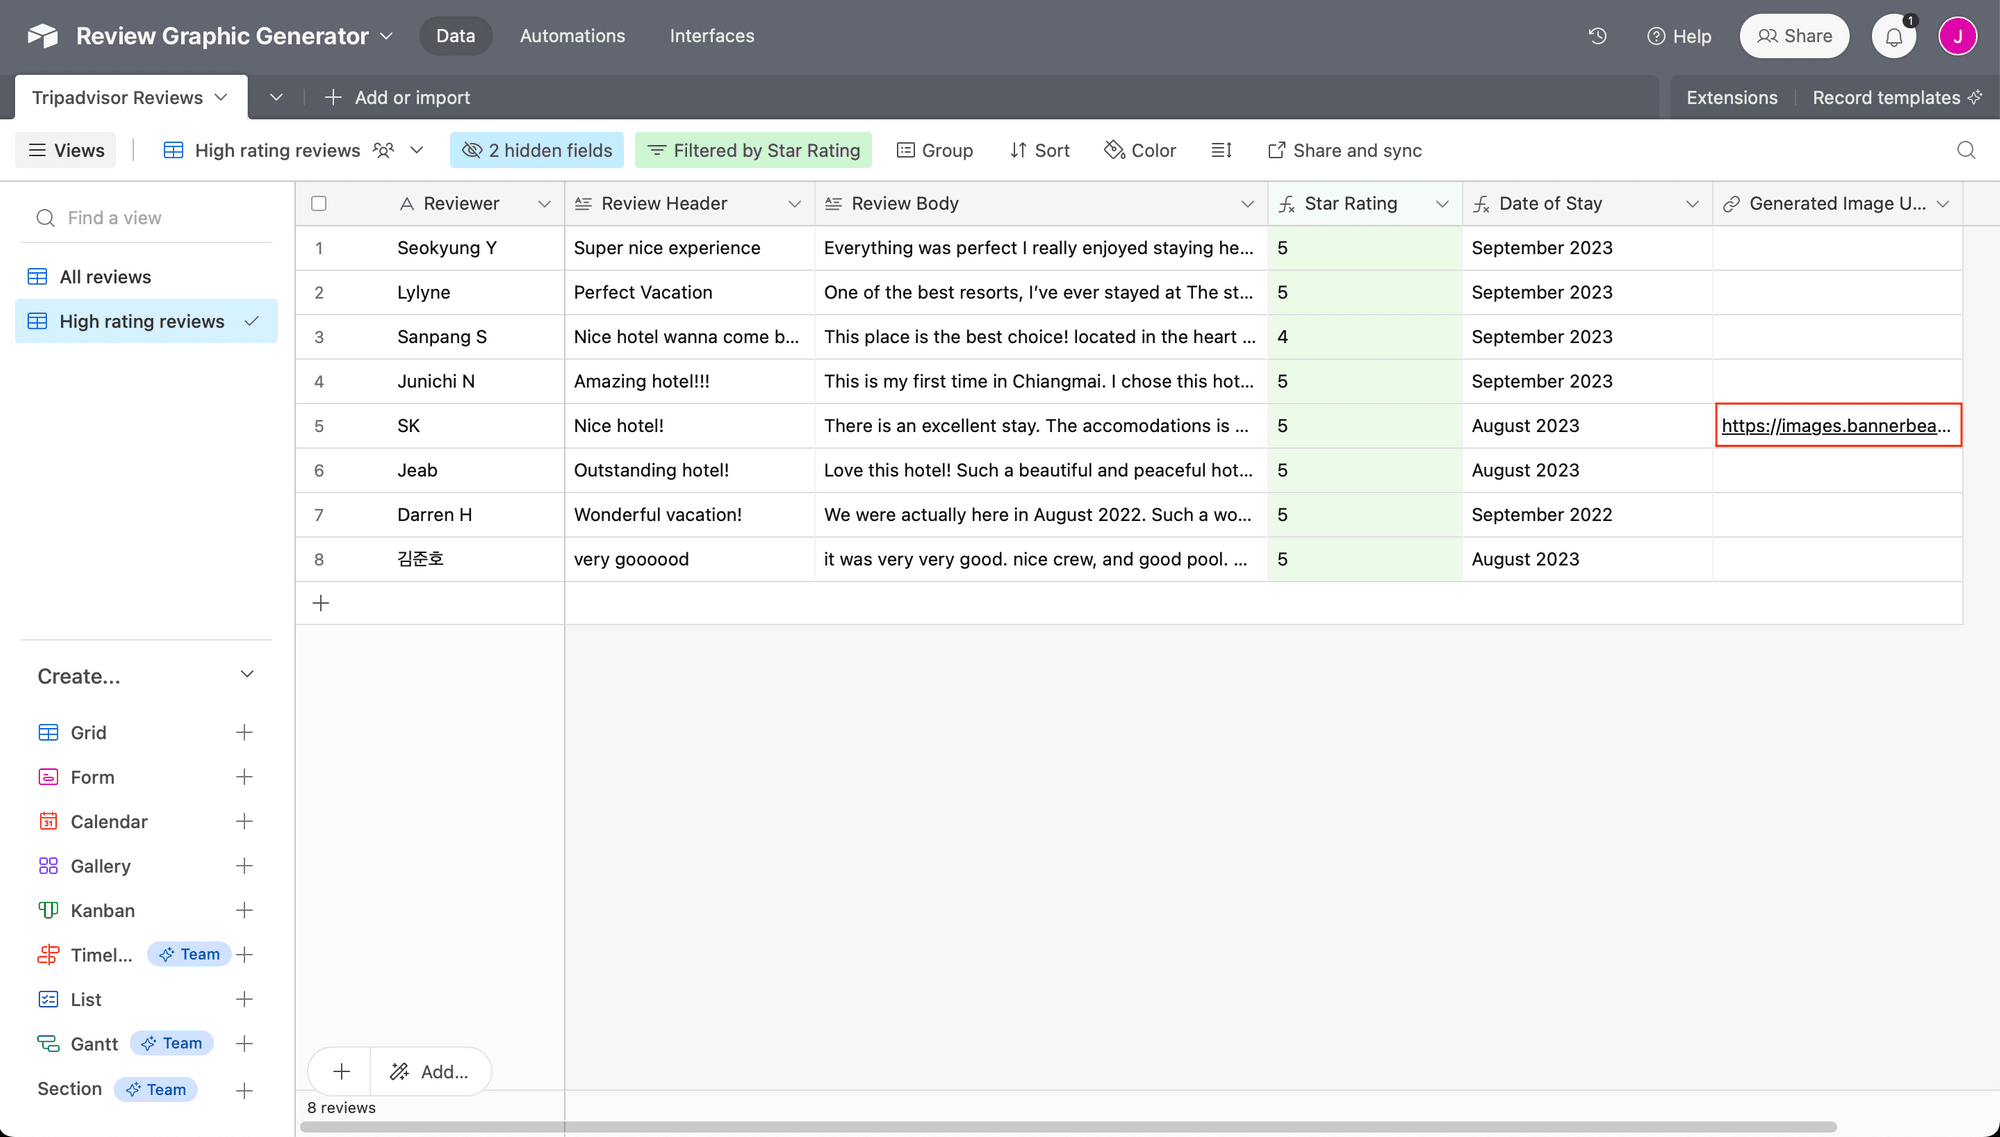
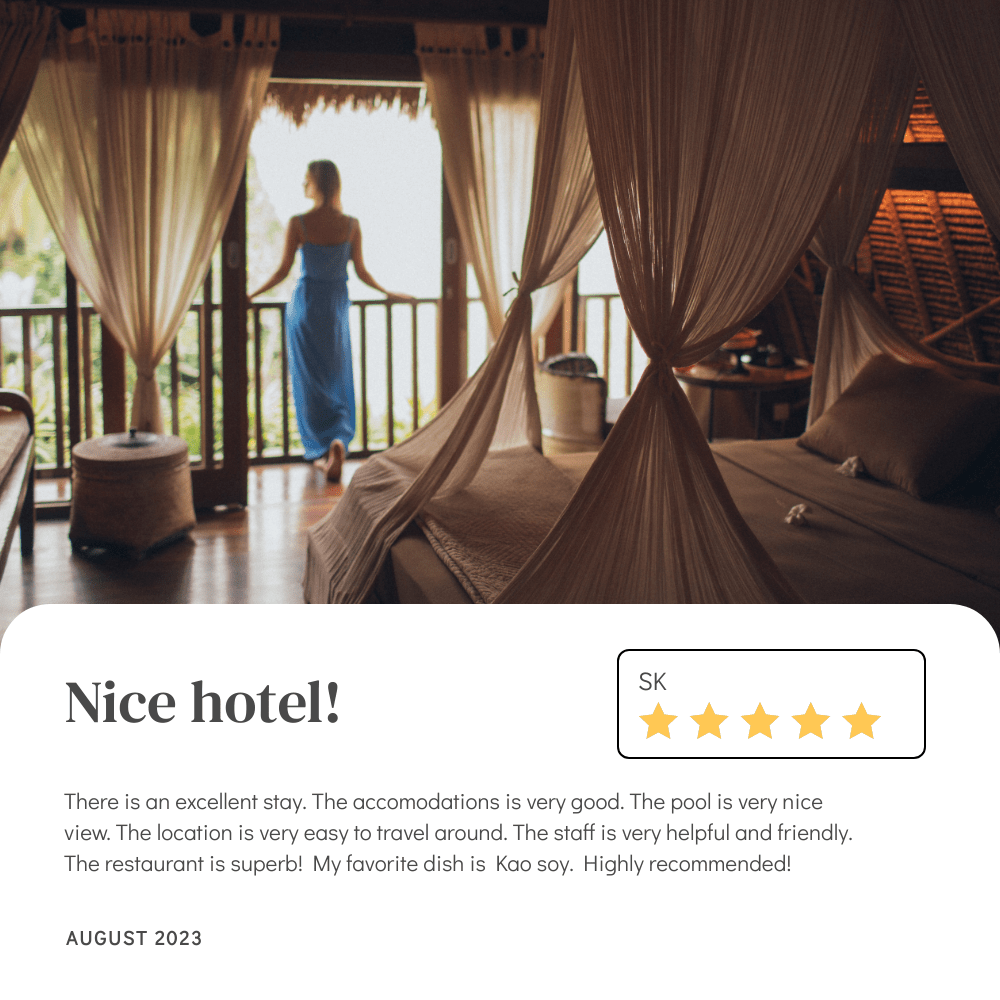
Now, you have an auto-produced review image ready for use!

Effortlessly Extract and Generate Social Proof
Hotels, restaurants, attractions, and other types of establishments live and die on social proof. Being able to communicate great reviews to potential customers is key to great business.
When you’re able to retrieve feedback online and prepare it for publishing without any manual work, your time can go towards delivering an exceptional guest experience. And thanks to nocode tools like Airtable, Browserbear, Bannerbear, and Zapier, setting a workflow up is a piece of cake.
Whether you choose to manually curate and schedule your generated images or add to the process to make it completely hands-free, automatic scraping and generating saves you valuable time every day.
