Web Scraping with Python: An Introduction and Tutorial
Contents
Data is one of the most valuable assets in this digital world. Every day, 2.5 quintillion bytes of data are created and added to the internet and the number is still increasing exponentially. With the vast amount of data available on the internet, web scraping has become a crucial skill for many industries, including data science, finance, and e-commerce.
With data, we can extract and gain invaluable insights to move the world forward. In this article, we will discuss various ways you can use to scrape data from a website using Python.
What is Web Scraping
Web scraping is a way to extract data and information from a website automatically using tools. It is usually used when the amount of data to be retrieved from a website is vast and can’t be done with manual effort.
Web scraping can be used for a variety of purposes, such as gathering data for market research, monitoring competitor prices, analyzing sentiment on social media, collecting news articles, and more. As it can be executed automatically, it can save you so much time and effort as compared to collecting the data manually.
Web Scraping Libraries (Python)
Python is a popular language for web scraping because of its ease of use and also the availability of different web scraping libraries. These libraries simplify the data scraping process and allow you to extract data from websites with ease.
Some of the most popular web scraping libraries include:
Beautiful Soup
Beautiful Soup is a popular library used for parsing HTML and XML documents to pull data out of them. Running an HTML or XML document using Beautiful Soup represents the document as a nested data structure, also known as a BeautifulSoup object. You can then navigate through the data structure and find the target HTML element to extract information from.
Here’s an example of finding all the URLs from an HTML document, as shown in Beautiful Soup's official documentation:
soup.find_all('a')
# [<a class="sister" href="http://example.com/elsie" id="link1">Elsie</a>,
# <a class="sister" href="http://example.com/lacie" id="link2">Lacie</a>,
# <a class="sister" href="http://example.com/tillie" id="link3">Tillie</a>]

for link in soup.find_all('a'):
    print(link.get('href'))

# http://example.com/elsie
# http://example.com/lacie
# http://example.com/tillie
Scrapy
Scrapy is an open-source web scraping framework written in Python. Although it is originally designed for web scraping, you can also use it to crawl websites for other purposes like SEO.
One big advantage of Scrapy is its speed. You can crawl websites very quickly as it’s asynchronous—multiple requests can be made simultaneously without having to wait for another to complete. This also means that the requests will not be affected when some other requests fail.
To scrape a website using Scrapy, you will need to run a ‘spider’ using the runspider command:
scrapy runspider quotes_spider.py -o quotes.jsonl
The Python file quotes_spider.py defines the spider that will crawl a website and extract data from it. As a result, it will yield a Python dictionary that contains the data and export it to a JSONL file:
{"author": "Jane Austen", "text": "\u201cThe person, be it gentleman or lady, who has not pleasure in a good novel, must be intolerably stupid.\u201d"}
{"author": "Steve Martin", "text": "\u201cA day without sunshine is like, you know, night.\u201d"}
{"author": "Garrison Keillor", "text": "\u201cAnyone who thinks sitting in church can make you a Christian must also think that sitting in a garage can make you a car.\u201d"}
...
Note: The example above is extracted from Scrapy’s documentation.
Selenium
Selenium is a web browser automation tool that is primarily used for testing web applications. It allows you to automate web browser actions, such as clicking buttons, filling forms, and navigating web pages using code. Therefore, you can also use it for web scraping.
To use Selenium, you will need to install its library and browser drivers. It has libraries for various programming languages, including Python, and supports different modern browsers like Chrome/Chromium, Firefox, Internet Explorer, Edge, and more. Once you have them installed, you will only need to write a few lines of code to start scraping.
Here’s a simple example of how to get the title and an HTML element from a website using Selenium:
from selenium import webdriver

driver = webdriver.Chrome()
driver.get("https://www.selenium.dev/selenium/web/web-form.html")
title = driver.title

text_box = driver.find_element(by=By.NAME, value="my-text")
Web Scraping without a Library (Browserbear API)
Besides using libraries like Beautiful Soup, Scrapy, and Selenium, you can also scrape a website without using one. One way to do so is by using an API like Browserbear.
Browserbear is a scalable, cloud-based browser automation tool that helps you to automate any browser task, including web scraping. For every automation, you will need to create a task in the Browserbear dashboard (creating a trial account is free). Then, you can send HTTP requests to the Browserbear API to trigger the task and receive the data.
Now that you have a little bit of an idea of what is Browserbear, let’s see how to scrape a website with it!
Creating a Browserbear Task
Follow the instructions in How to Scrape Data from a Website Using Browserbear to create a web scraping task in Browserbear. After creating the task, try running it from the dashboard.
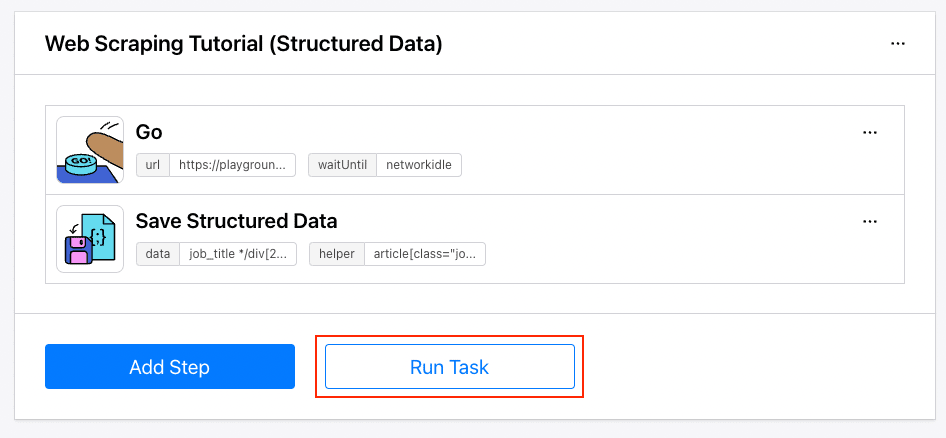
If it runs successfully, we can write code in Python to trigger it.
🐻 Bear Tips: You can follow this link to add the web scraping task to your dashboard immediately!
Writing the Python Code
Step 1. Import the ‘Request’ Module, Insert Headers, and Declare Constants
To use the Browserbear API, you will need to import the Requests module and insert your account’s API Key to the header of your requests. Declare the Task ID in your code too:
import requests
import json

api_key = "your_api_key"
headers = {
  'Authorization' : f"Bearer {api_key}"
}
task_uid = "the_task_id"
Step 2. Make a POST Request to Scrape the Website
Then, we can make a POST request to the Run endpoint to run the web scraping task.
post_url = f"https://api.browserbear.com/v1/tasks/{task_uid}/runs"
response = requests.post(post_url, headers=headers)

result = json.loads(response.text)
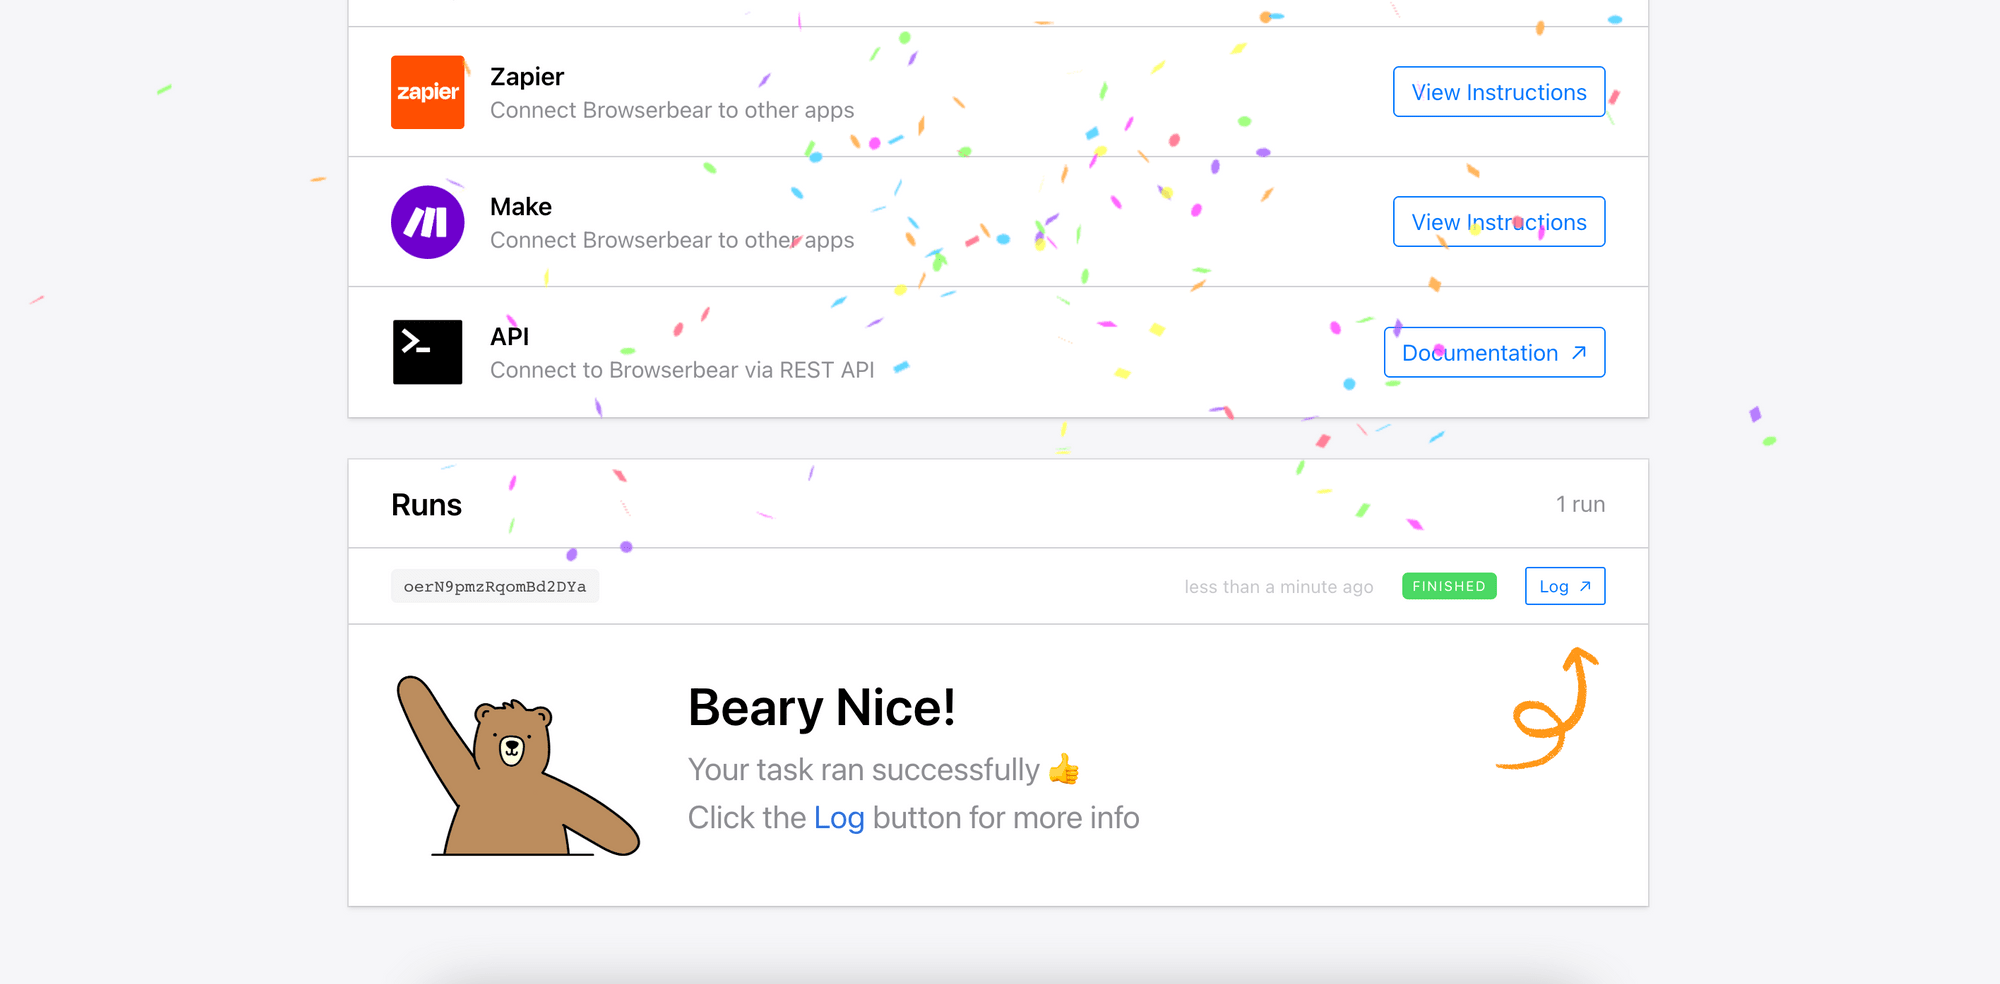
Every Browserbear task runs asynchronously. You will receive a 202 Accepted response after making the POST request but to receive the result, you will need to query the GET endpoint or use a webhook.
Response:
{
  "created_at": "2023-02-17T10:35:14.813Z",
  "video_url": null,
  "webhook_url": null,
  "metadata": null,
  "uid": "eAXxpPQP6LRkV0y3YJ",
  "steps": [
    {
      "action": "go",
      "uid": "waxkA4Dz6KNbjnlJoP",
      "config": {
        "url": "https://playground.browserbear.com/jobs/",
        "waitUntil": "networkidle"
      }
    },
    {
      "action": "save_structured_data",
      "uid": "waxkA4Dz69WBjnlJoP",
      "config": {
        "data": "job_title\n*/div[2]/div[1]/h2/a\nText\n---\ncompany\ndiv[class=\"company\"]\nText\n---\nlocation\np[class=\"location\"]\nText\n---\nsalary\ndiv[class=\"salary\"]\nText\n---\nlink\n*/div[2]/div[1]/h2/a\nhref\n---\n",
        "helper": "article[class=\"job card\"]"
      }
    }
  ],
  "status": "running",
  "finished_in_seconds": null,
  "task": "v25PO0jEq4wlLxq4GJ",
  "outputs": []
}
Step 3. Make GET Requests to Receive the Result (API Polling)
The GET endpoint returns a Run Object that contains the steps, outputs, and other details of the task run:
{
  "created_at": "2022-12-06T04:34:15.238Z",
  "video_url": "https://media.browserbear.com/videos/oZwrg1DnX5qQM0v7Wq/2843a2b0a90c09b80d6d81f037854b5a3f33f2fa.mp4",
  "uid": "5dDvA47kyWQ2N61w3R",
  "task": "851LyQMwvZw2lrXKpq",
  "steps": [
    {
      "action": "go",
      "config": {
        "url": "https://twitter.com/elonmusk"
      },
      "uid": "GNqV2ngBmly7O9dPRe"
    },
    {
      "action": "take_screenshot",
      "uid": "Km0k2XNbnlBA6Pplde",
      "output": "https://media.browserbear.com/screenshots/oZwrg1DnX5qQM0v7Wq/o2Wm9xgbkrEzpqDZ0Y/1.jpg"
    }
  ],
  "status": "finished",
  "finished_in_seconds": 6,
  "webhook_url": null,
  "outputs": [],
  "metadata": null
}
When the task is still running, you will get an empty outputs array. Keep making GET requests to the endpoint to get the latest result:
result_uid = result["uid"]

get_url = f"https://api.browserbear.com/v1/tasks/{task_uid}/runs/{result_uid}"
response = requests.get(get_url, headers=headers)

result = json.loads(response.text)
If the task has finished running, you should see the scraped data in the outputs:
...
"status": "finished",
"finished_in_seconds": 12,
"task": "v25PO0jEq4wlLxq4GJ",
"outputs": {
    "waxkA4Dz69WBjnlJoP_save_structured_data": [
        {
            "job_title": "Education Representative",
            "company": "Wildebeest Group",
            "location": "Angola",
            "salary": "$51,000 / year",
            "link": "/jobs/P6AAxc_iWXY-education-representative/"
        }
...
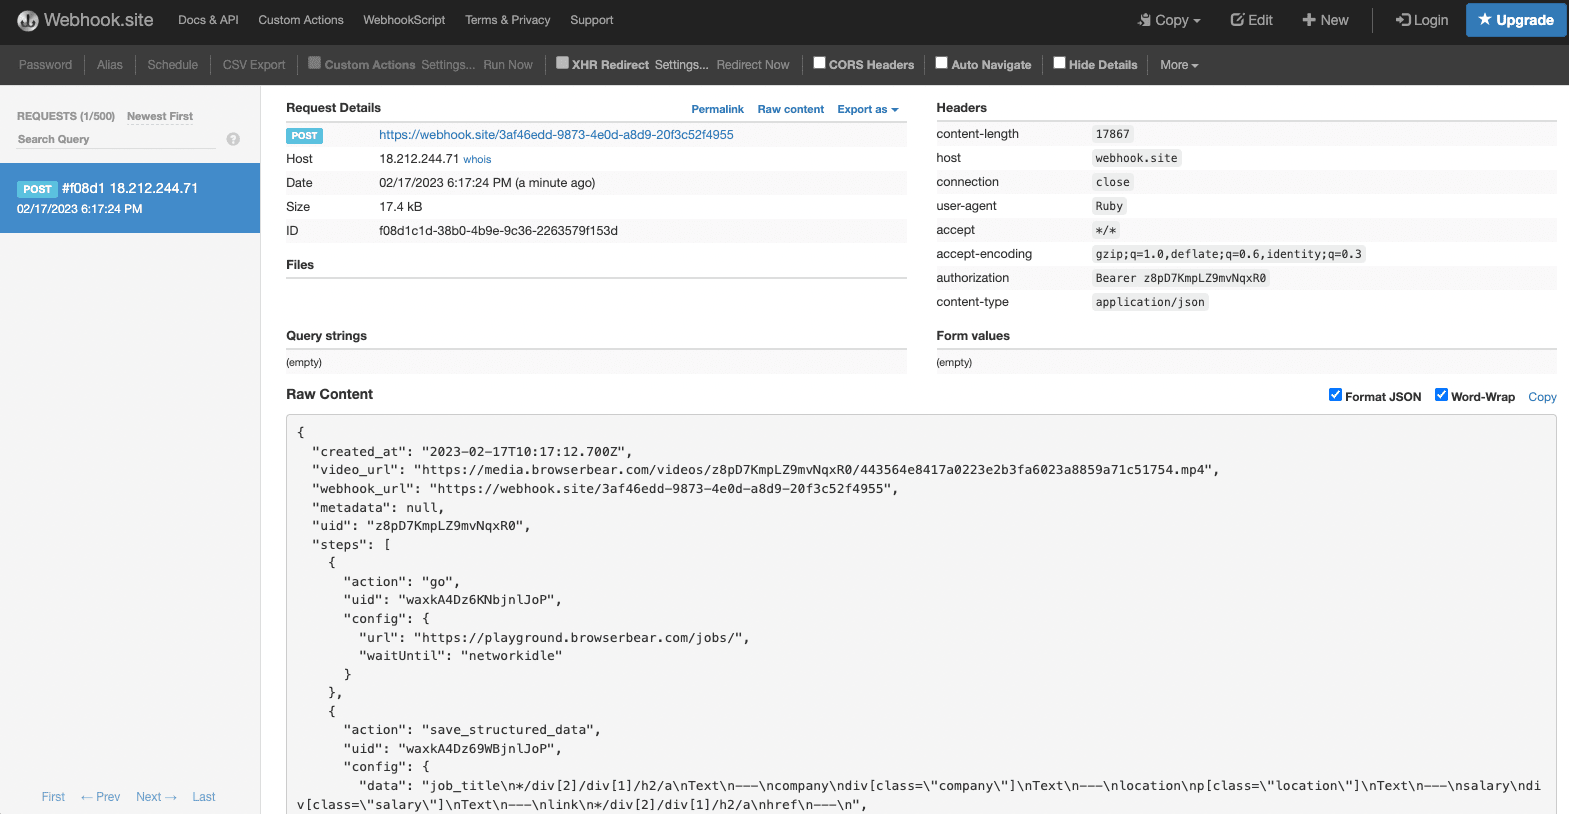
Alternatively, you can also use a webhook to receive the result automatically when the task has finished running. To do this, you’ll need to add a webhook URL when making the POST request so that Browserbear will know where to send the result to:
data = {'webhook_url' : "your_webhook_url"}

response = requests.post(url, headers=headers, json=data)
You can use the unique URL provided by Webhook.site to test the webhook. The result and the details of the HTTP request should be shown after you’ve made a request to the API:
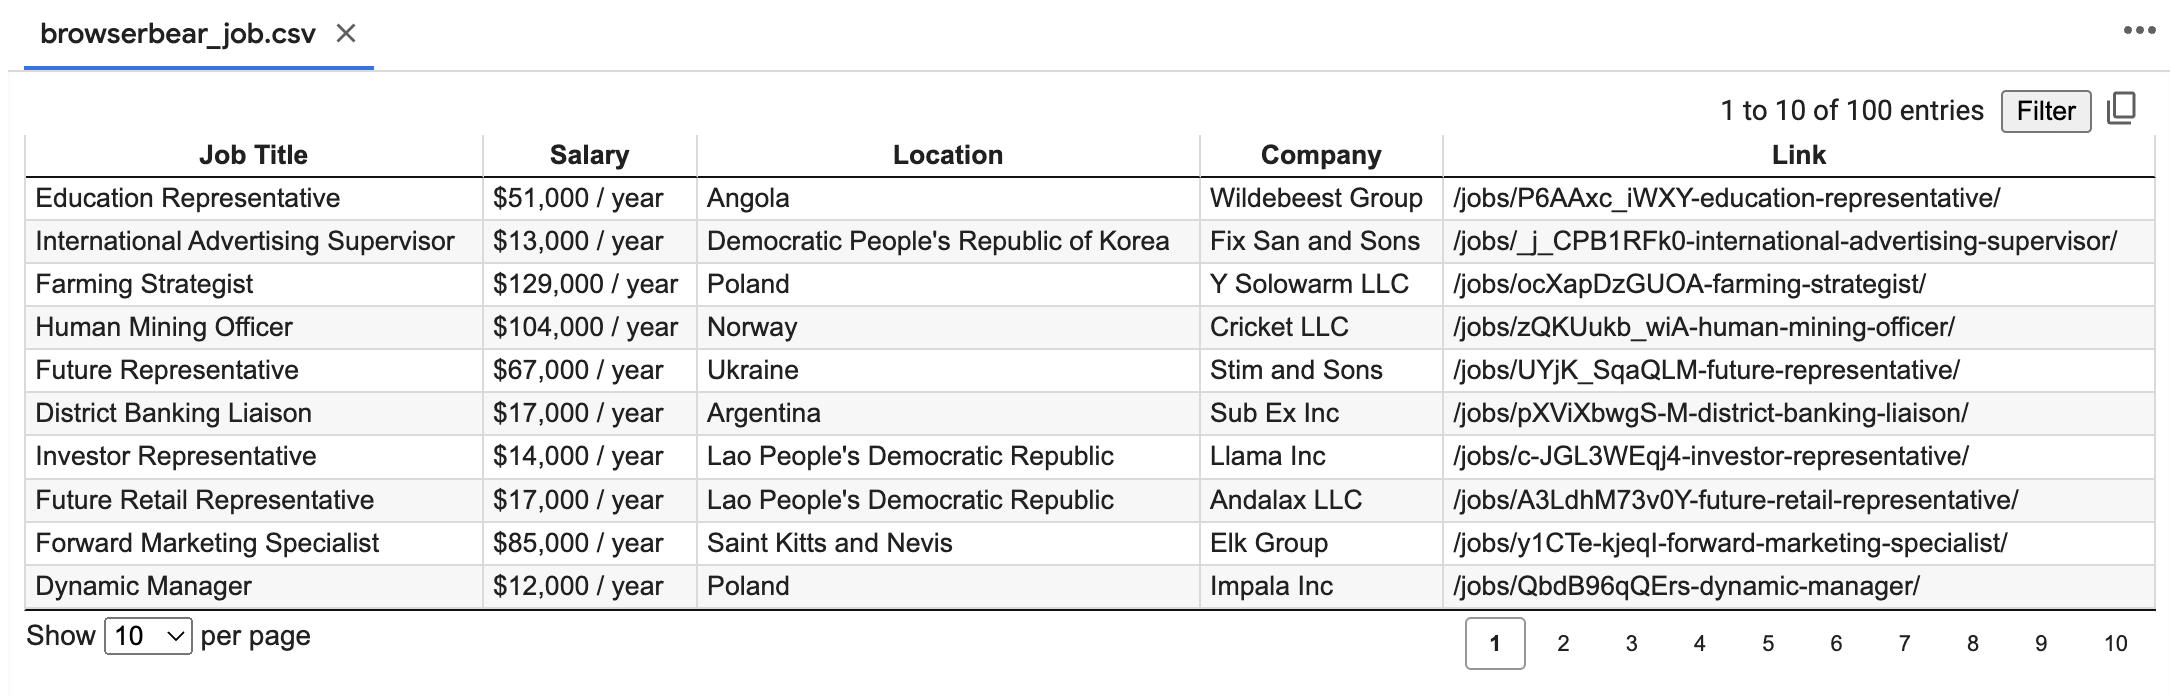
Step 4. Export the Data
Lastly, export the data into a spreadsheet.
import csv

result = json.loads(response.text)
job_list = result["outputs"]["waxkA4Dz69WBjnlJoP_save_structured_data"]

with open('browserbear_job.csv', 'w', newline='') as file:
    writer = csv.writer(file)
    writer.writerow(['Job Title', 'Salary', 'Location', 'Company', 'Link'])
    for job in job_list:
      writer.writerow([job['job_title'], job['salary'], job['location'], job['company'], job['link']])
Conclusion
Using a library or an API has its own advantages. When using a browser automation API like Browserbear, you can reuse the same task for projects in various languages like Node.js, Java, Ruby, etc. as all you need is to make an HTTP request to the API, as compared to using a library where you have to rewrite the code.
All in all, you should choose your tool depending on what you need. If you need to take website screenshots, test HTML elements, or do other repetitive browser tasks too, use Browserbear. Registering a trial account is free!