How to Create an API in 4 Easy Steps (with Code Example in Python)
Contents
Application Programming Interfaces (APIs) enable different applications/systems to communicate and exchange data seamlessly. In this article, we are going to break down the process of creating an API into 4 easy steps and build a few API endpoints using Python and Flask. But before we dive into the implementation details, let's first establish a clear understanding of what an API endpoint is.
What is an API Endpoint
An API endpoint is a specific URL that you can send an HTTP request to to access a particular function or data. Think of it as a hotline that you can call to get information from customer service.
API URLs can have different structures depending on how they’re designed. That said, they are typically organized based on the functionalities or resources that they're offering. The URL usually starts with a base URL, followed by a unique endpoint that reflects its purpose.
Here’s an example:
- Base URL:
https://api.browserbear.com - Endpoint for creating or retrieving a task’s run:
/v1/tasks/<task_uid>/runs - Complete URL:
https://api.browserbear.com/v1/tasks/<task_uid>/runs
Each API endpoint corresponds to a specific operation or data set. You can send different HTTP requests (POST, PUT, DELETE, etc.) to the same URL to perform various actions like retrieving data, creating new data, updating existing data, or deleting data.
🐻 Bear Tips: Use descriptive and meaningful endpoint names and resource URLs to make your APIs more user-friendly.
Steps to Create an API
Creating an API involves several steps and here is an outline of the process:
Step 1. Understand/Define the Requirements
Like developing any other application, it's crucial to understand the needs and objectives of the project. Start by gathering requirements from stakeholders, determining the desired functionality, and defining the use cases.
Step 2. Design the API
Once you have a clear understanding of the requirements, you can start designing the API. This includes deciding on the architecture, endpoints, data models, and overall structure of the API product. This is one of the most crucial steps of creating an API product as the design will significantly impact its usability, scalability, and maintainability.
🐻 Bear Tips : Include versioning in your API to allow for changes without breaking existing clients.
Step 3. Develop the API
With a solid design in place, you can start the development. Using your chosen programming language and framework, write the code to implement the logic for different endpoints.
Step 4. Test the API
After completing the development stage, test your API thoroughly to ensure it functions as intended. This includes performing various types of testing, such as unit testing and integration testing to validate its behavior in real-world scenarios.
Now that you have learned what it takes to create an API, let’s create some REST APIs using Python and Flask!
Code Example: Creating Python REST APIs using Flask
Flask is a Python web development framework that makes developing web applications and APIs easy and quick. Using Flask, you can create and define RESTful routes and API endpoints without manual configurations.
Start by creating a new folder for your project and go to the project directory from the terminal/command prompt. Then, follow the steps below:
Step 1. Set up Flask
In the terminal/command prompt, run the command below to install Flask:
pip install flask
Note: If you’re using Python 3.x, replace pip in the command with pip3.
Then, create a new Python file named main.py and paste the code below into the file to create a simple Flask application with a single route ( / ):
from flask import *

app = Flask( __name__ )

@app.route("/")
def home():
    return "Hello"

if __name__ == " __main__":
    app.run()
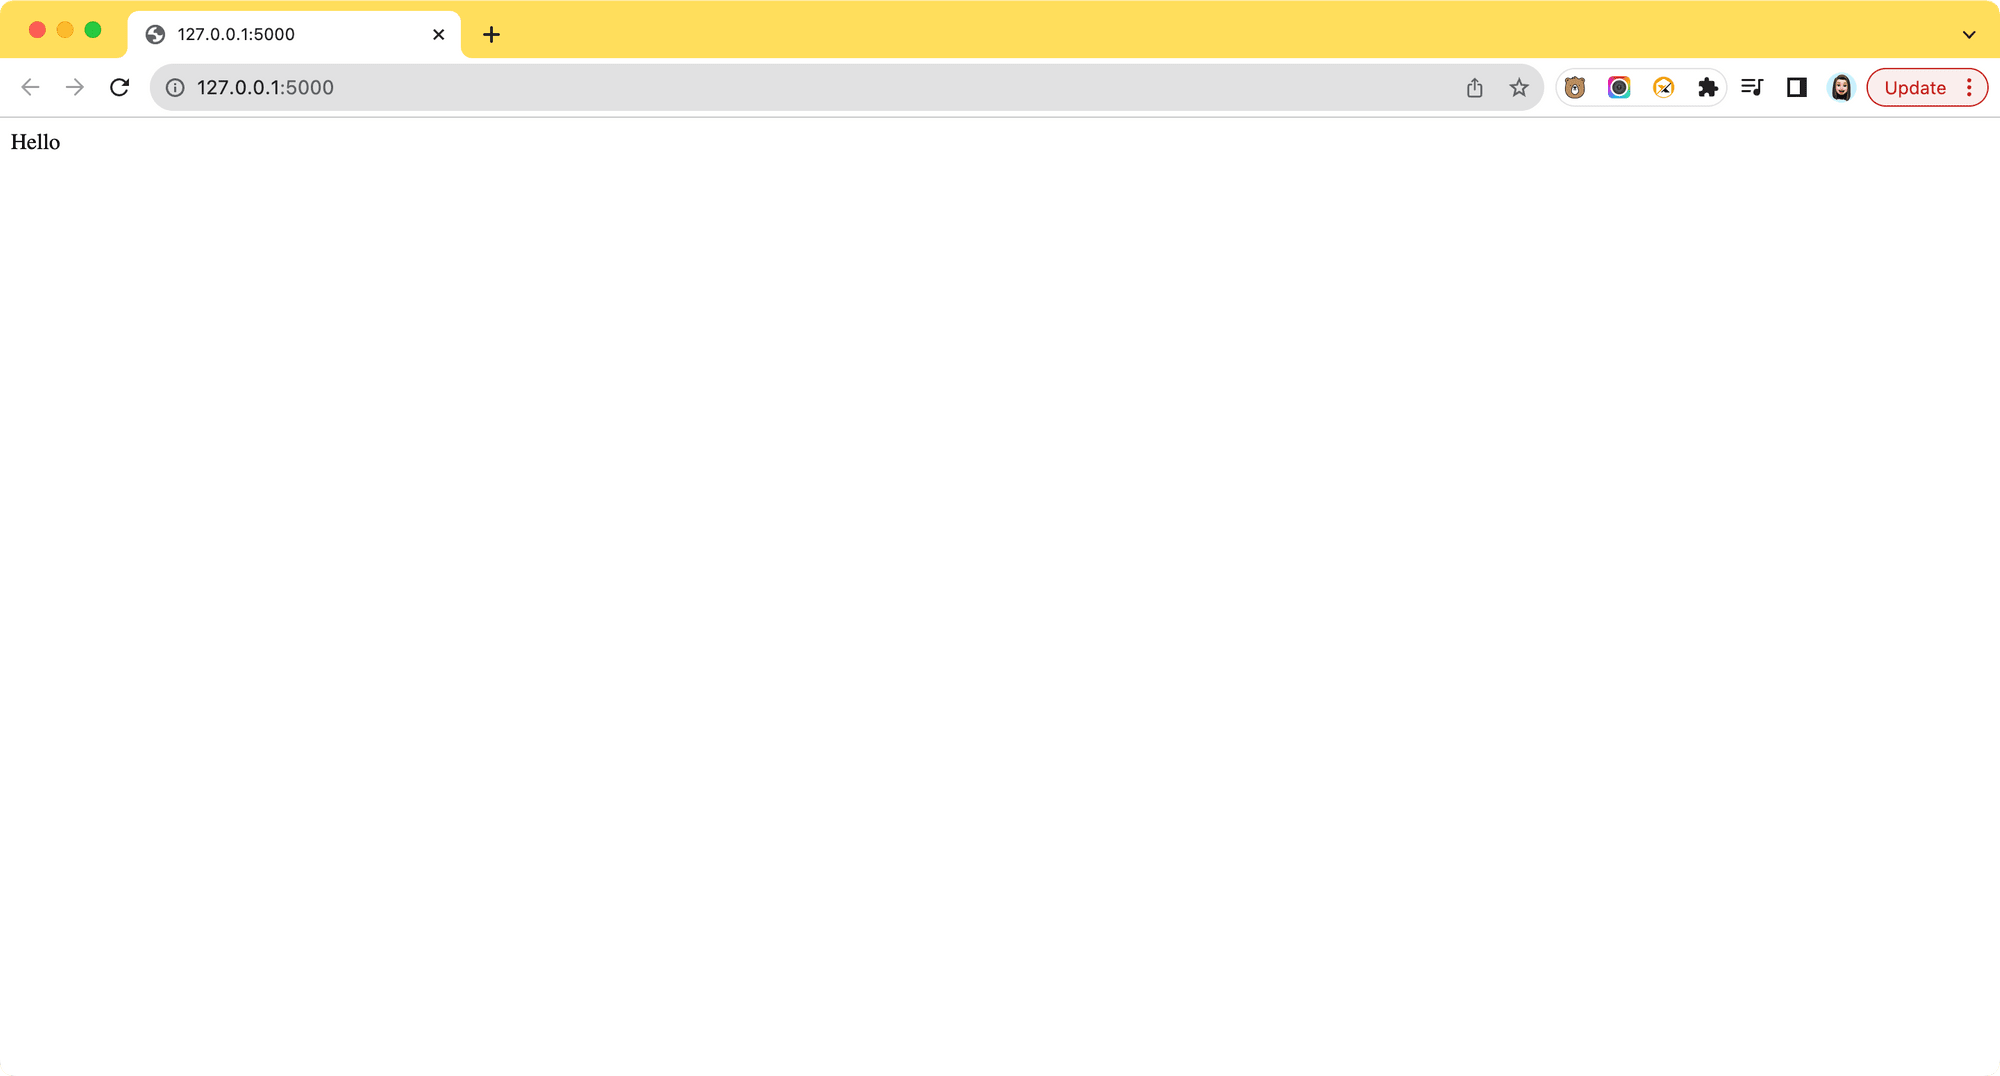
When you run the script with the command python main.py ( or python3 main.py ) in the terminal/command line, the application will run on your localhost and return the string “Hello”:
🐻 Bear Tips: You can also specify the route’s HTTP method explicitly in the
@app.route()decorator (eg.@app.route("/users", methods=['GET'])).
Step 2. Create API Endpoints
Before we create API endpoints to retrieve and add data, create an array named users to simulate data from a database:
from flask import *

...

users = [{'id': 1, 'name': 'Jo'}, {'id': 2, 'name': 'Jane'}]

...

if __name__ == " __main__":
    app.run()
Next, we'll create a few endpoints that can be accessed using the GET and POST methods…
GET Request
Add a route named /users and specify that it can be accessed using the GET method. When a GET request is made to this endpoint, it will return a response containing all users from the users array.
from flask import *

...

users = [{'id': 1, 'name': 'Jo'}, {'id': 2, 'name': 'Jane'}]

@app.route("/users", methods=['GET'])
def get_all_users():
    return jsonify(users), 200

...

if __name__ == " __main__":
    app.run()
GET Request with a Parameter/Path Parameter
You can query specific data using a parameter or path parameter. For example, if you want to retrieve information about a particular user, you can pass their user ID as a path parameter in the request URL.
The code below checks whether the user ID is valid and returns the user associated with that ID. Otherwise, it will return an error message with the 400 status code.
from flask import *

...

@app.route("/users/<user_id>", methods=['GET'])
def get_user(user_id):

    if (user_id.isnumeric()):
        print(users, user_id)
        result = next((obj for obj in users if obj["id"] == int(user_id)), None)
        print(result)
        return jsonify(result), 200
    else:
        return jsonify({'error': 'user_id is invalid'}), 400

...

if __name__ == " __main__":
    app.run()
POST Request
To add new data, create a new route that can be accessed using the POST method. Add the code below to your main.py file:
from flask import *

...

@app.route('/users', methods=['POST'])
def create_user():
    if not request.json or 'name' not in request.json:
        return jsonify({'error': 'Invalid data'}), 400

    user = {
        'id': users[-1]['id'] + 1 if users else 1,
        'name': request.json['name'],
    }
    users.append(user)
    return jsonify(users), 201

...

if __name__ == " __main__":
    app.run()
Although there is an existing /users endpoint, you can use multiple HTTP methods on the same endpoint to perform different operations, such as GET, POST, DELETE, etc.
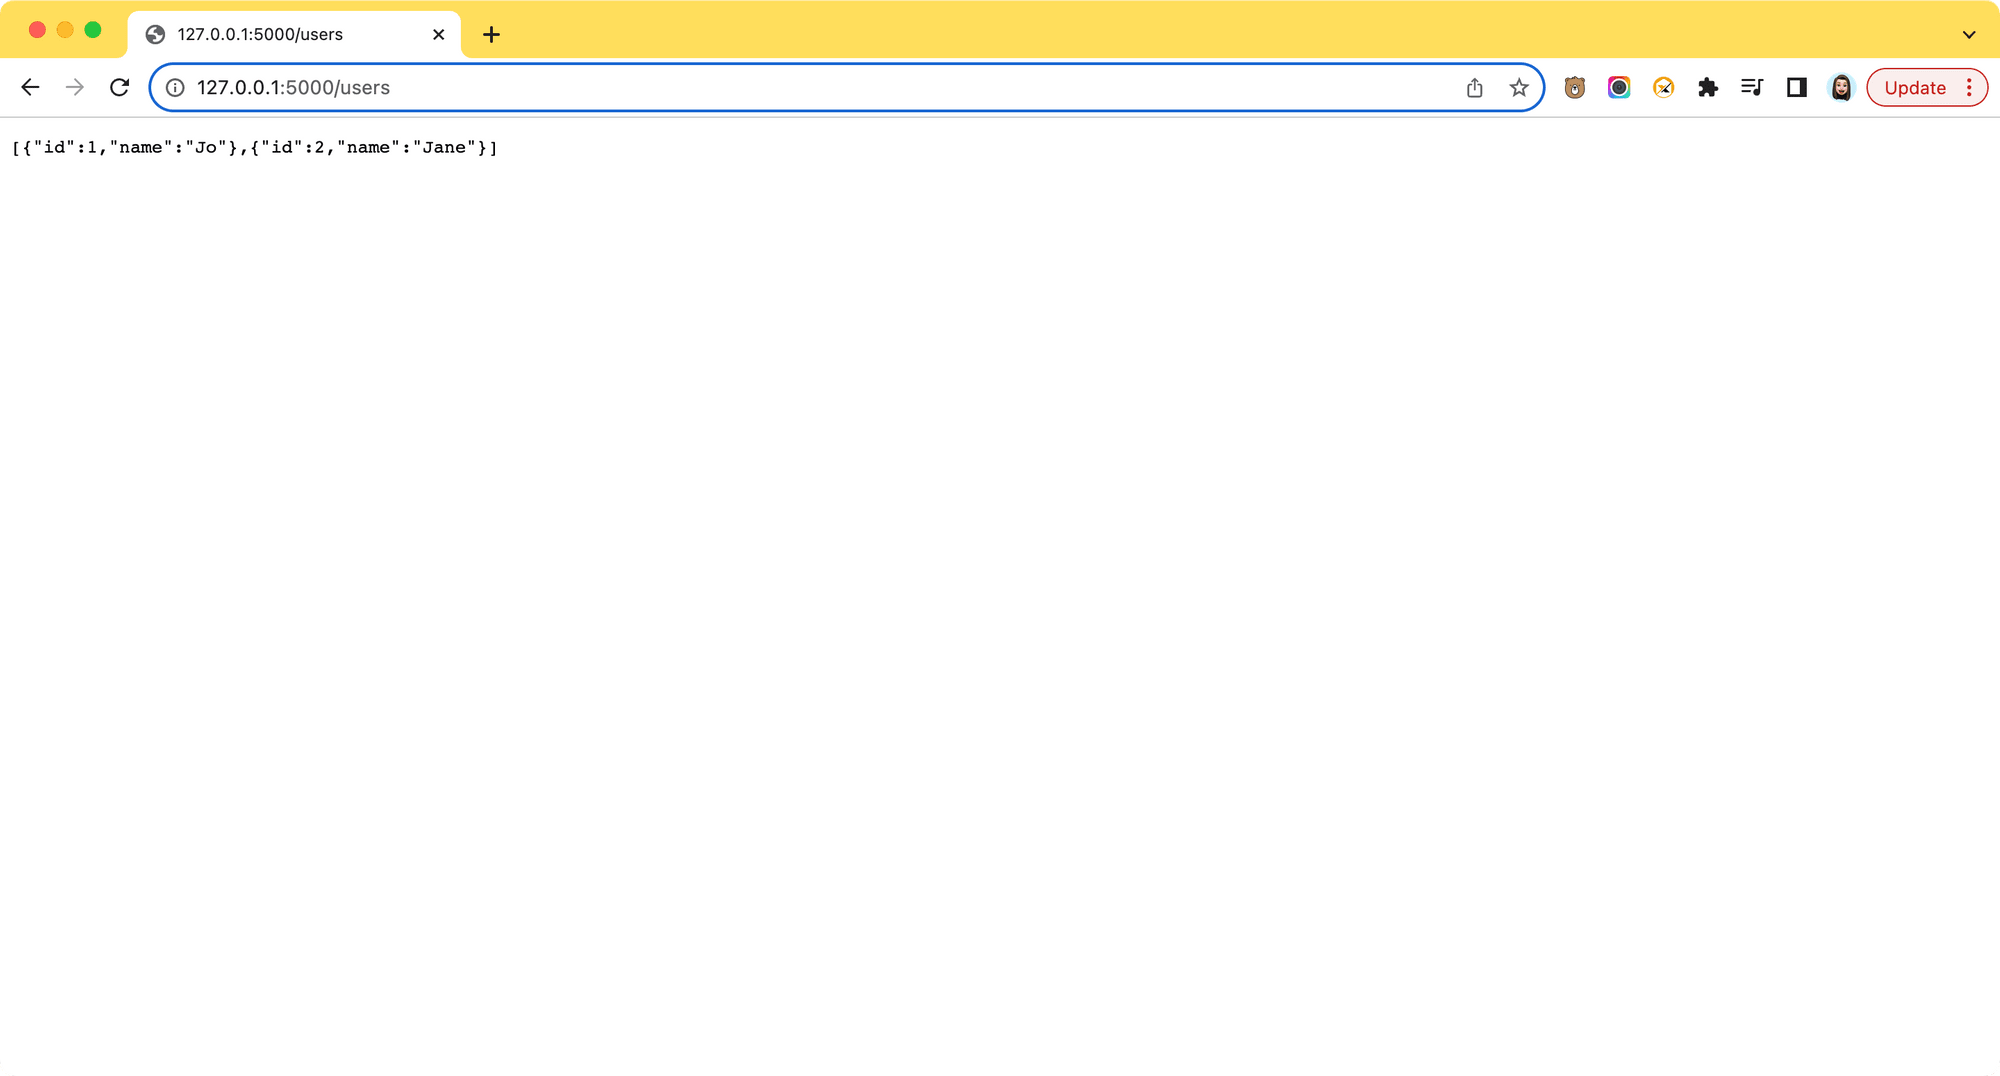
Step 3. Test API Endpoints
After creating the API endpoints, we need to verify that they are functioning. Let’s start with the GET /users endpoint. When you go to the URL in a web browser, it should return the users array:
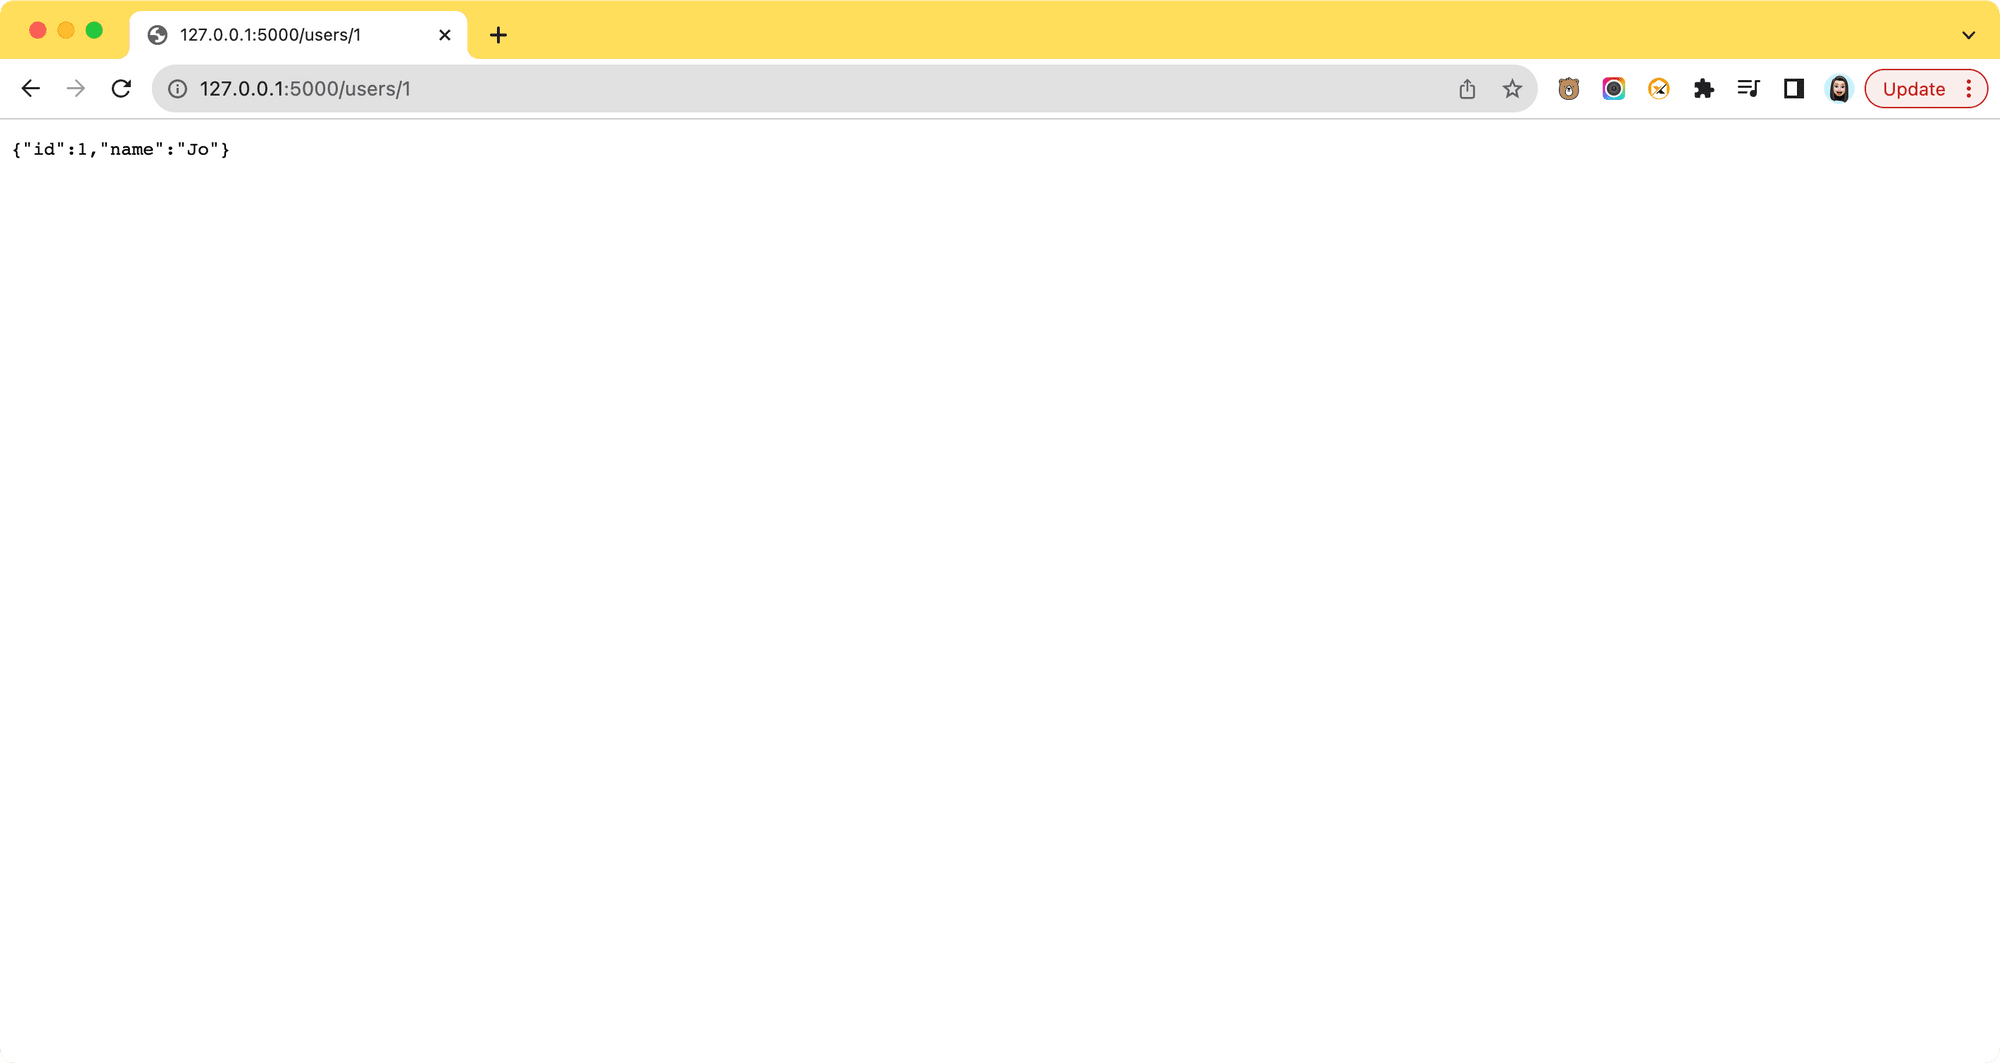
Next, we want to test whether we can use a path parameter to query a specific user from the users array. Append a user ID (eg. 1) to the end of the URL and press enter. It should return the user that is associated with the user ID:
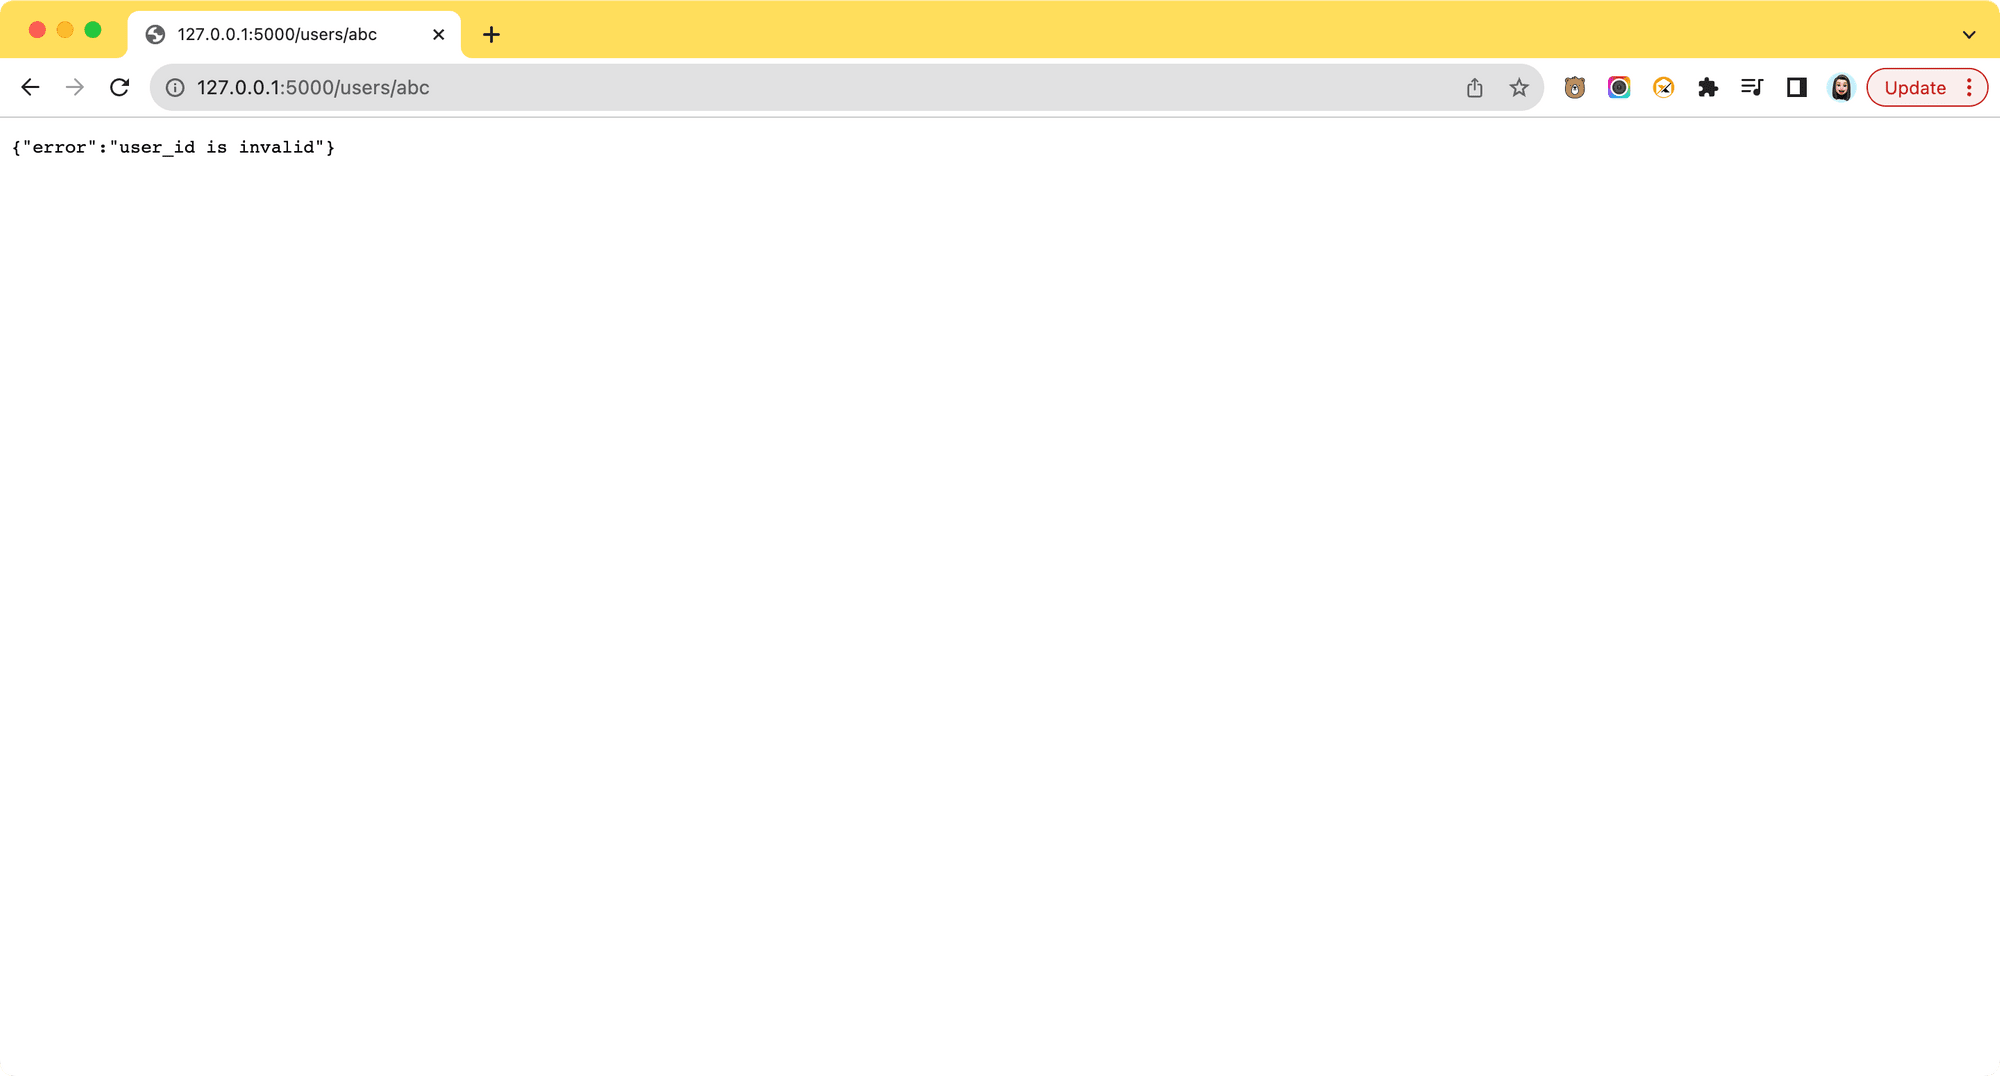
When an invalid path parameter is passed in the URL, you should see an error message:
For the POST /users endpoint, replace the IP in the command below with your localhost’s IP and run it in your terminal/command prompt:
curl -X POST -H "Content-Type: application/json" -d '{"name": "Jack"}' http://127.0.0.1:5000/users
The command above sends a POST request to the /users endpoint with a JSON object containing a new username. The new username should be added to the users array.
You can validate the result by sending another GET request to the /users endpoint:
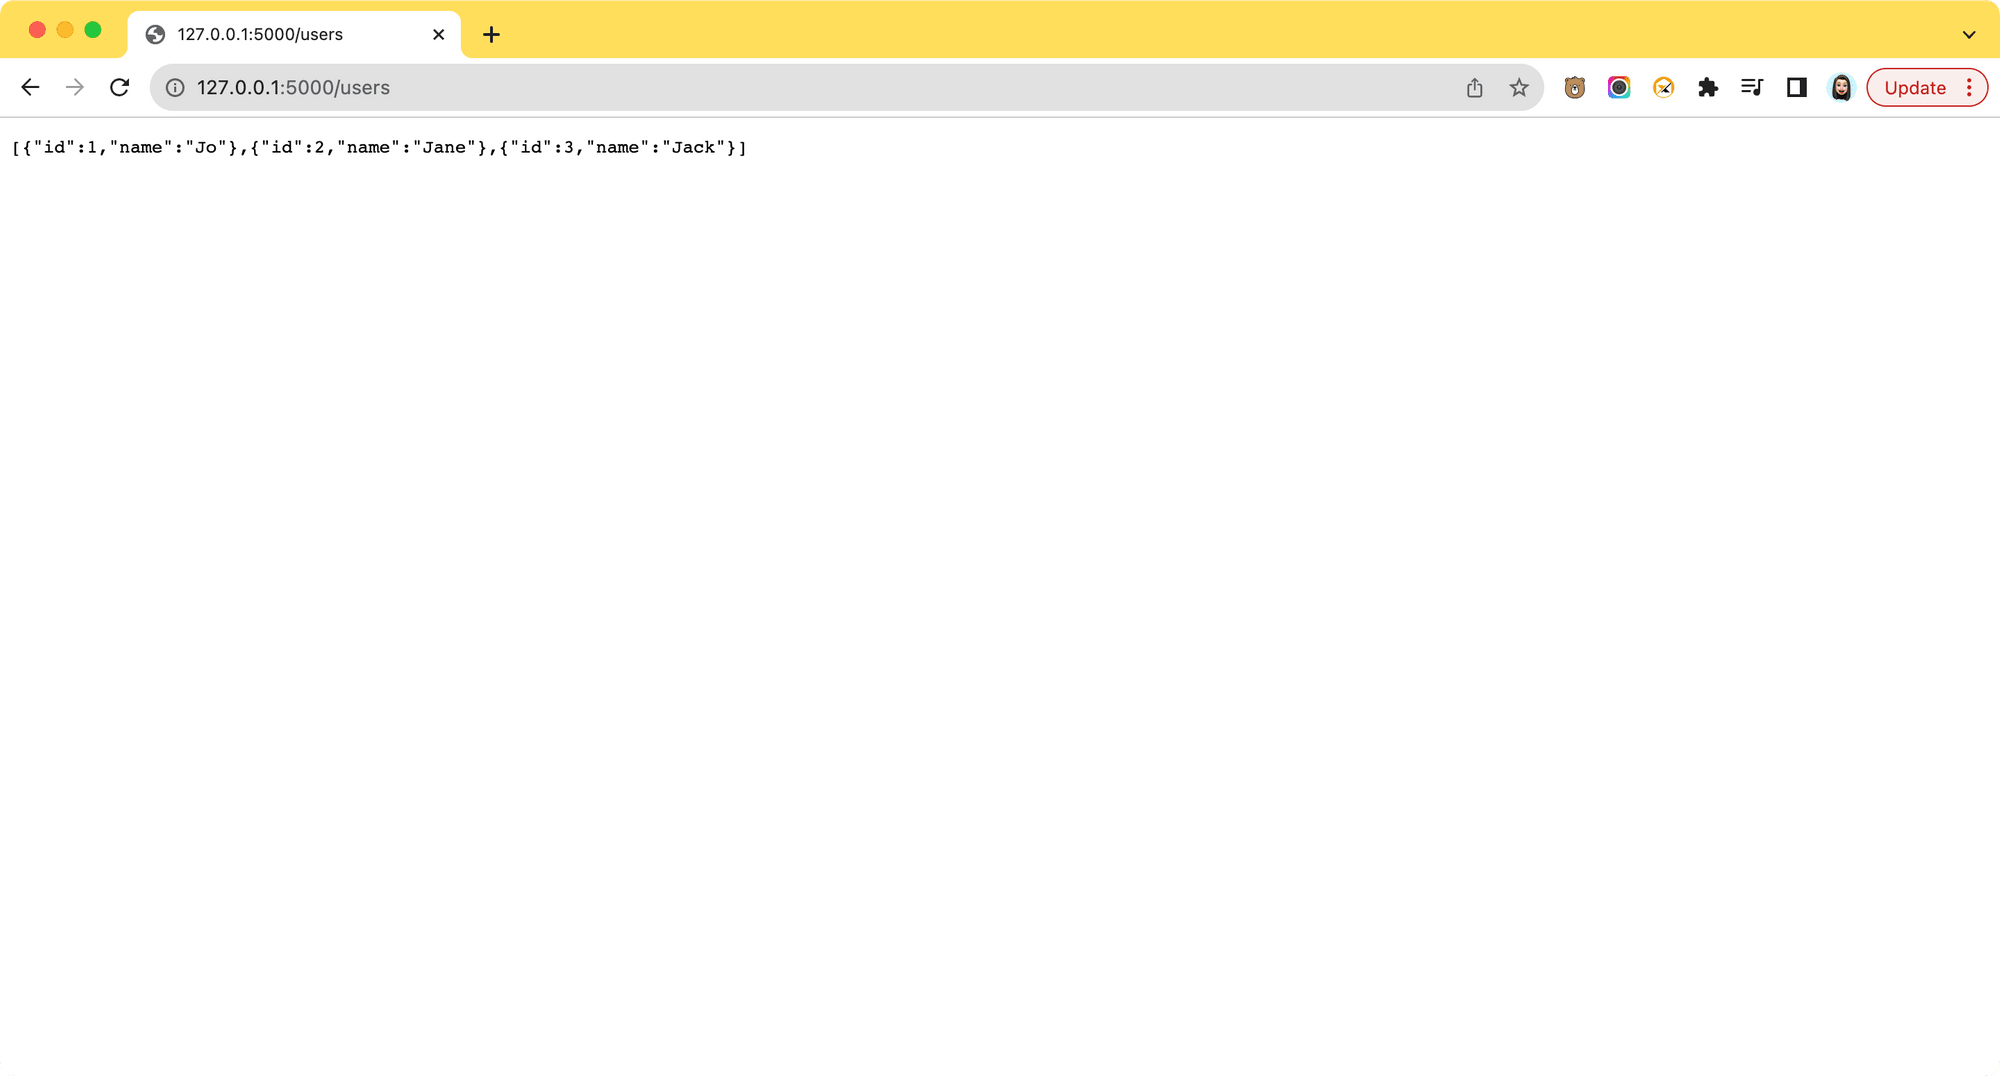
Voila, you have successfully created your first few APIs! We are using the web browser and curl in this tutorial to test the APIs due to their simplicity. When you’re developing APIs in real life, you can use API tools like Postman or Insomnia to test and interact with your APIs more efficiently. These tools provide a user-friendly interface where you can easily send requests, inspect responses, and analyze API performance.
Things to Take Note of When Creating an API
There are several important factors to consider to ensure your API's effectiveness, reliability, and usability. In this section, we will address some key aspects that you should take note of when developing an API.
Security and Access Control
When creating an API, don’t forget to implement security measures like authentication and authorization to protect the API from unauthorized access. You can implement various access control and authentication mechanisms, such as API keys, OAuth, or JSON Web Tokens (JWT) to ensure its security. This ensures that only authorized users can access certain resources and keep sensitive data secure.
Besides that, you can also add an extra layer of protection by encrypting data using encryption algorithms like RSA and implementing secure communication using HTTPS.
Documentation
Proper documentation is essential for any API to help other developers understand and use them effectively. A comprehensive API documentation typically covers the authentication and authorization method, endpoints, request and response examples, and other essential information for consuming the API (here's an example).
To make documenting easier, you can use API documentation tools like Swagger, Postman, Redocly, etc. These tools help you generate clean and interactive API documentation and make API management a breeze!
Performance and Scalabilit y
Ensuring that your API performs well and can handle increased traffic is crucial. Perform load testing and optimize your API’s performance and scalability. You can use techniques like load balancing, caching, pagination, filtering, rate limiting, etc.
You can also utilize auto-scaling in cloud environments like Azure, AWS, and Google Cloud to add more server instances automatically as traffic increases. These optimization techniques help to ensure that your API can deliver fast and responsive service even in high-traffic conditions.
Conclusion
Creating an API requires thoughtful planning and consideration of the consumers’ needs. Make sure to take important factors into consideration to ensure that it is well-designed, secure, and serves its intended purpose effectively. Last but not least, listen to your users’ feedback and continuously improve your API based on their needs and requests!