How to Auto-Generate Multilingual Images for React Apps with i18n Internationalization Using Bannerbear
Contents
English may be the most widely spoken language in the world (with around 1.5 billion people worldwide), but did you know that less than 5% of the global population are native English speakers? In a globalized market, offering multilingual content on your website or web application can give you a competitive edge as users are more likely to choose a product or service that speaks their language.
If you're part of a structured company with a team of developers, translators, and designers, creating an internationalized website or application might not seem daunting. But for indie hackers and solopreneurs, the task becomes a mountain of work. Translating content, including text on images into multiple languages can be overwhelming.
Fortunately, there's a way to make this process easier. In this article, we'll show you how to effortlessly produce images with text in multiple languages for React applications, automatically. And the secret ingredient? Bannerbear.
Following this tutorial, you will be able to create images with text in multiple languages images for your website/app automatically:
Language set to English
Language set to German
What is Internationalization (i18n)
Internationalization, also known as i18n, is the process of designing and developing applications so that they can be adapted for users of different regions and languages. That includes ensuring that they support various languages, allowing users to easily switch between locales and view content in their preferred language.
Some internationalized websites automatically detect the user's region and serve localized content, while others allow users to manually select their preferred language and region. The content served in each region can vary - it could be translated versions of the original content or completely unique content tailored specifically to that region.
To enable internationalization (i18n) in a React application, you'll need external libraries that support multiple languages and locales. One popular library for i18n in React is react-i18next, which provides a comprehensive set of tools and components for managing translations.
Pre-requisites
Before following this tutorial, make sure you have the tools below:
- npm
- React
- An AWS account (for creating S3 buckets and a Lambda function)
- A Bannerbear account (for creating a template to generate images automatically)
Creating a Bannerbear Template
Bannerbear helps you generate custom images and videos automatically using API. These media files can be created based on a template where you can add static and dynamic objects such as images, text, and shapes. By calling the Bannerbear API with different data in the request body, the dynamic objects in the template can be modified to generate images with unique content.
Start by creating a free Bannerbear account. Then, duplicate the template below into your account:

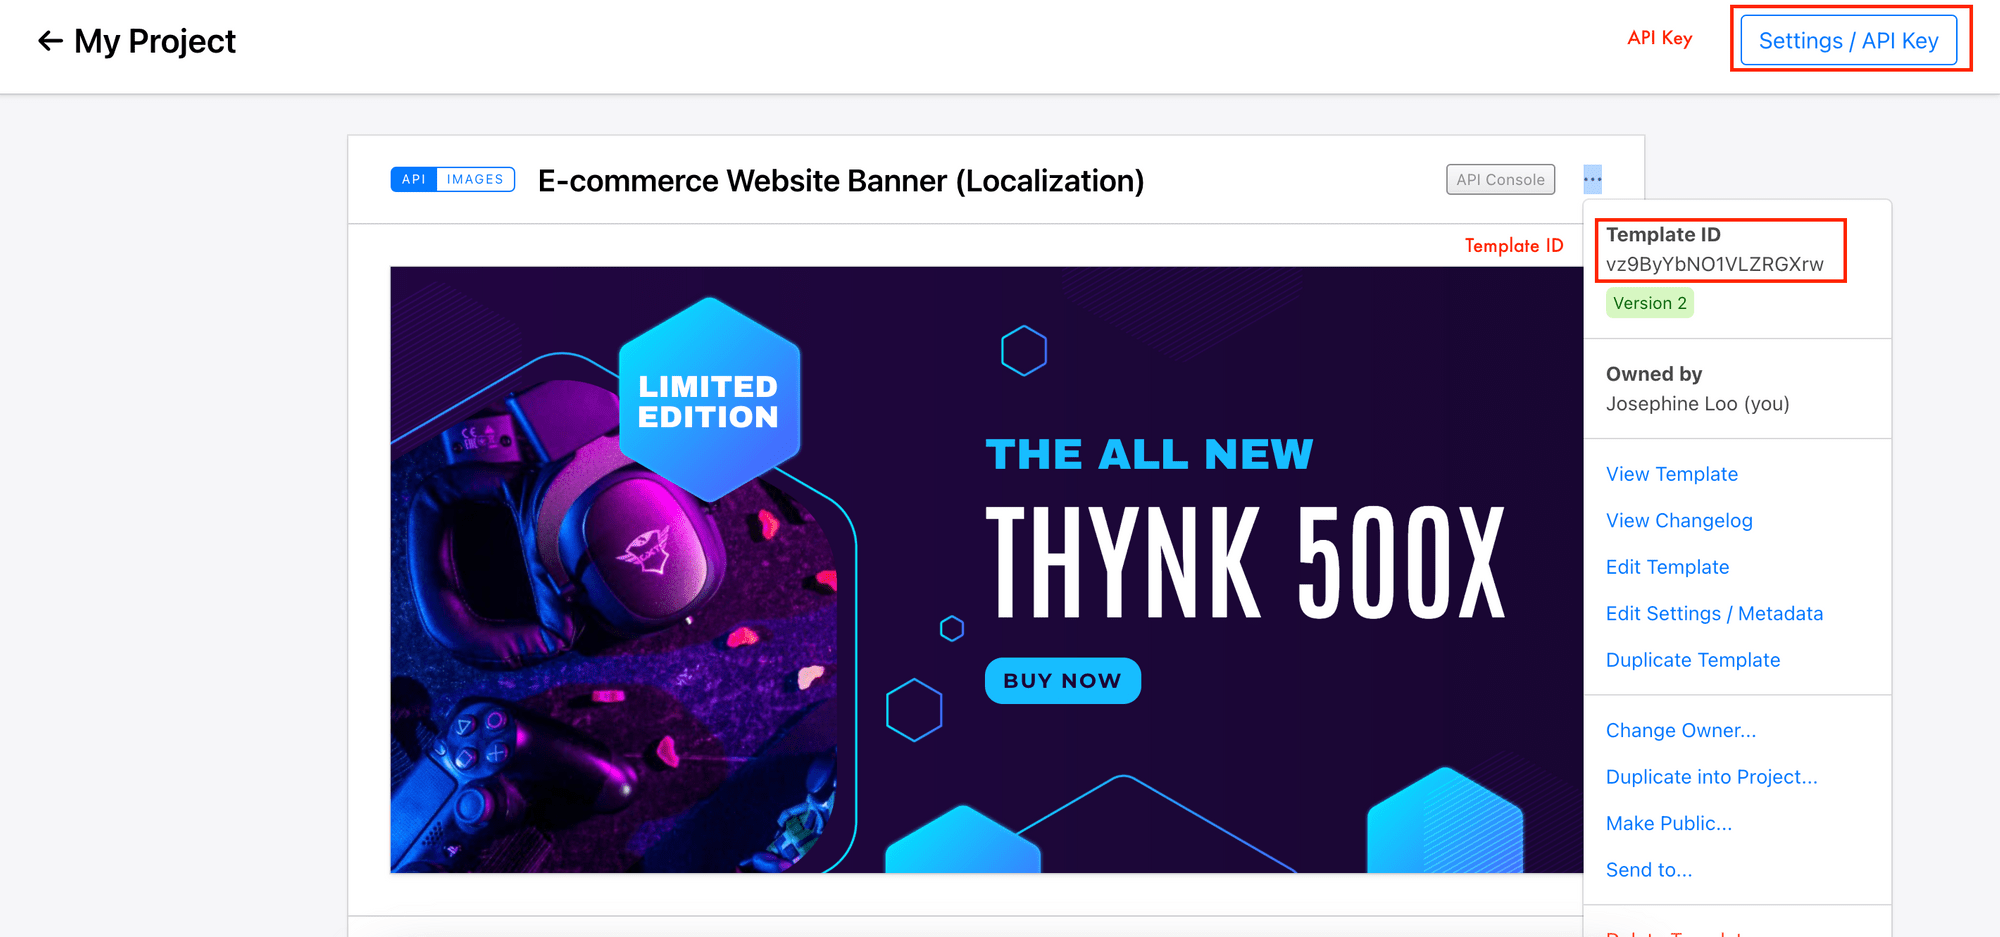
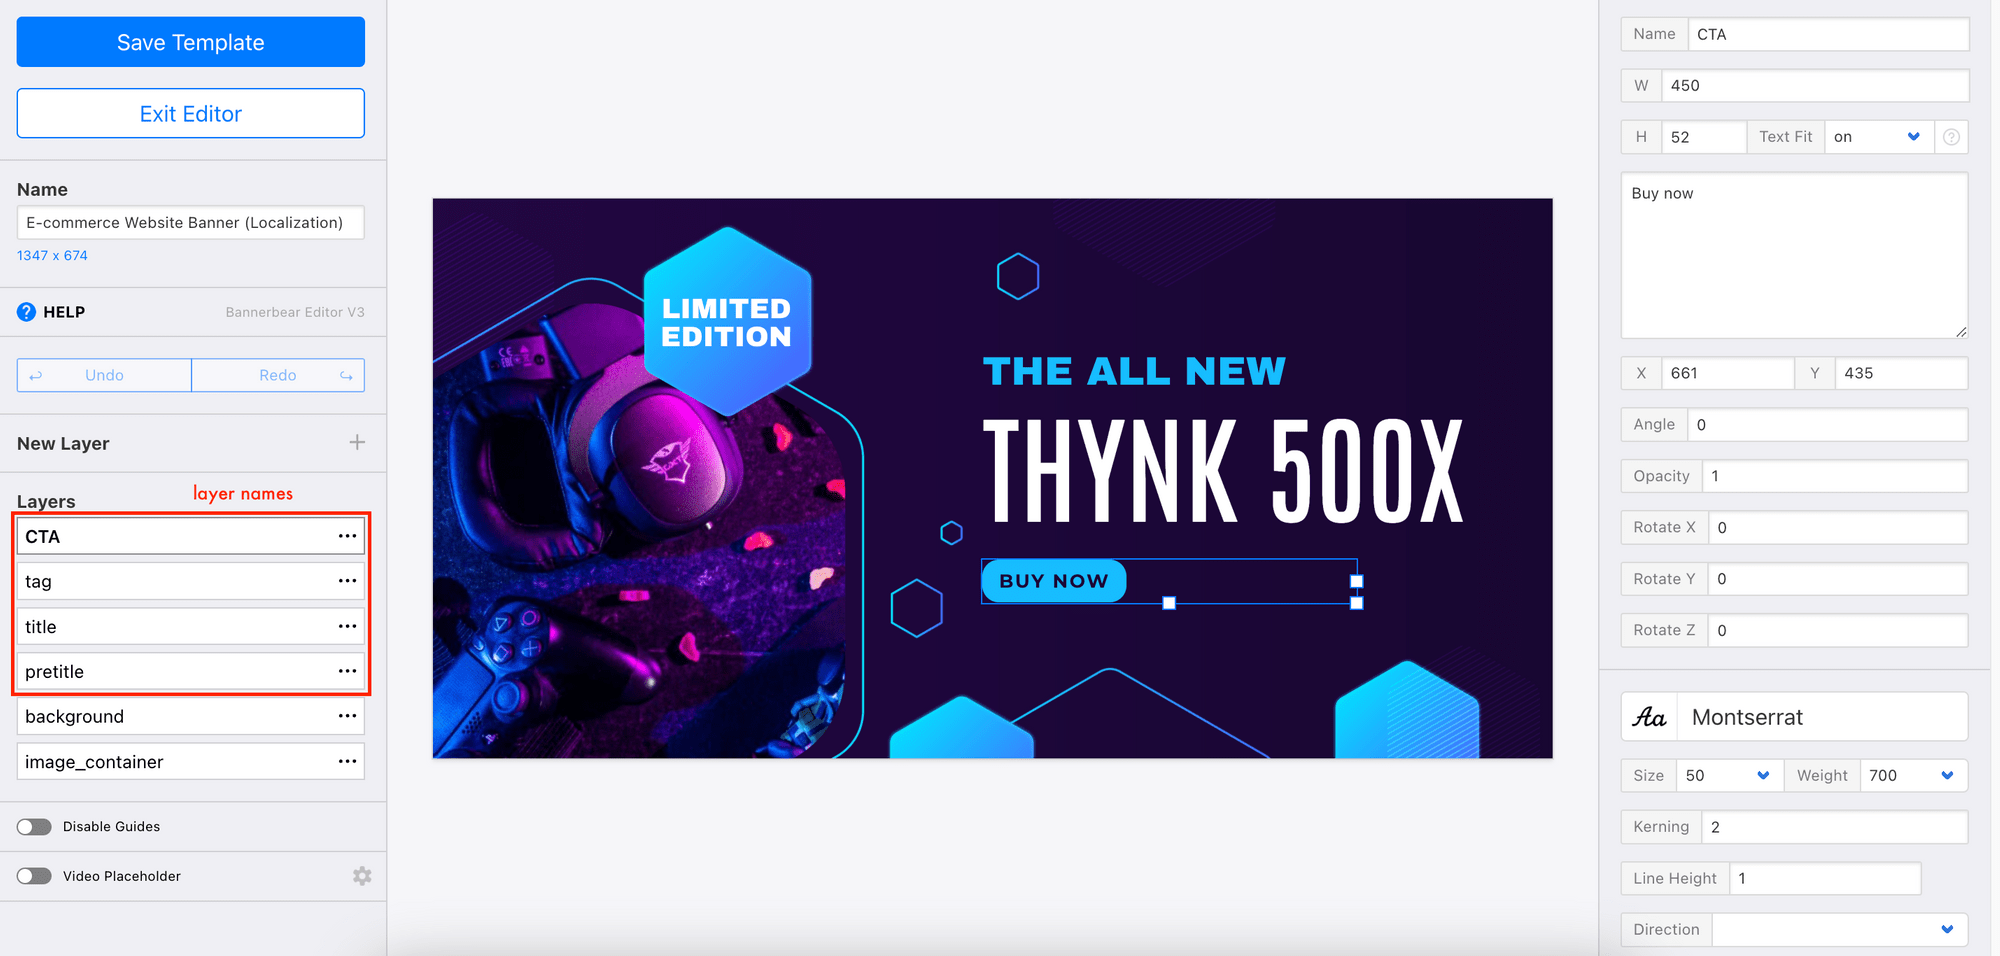
To use Bannerbear API to generate images automatically using the template above, you need the project API key, template ID, and the names of the layers in the template. Get them from your Bannerbear dashboard and template editor as shown in the screenshots below:
Next, create a JSON file with any name (eg. internationalization.json) and an object that contains the following properties:
- file_name
- api_key
- template_id
- translation
The file_name property will be used to name the output images generated by Bannerbear. You can change the property value to customize the names of the output images.
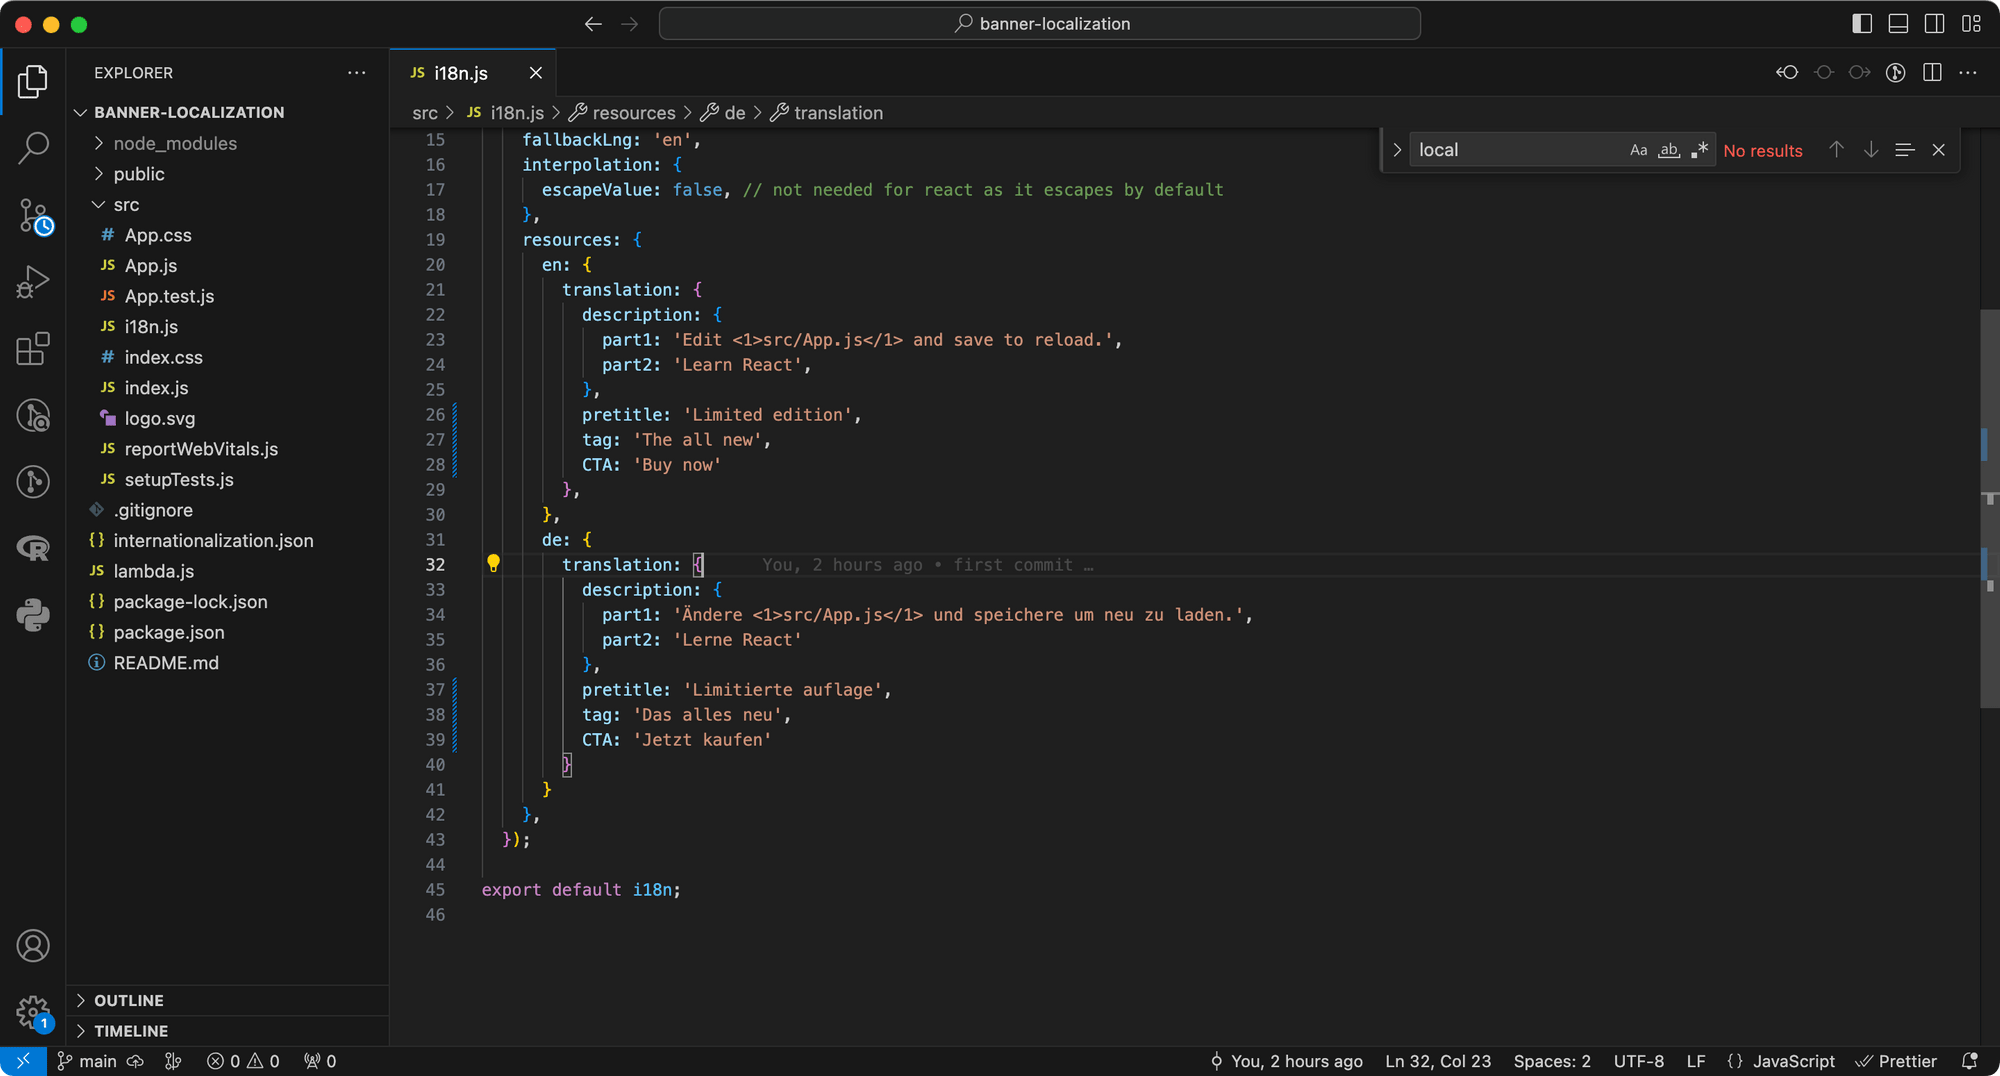
The translation property is an object that contains the names of the layers in the Bannerbear template and their values, which will be displayed as text on the output image. You need a separate object for each language. For this tutorial, we will generate images in two languages—English (en) and German (de) but you can modify it to add as many languages as you need.
Here’s an example of the JSON file's content:
{
  "file_name": "promo_banner.jpg",
  "api_key": "your_api_key",
  "template_id": "your_template_id",
  "translation": {
    "en": {
      "pretitle": "Limited edition",
      "tag": "The all new",
      "CTA": "Buy now"
    },
    "de": {
      "pretitle": "Limitierte auflage",
      "tag": "Das alles neu",
      "CTA": "Jetzt kaufen"
    }
  }
}
These values will be used in the API requests sent to Bannerbear to trigger the image generation process.
🐻 Bear Tips: Various types of design templates are available in the Template Library, including product thumbnails, Open Graph images, podcast covers, and more.
Creating AWS S3 Buckets
Note: All S3 buckets and Lambda functions in this project need to be created in the same region (eg. ap-southeast-1). Otherwise, you will run into errors.
We need two AWS S3 Buckets for this project:
- banner-i18n (private) - to store the JSON file in the previous section
- banner-i18n-output (public) - to store the output images generated by Bannerbear
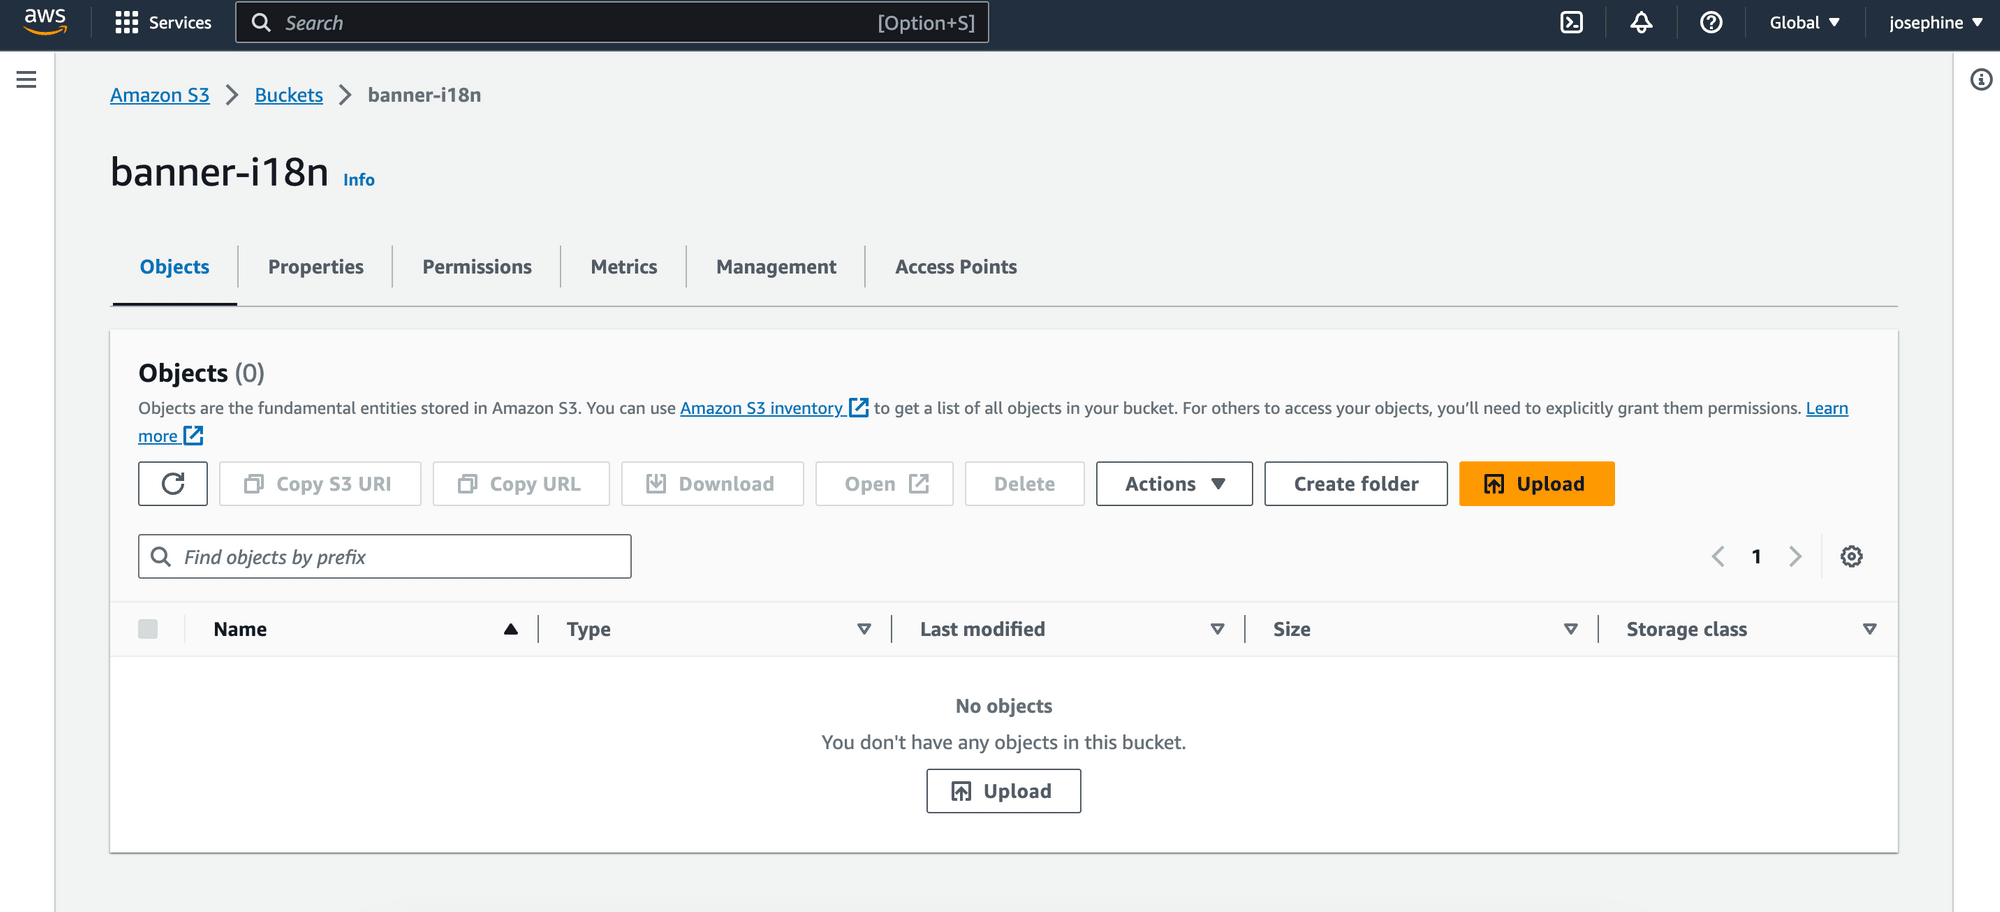
First, create a private S3 bucket named “banner-i18n” for storing the JSON file following the official guide.
Follow the steps in Create a permissions policy and Create an execution role too so that the Lambda function that we are going to create in the next step will be able to access the S3 bucket and its objects.
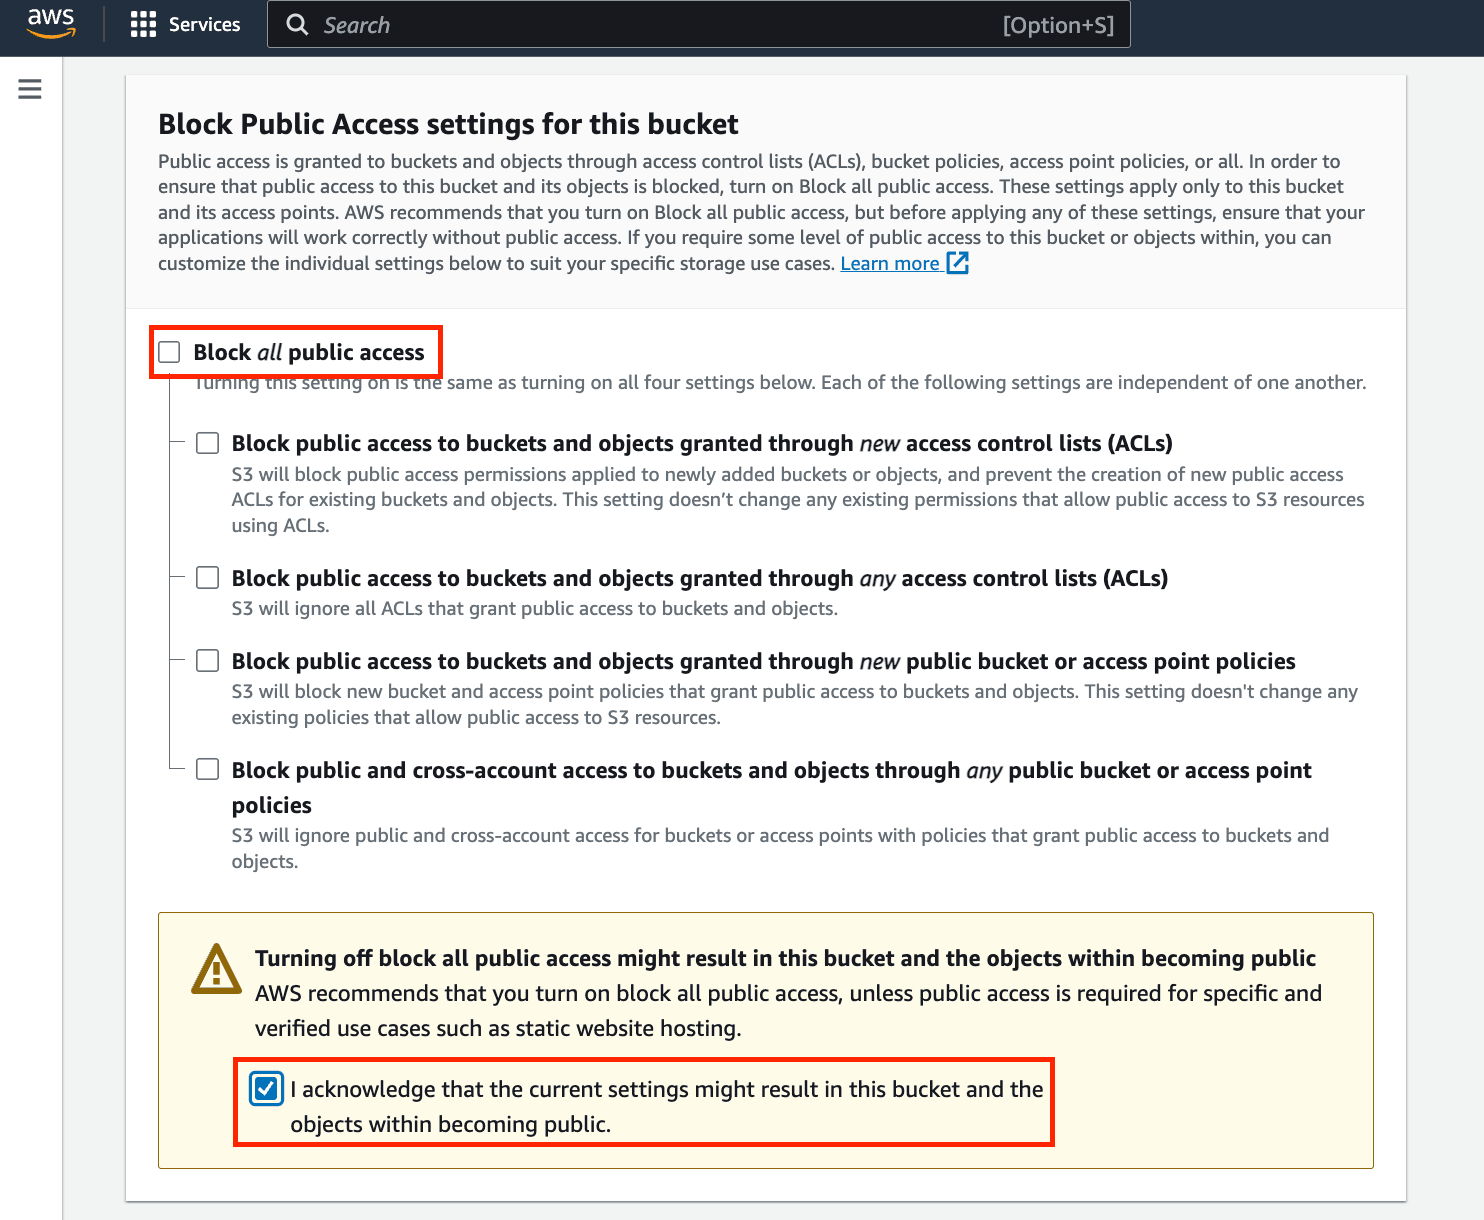
Next, create another S3 bucket named “banner-i18n-output” for storing the output images generated using Bannerbear. For this bucket, untick the “Block public access” box and confirm the action by checking the warning tickbox:
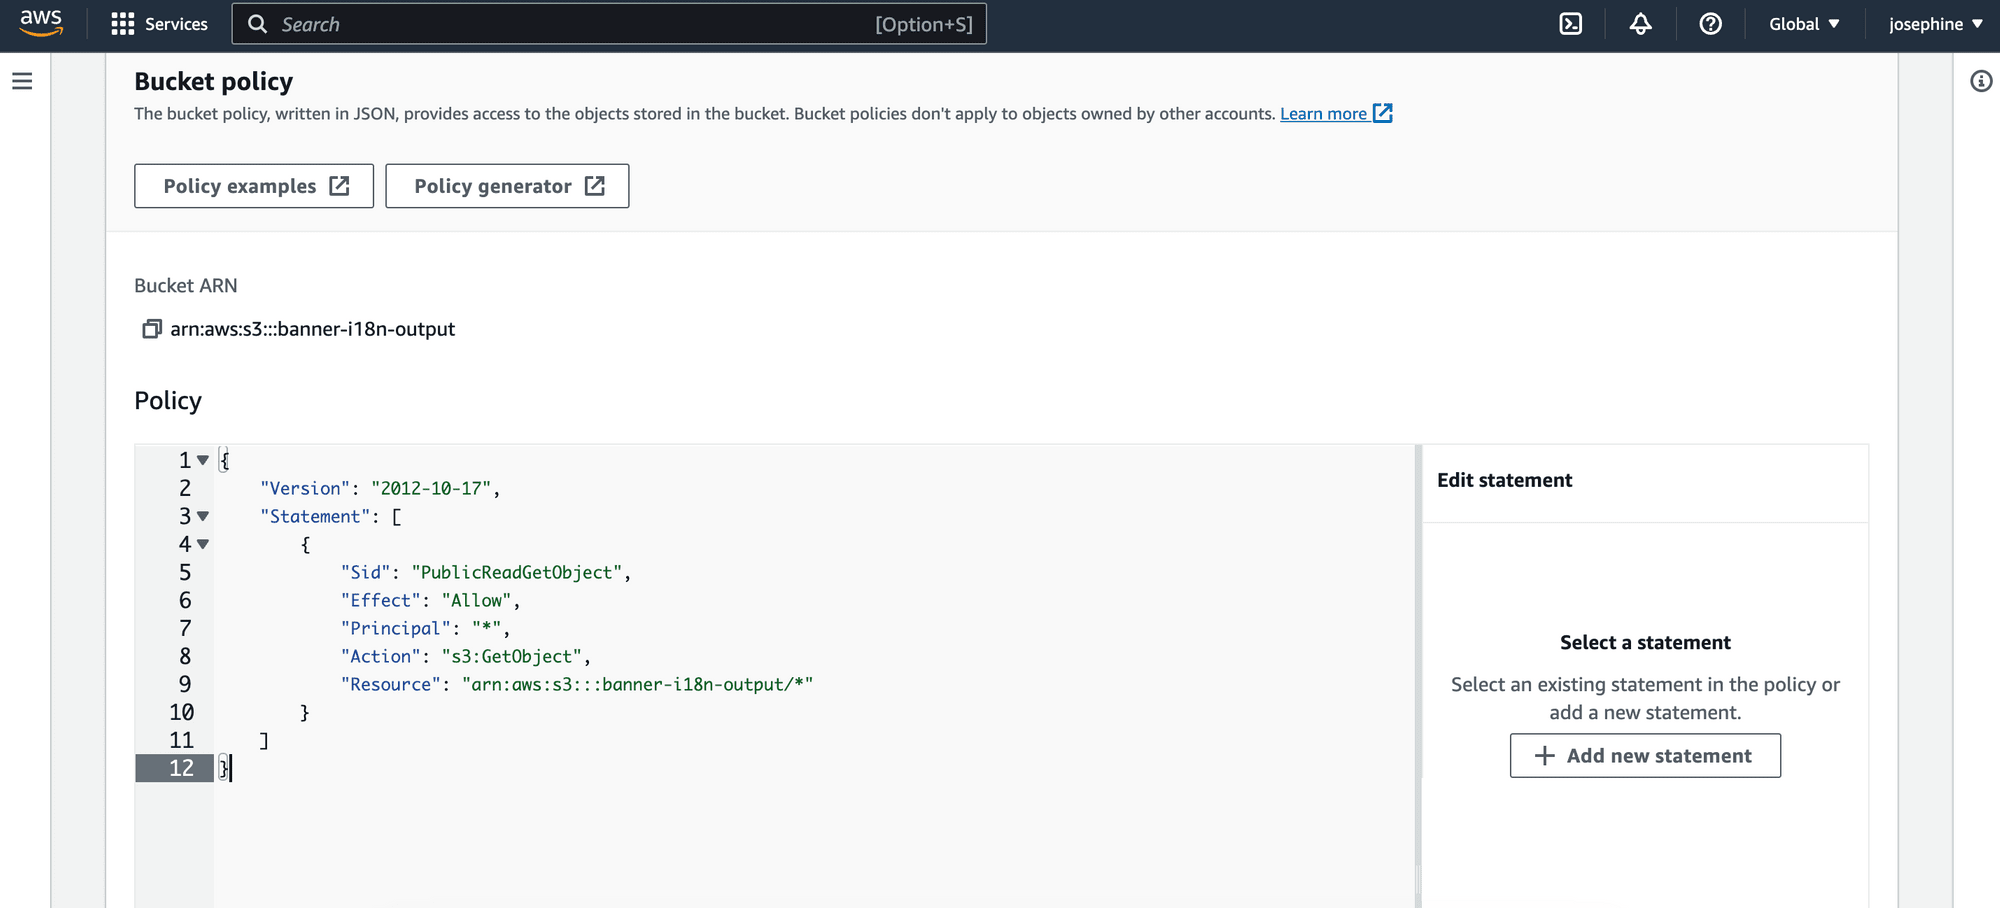
After creating the bucket, click on it and find “Bucket Policy” under the “Permissions” tab. Click “Edit” and add the config below to allow public reading access for the objects in the bucket:
{
	"Version": "2012-10-17",
	"Statement": [
		{
			"Sid": "PublicReadGetObject",
			"Effect": "Allow",
			"Principal": "*",
			"Action": "s3:GetObject",
			"Resource": "arn:aws:s3:::banner-i18n-output/*"
		}
	]
}
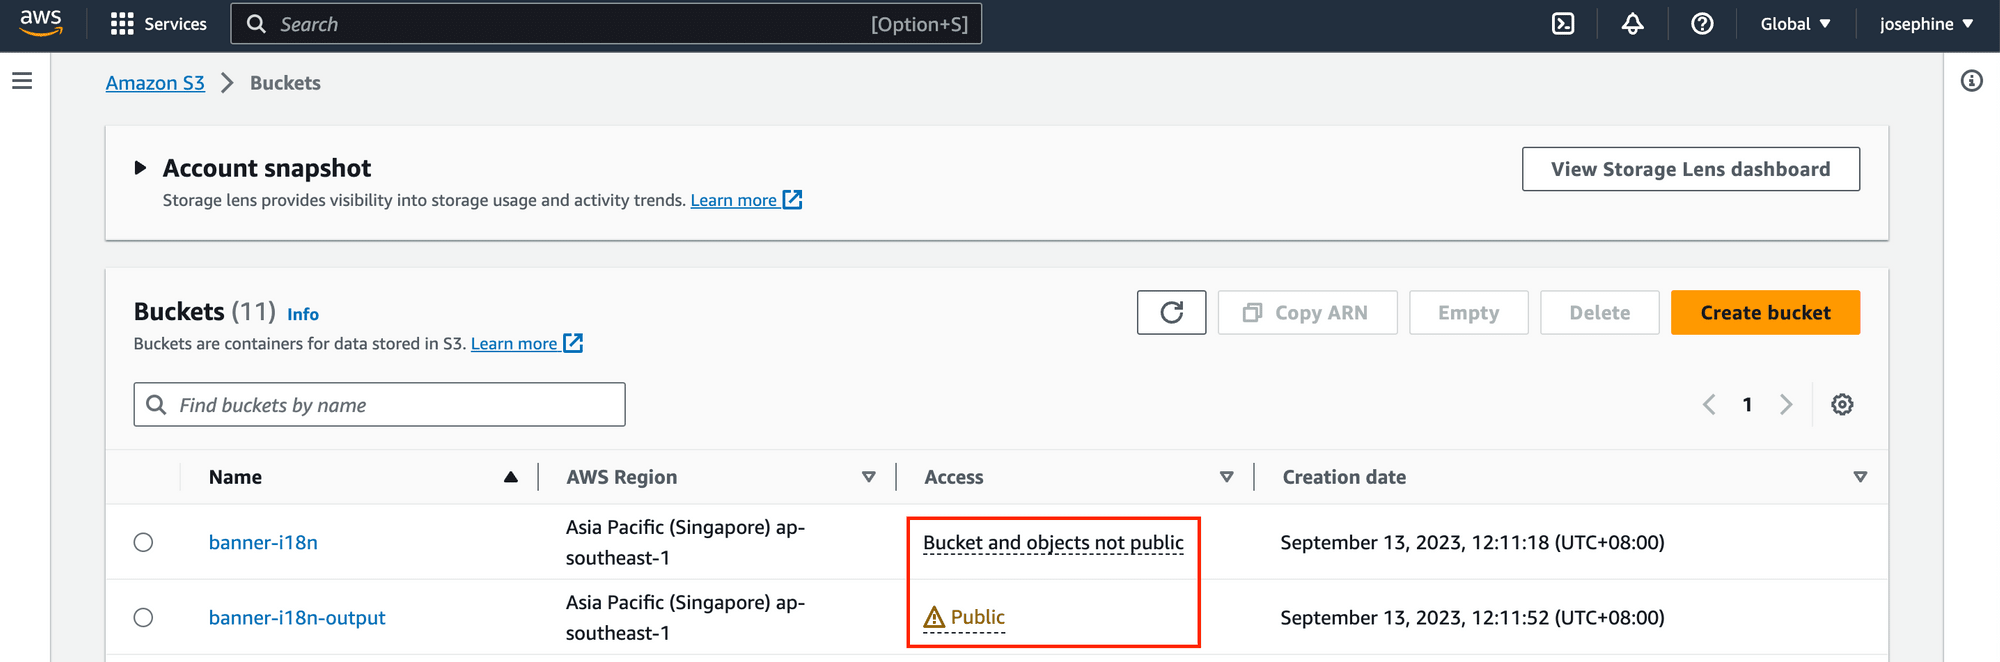
The first bucket (banner-_i18n)_ should be private and the second one (banner-_i18n-output)_ should be public:
Creating an AWS Lambda Function
We will deploy a Lambda function to listen to the object creation event in the first S3 bucket and send a POST request to Bannerbear to trigger the image generation process automatically. Then, the image returned in the response will be uploaded to the second S3 bucket (banner-_i18n-output)_ using AWS SDK.
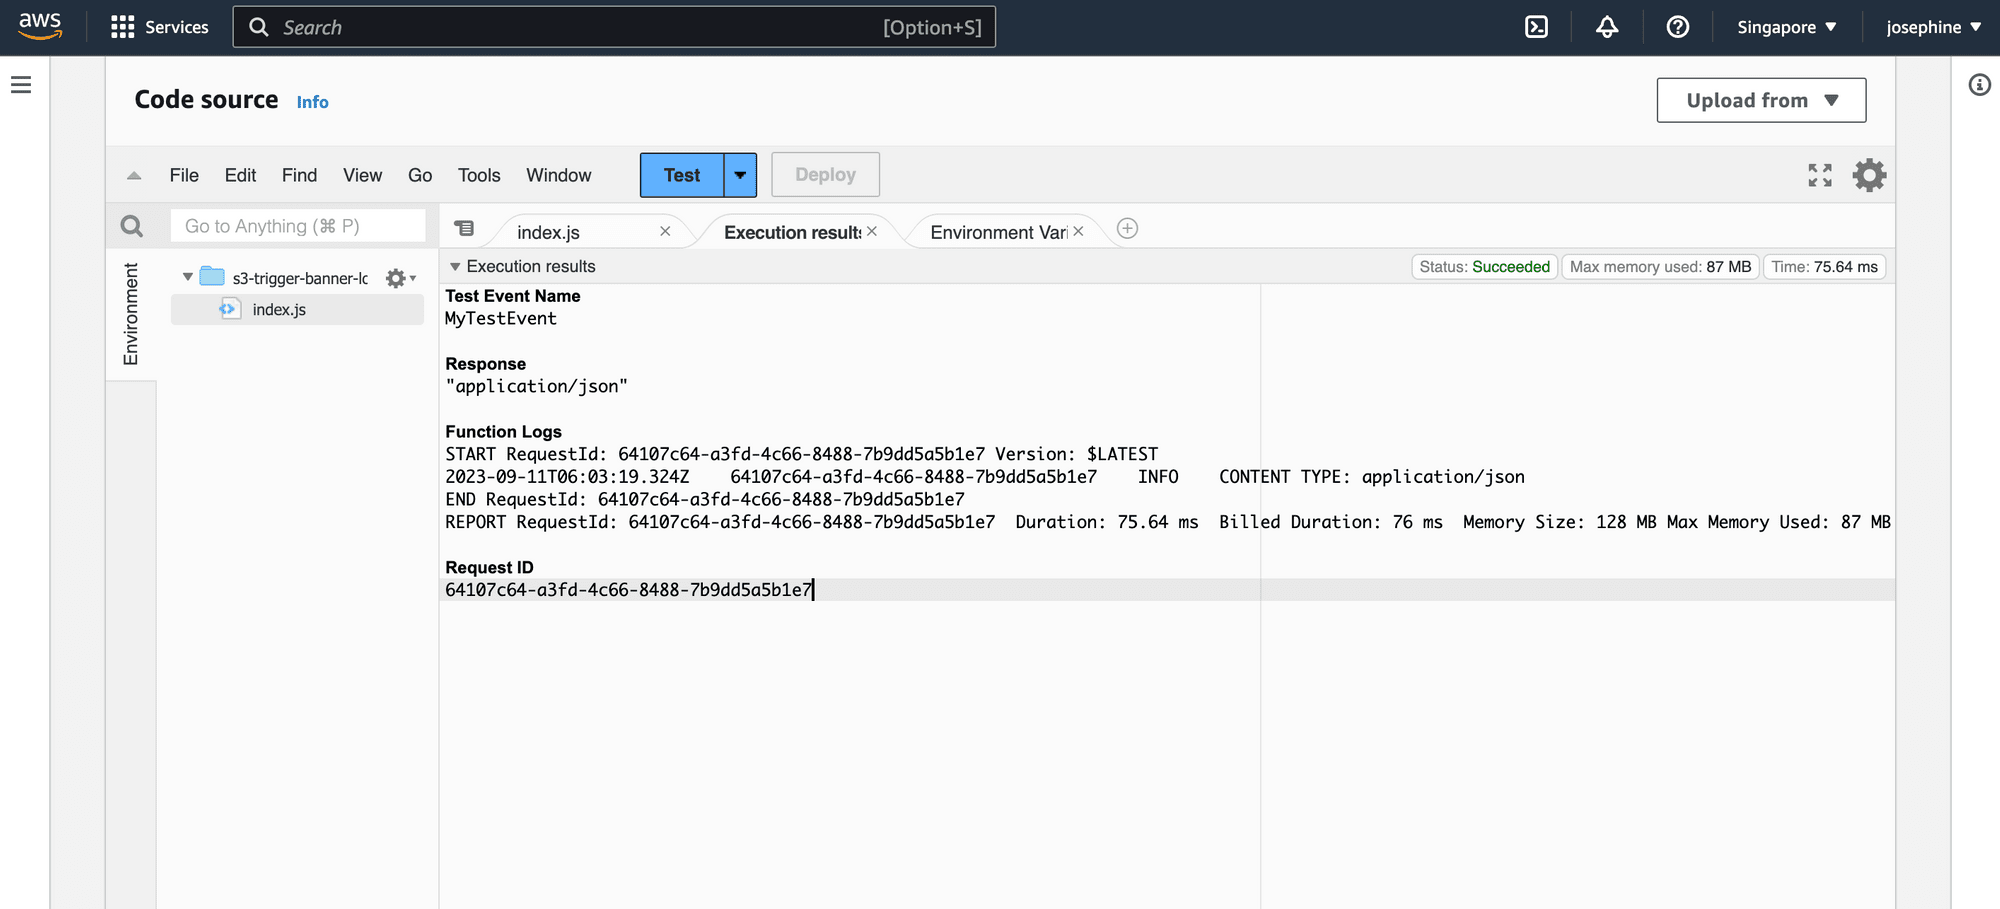
Follow the steps from Create the Lambda function to Create the Amazon S3 trigger in the official guide to create a new Lambda function in Node.js 16.x runtime. After completing the steps, CONTENT TYPE: <content_type> should be printed in the log when a new object is added to the S3 bucket.
Let’s modify the code to send POST requests to Bannerbear to generate images in different languages according to the data in the JSON file.
First, import the https module for making HTTP requests:
const https = require('https');
Then, modify the code to trigger the next actions only if a JSON file is uploaded to the "banner-i18n" bucket. We will read the file and pass the JSON object to the generateImage() function to generate images with Bannerbear:
exports.handler = async (event, context) => {
		...
    try {
        const { ContentType } = await s3.headObject(params).promise();
        console.log('CONTENT TYPE:', ContentType);

        if (bucket === 'banner-i18n' && ContentType === "application/json") {

            // generate image with Bannerbear
            const response = await s3.getObject(params).promise();
            const jsonObj = JSON.parse(response.Body.toString('utf-8'))
            const internationalizedImg = await generateImage(jsonObj);
            console.log(internationalizedImg);

        }

        return ContentType;
    } catch (err) {
					...
    }
};
In the generateImage() function, the POST request data will be prepared using the API key, template ID, and variables contained in the JSON object. For every language in the JSON object, a POST request will be sent to https://api.bannerbear.com/v2/images to generate images with translations in that language.
async function generateImage(jsonObj) {

    var imgObj = [];
    const fileName = jsonObj.file_name;

    for (const lang in jsonObj.translation) {

        const data = {
            "template" : jsonObj.template_id,
            "modifications" : []
        }

        // prepare data
        for (const vrb in jsonObj.translation[lang]) {
            data.modifications.push({
                "name": vrb,
                "text": jsonObj.translation[lang][vrb]
            })
        }

        const postData = JSON.stringify(data);
        const options = {
            protocol: 'https:',
            hostname: 'sync.api.bannerbear.com',
            port: 443,
            method: 'POST',
            path: '/v2/images',
            headers: {
            'Content-Type': 'application/json',
            'Authorization': `Bearer ${jsonObj.api_key}`
            }
        };
        var res = await makeHttpPostRequest(options, postData);
        var imgUrl = res.image_url_jpg;

        imgObj.push({
            "lang": lang,
            "img_url": imgUrl,
            "file_name": `${fileName.split('.')[0]}-${lang}.${fileName.split('.')[1]}`
        })
    }
    return imgObj;
}

function makeHttpPostRequest(options, postData) {

    return new Promise((resolve, reject) => {
        const req = https.request(options, res => {
          var rawData = '';

          res.on('data', chunk => {
            rawData += chunk;
          });

          res.on('end', () => {
            try {
              resolve(JSON.parse(rawData));
            } catch (err) {
              reject(new Error(err));
            }
          });
        });

        req.on('error', err => {
          reject(new Error(err));
        });

        req.write(JSON.stringify(postData));
        req.end();
    });
}
Next, upload the images generated to the second S3 bucket (banner-i18n-output):
exports.handler = async (event, context) => {
		...
    try {
        ...
        if (bucket === 'banner-i18n' && ContentType === "application/json") {
            ...
            // upload to the "banner-i18n-output" folder
            await uploadImg(internationalizedImg);
        }

        return ContentType;
    } catch (err) {
					...

};

async function uploadImg(internationalizedImg) {

    for (const index in internationalizedImg) {
        const imageBuffer = await makeHttpGetRequest(internationalizedImg[index].img_url);
        const params_upload = {
            Body: imageBuffer,
            Bucket: "banner-i18n-output",
            Key: internationalizedImg[index].file_name,
            ContentType: "image/jpeg"
         };
        const upload_res = await s3.putObject(params_upload, function(err, data) {
          if (err) console.log(err, err.stack); // an error occurred
          else console.log('successful'); // successful response
         }).promise();

    }

}

function makeHttpGetRequest(url) {

  return new Promise((resolve, reject) => {
    const req = https.get(url, res => {
      var rawData = [];

      res.on('data', chunk => {
        rawData.push(chunk);
      });

      res.on('end', () => {
        try {
          resolve(Buffer.concat(rawData));
        } catch (err) {
          reject(new Error(err));
        }
      });
    });

    req.on('error', err => {
      reject(new Error(err));
    });
  });
}
Creating a Simple React App
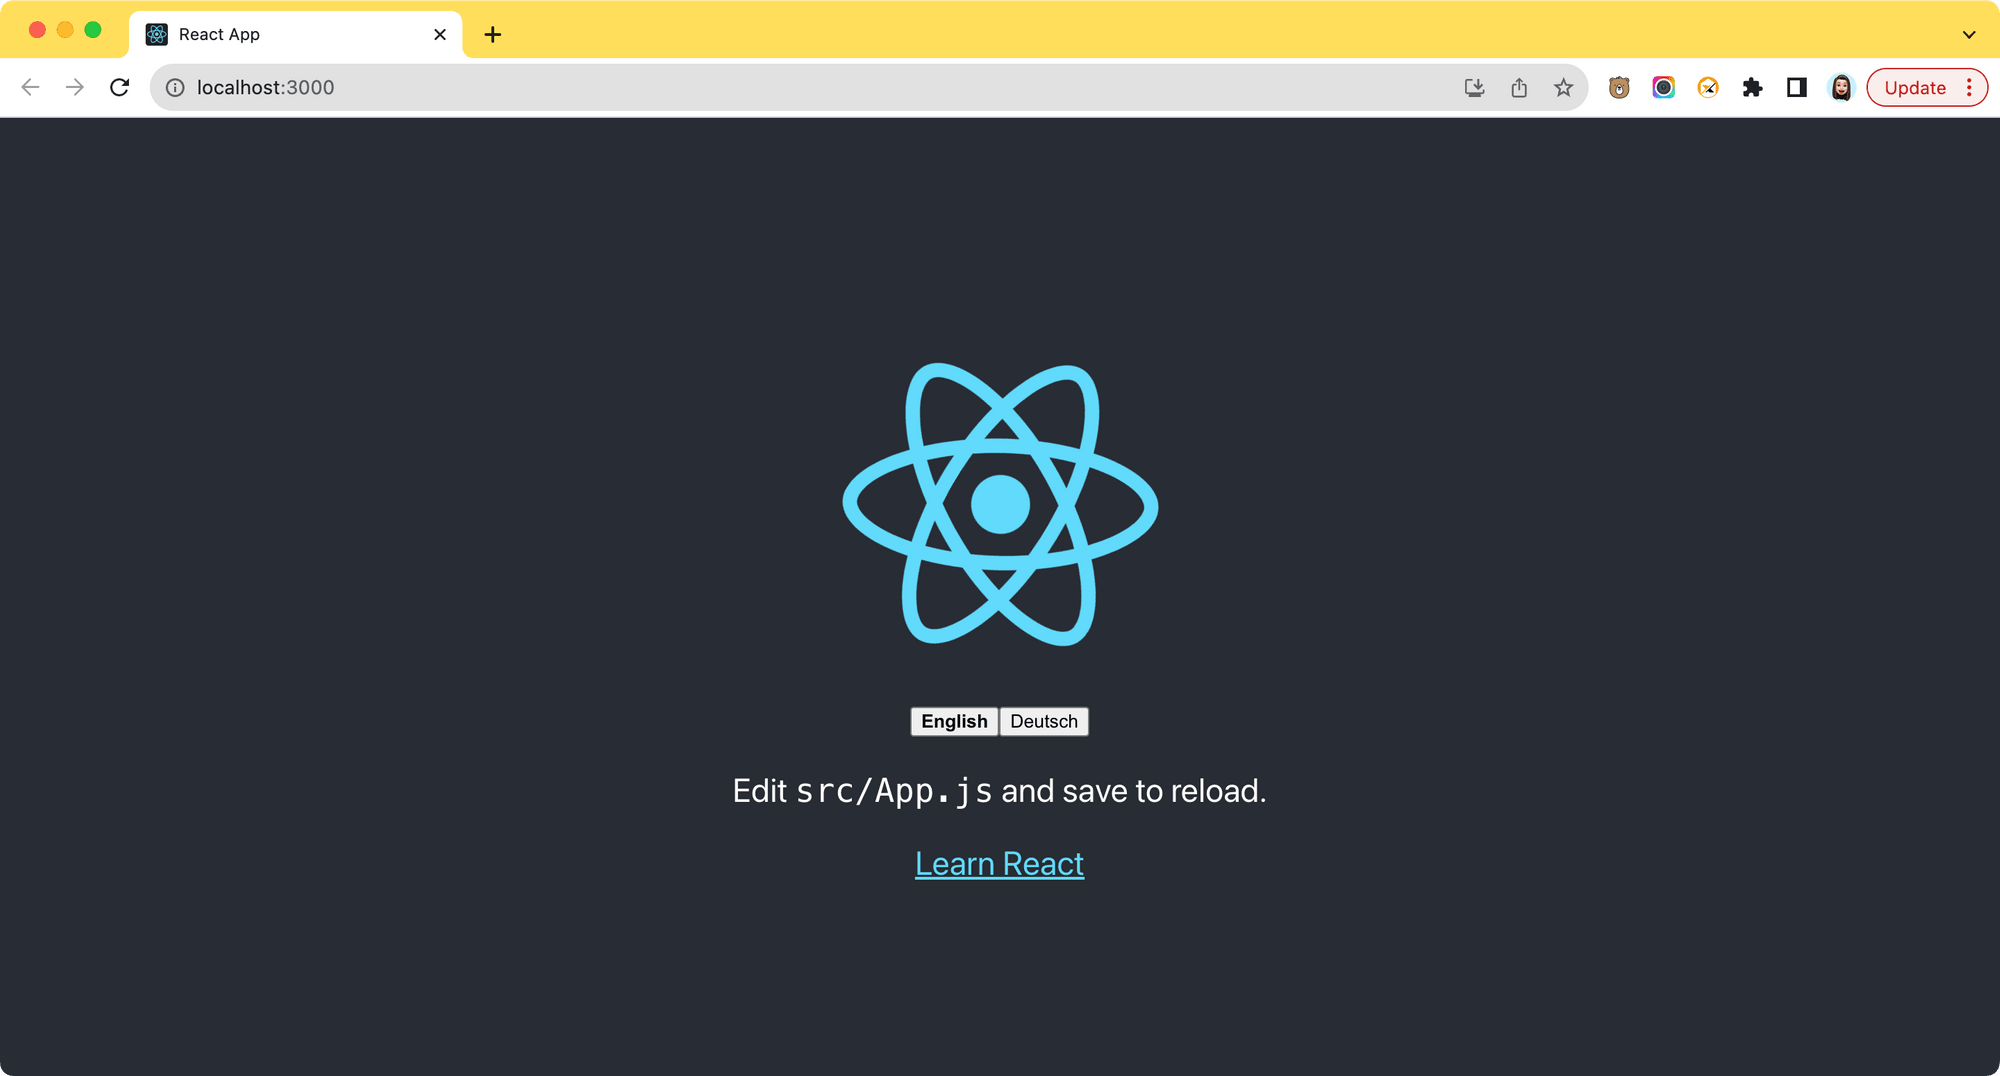
Follow this tutorial to create a React app with i18n installed. When you run npm start in the terminal/command prompt, the app should start running at http://localhost:3000/:
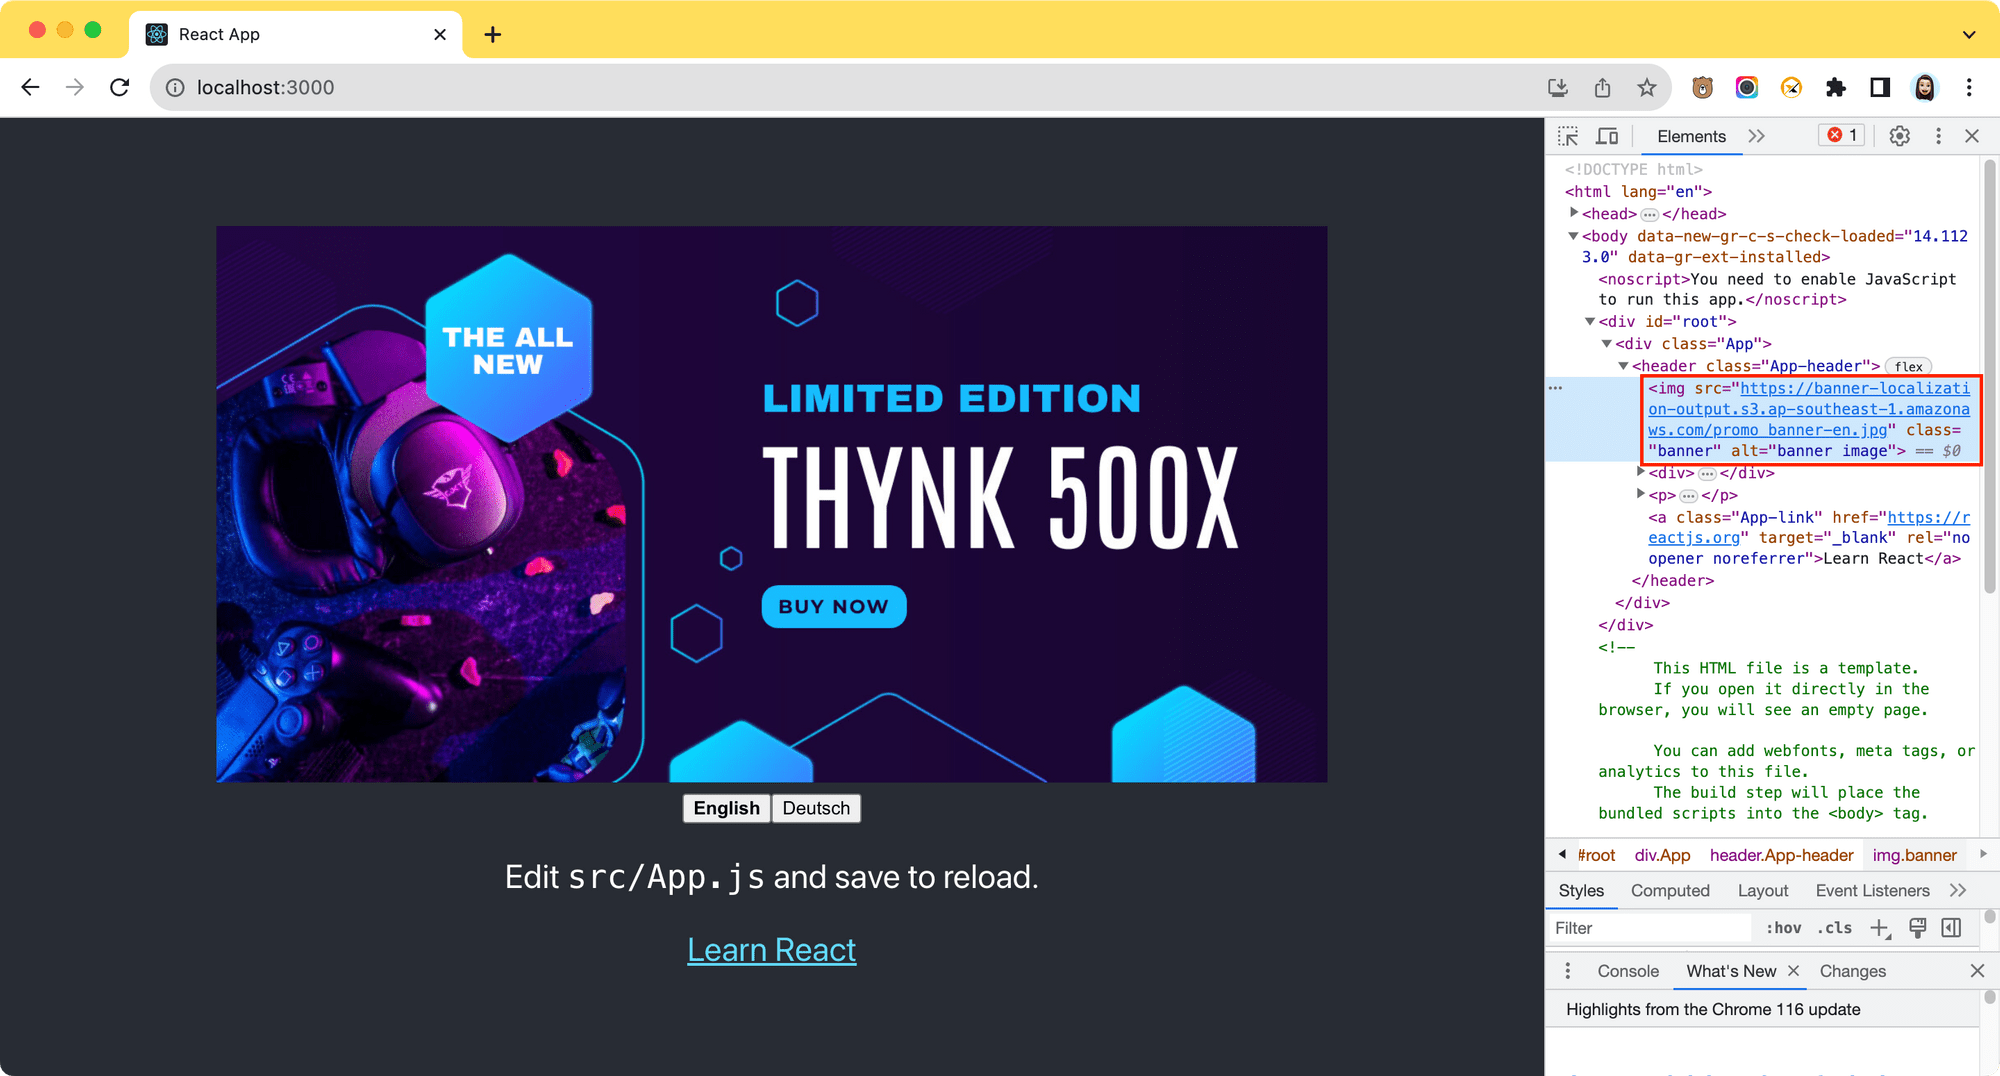
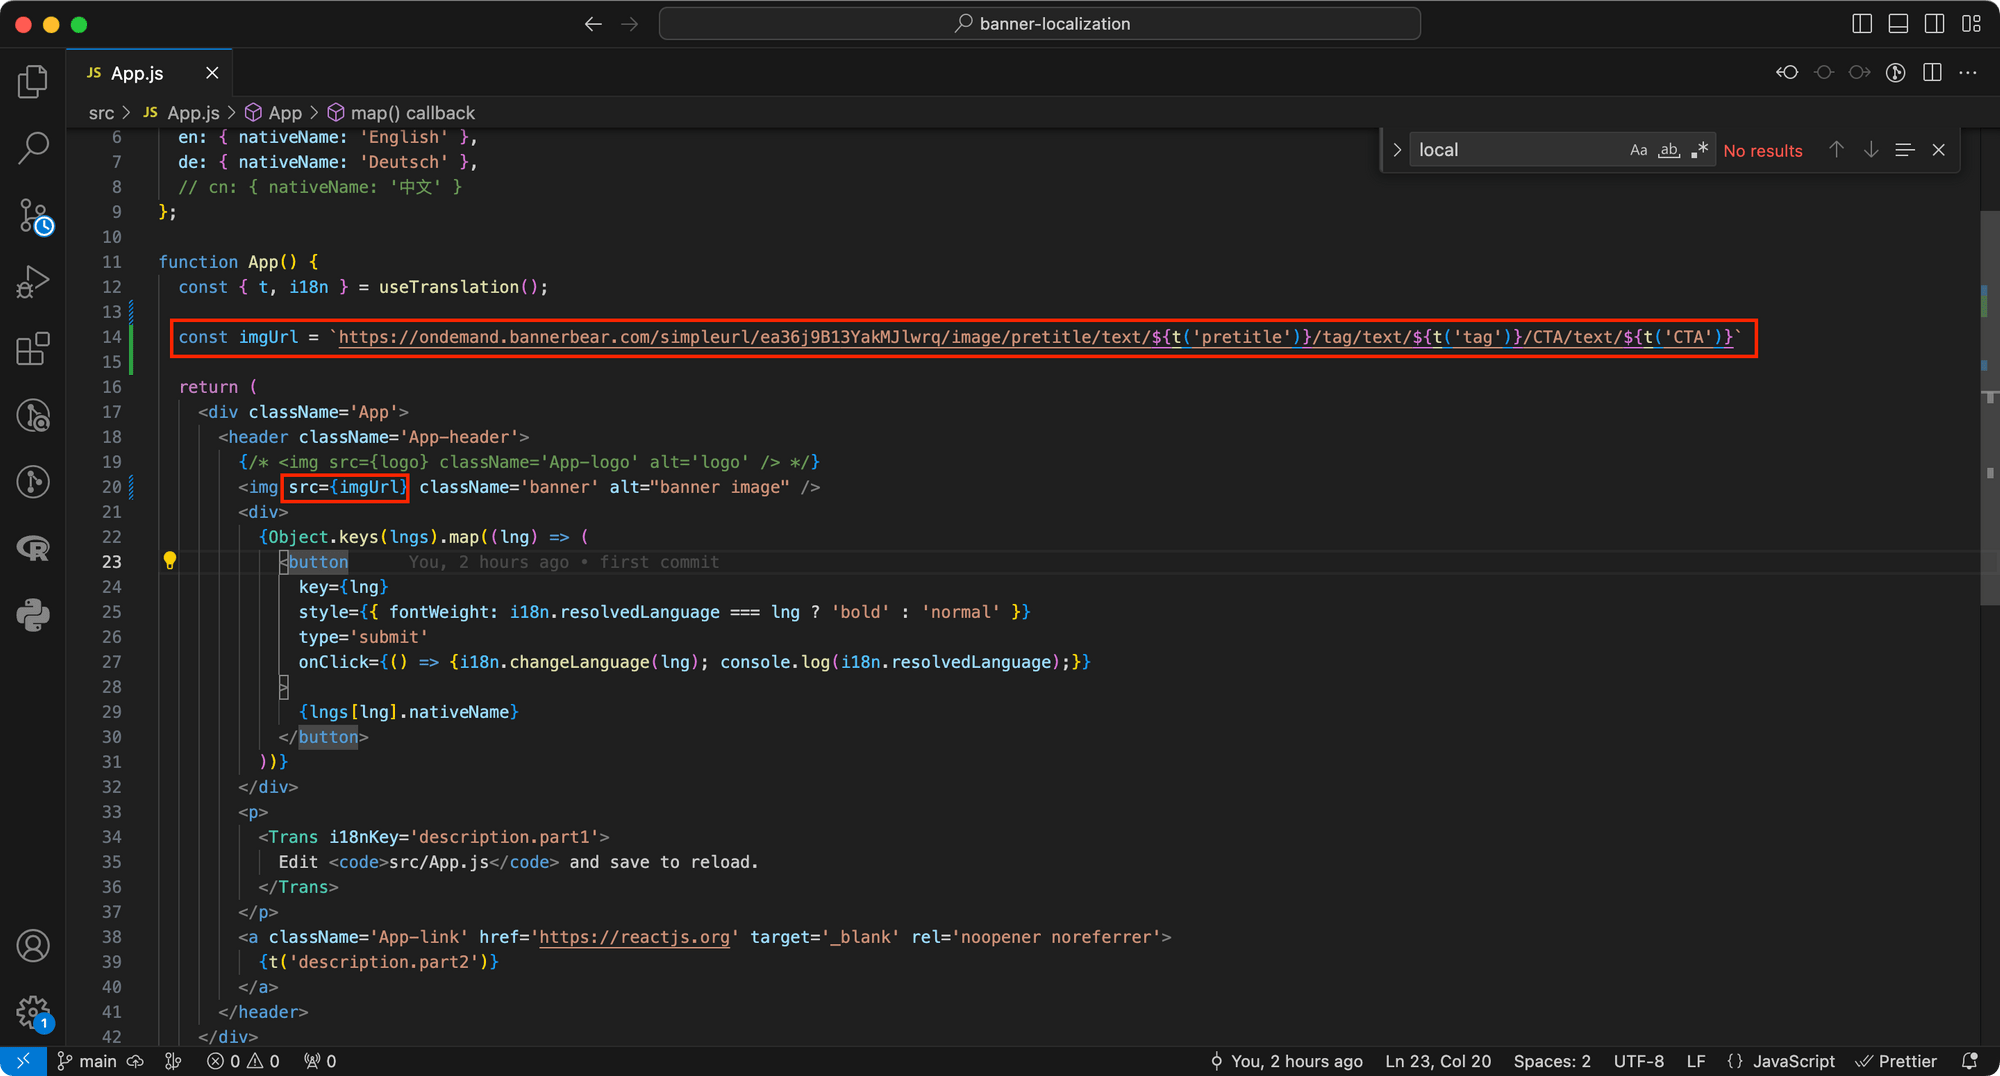
Let’s replace the React logo with the output images. The URLs for the images stored in the S3 bucket should follow the same format, like the example below:
https://<bucket-name>.s3.<region>.amazonaws.com/<file-name>
We can use a dynamic URL in our code to display different images automatically according to the selected language:
<header className='App-header'>
	{/* <img src={logo} className='App-logo' alt='logo' /> */}
	<img src={`https://banner-i18n-output.s3.ap-southeast-1.amazonaws.com/promo_banner-${i18n.resolvedLanguage}.jpg`} className='banner' alt="banner image" />
	...
</header>
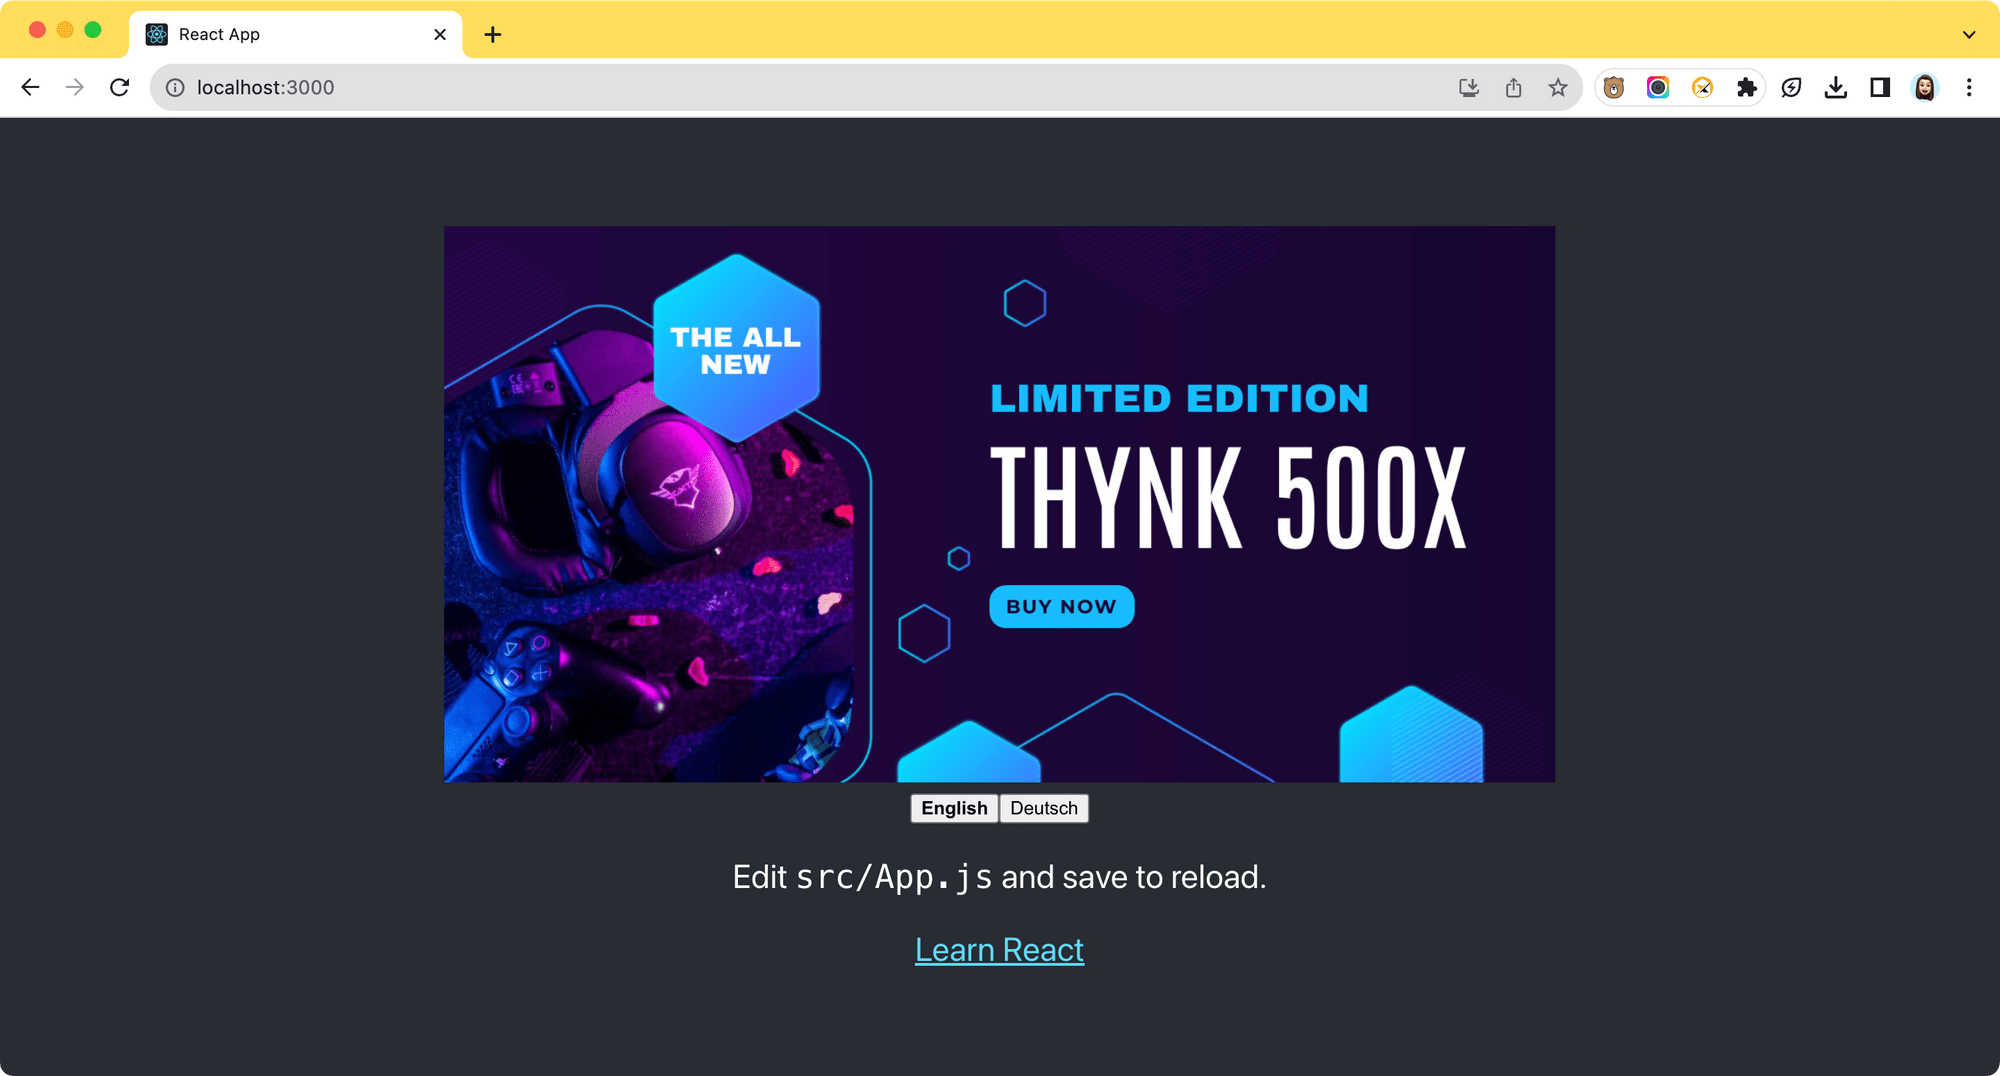
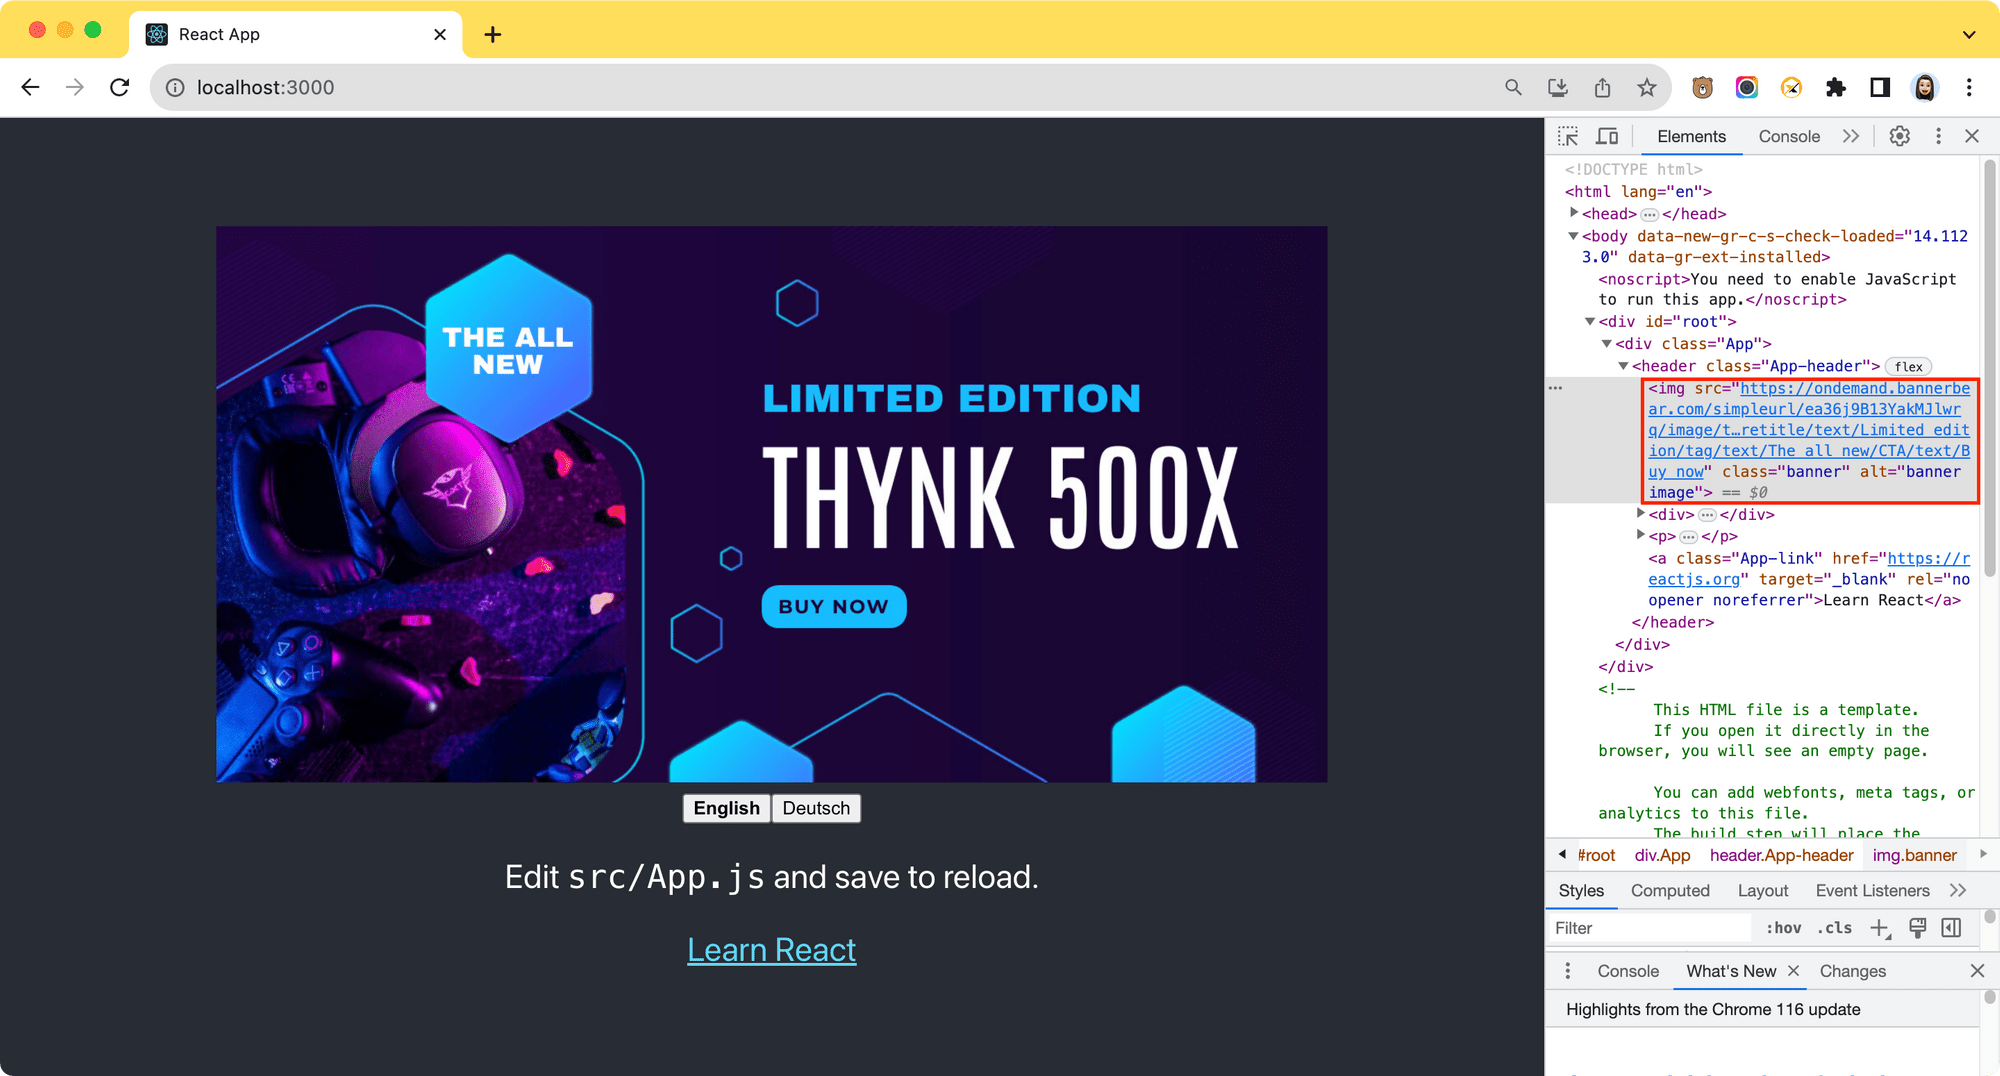
This is the image displayed when “English” is selected:
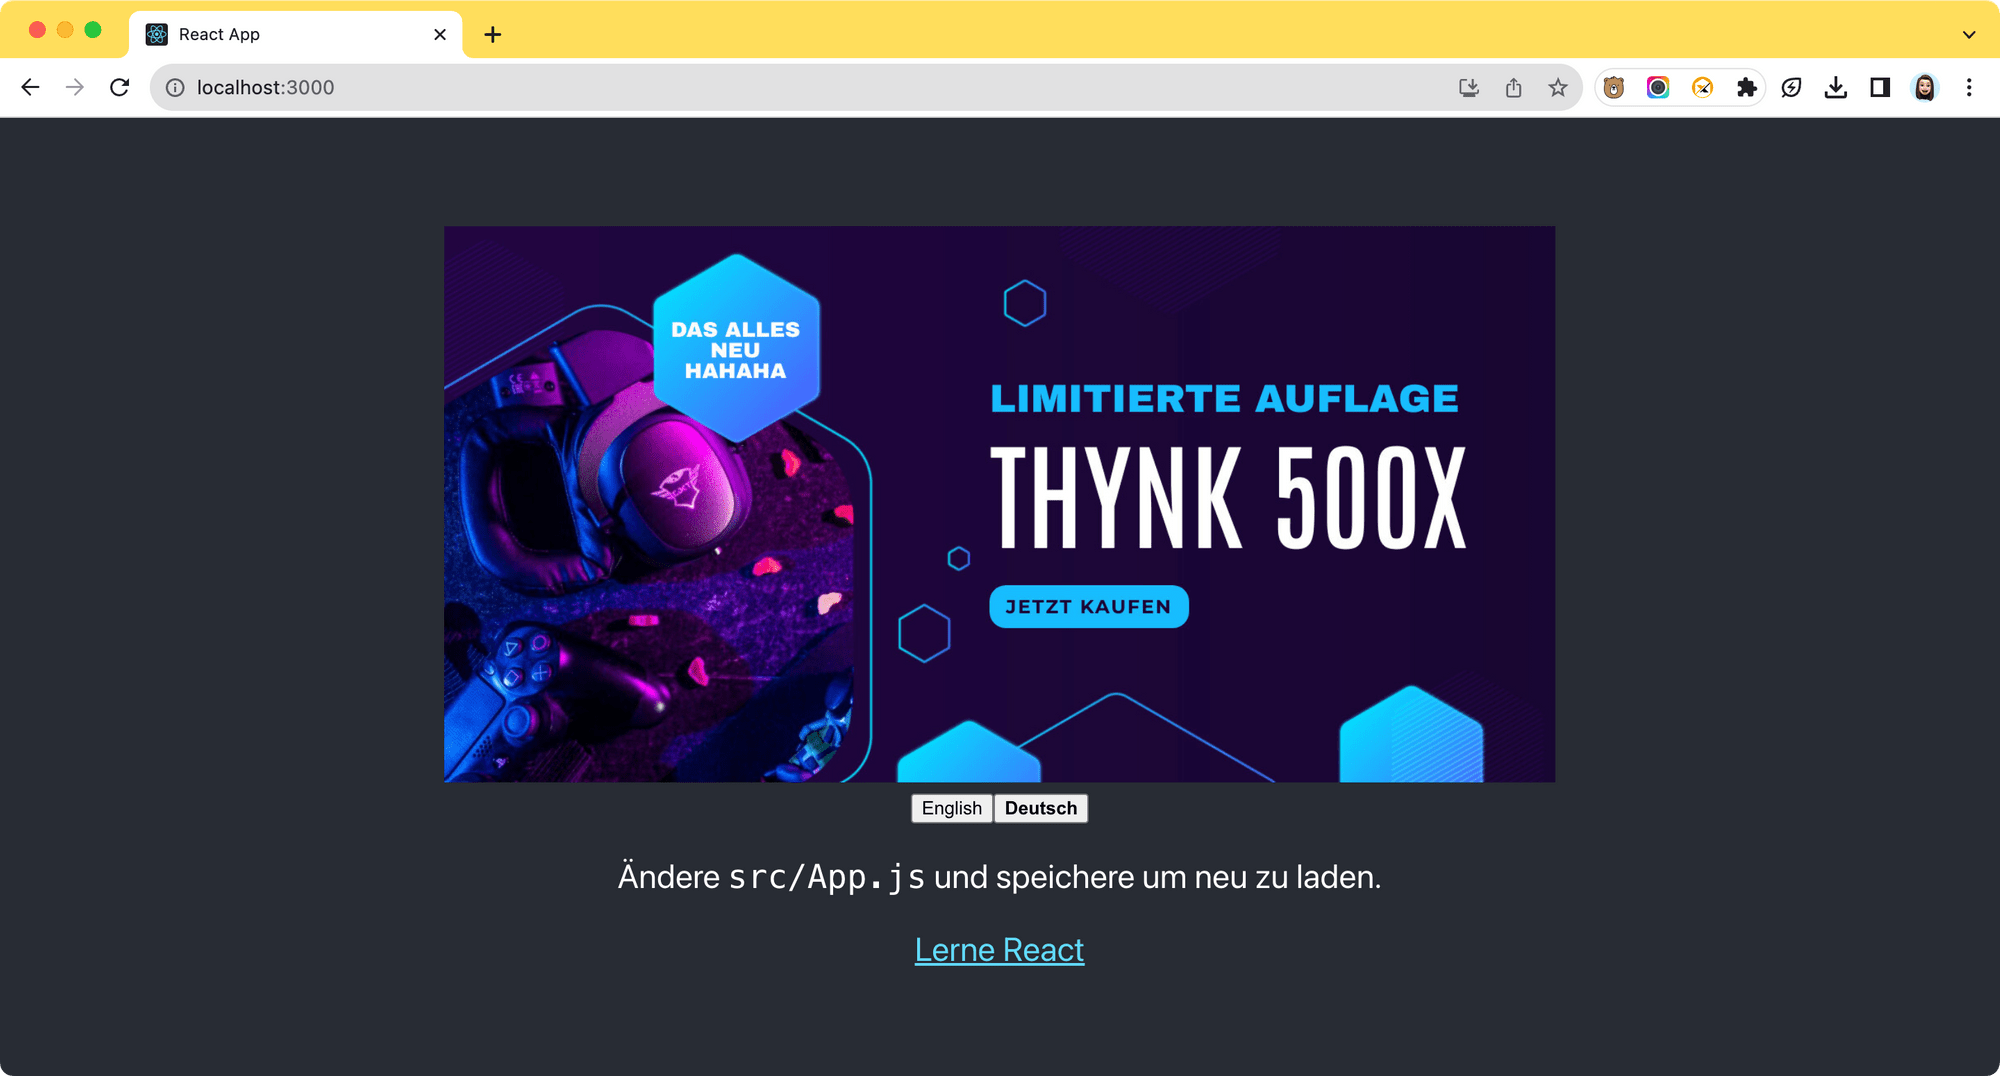
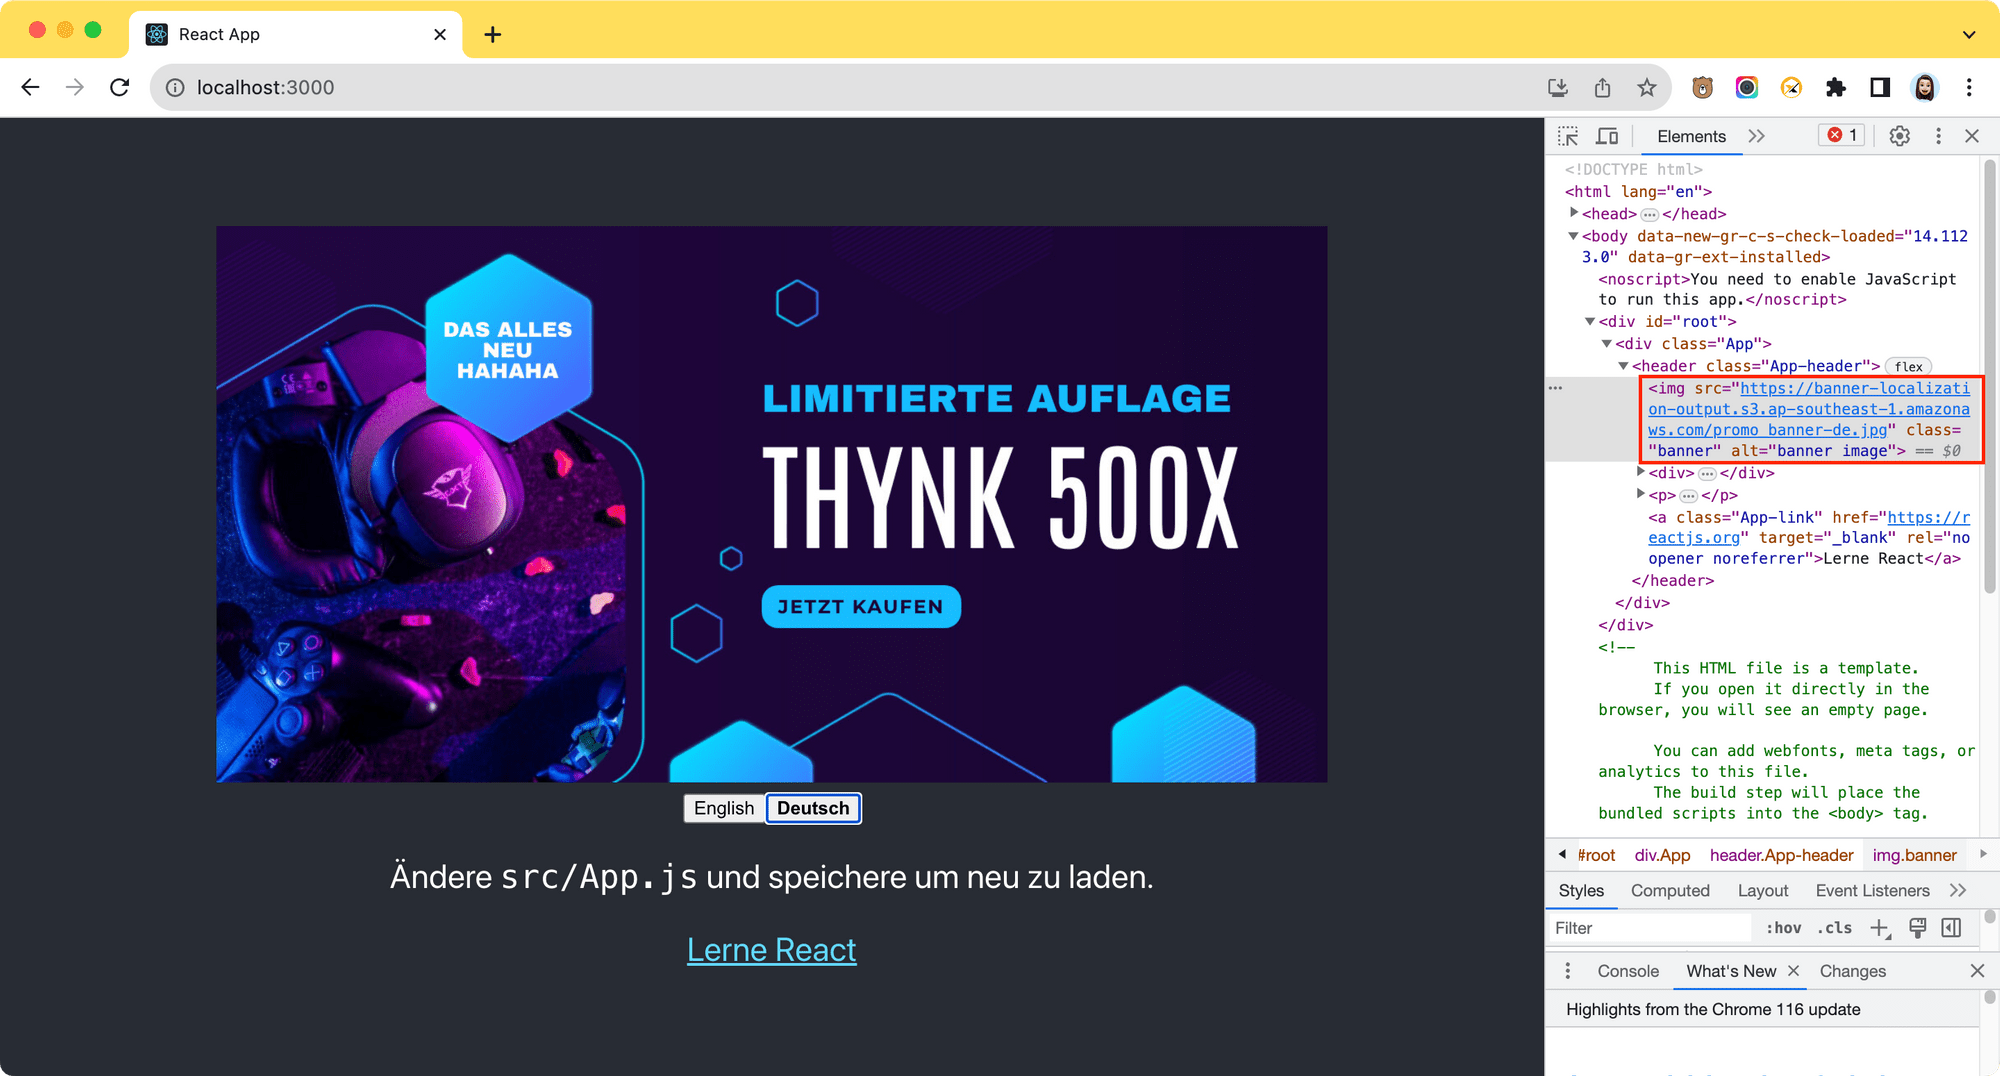
… and this is the image displayed when “Deutsch” is selected:
🐻 View the full code on this GitHub repo.
Using a Simple/Signed URL
You can also use a Simple/Signed URL to generate the images automatically when the website is loaded instead of pre-generating them.
To use a Simple/Signed URL, you will need to generate a URL base from the Bannerbear dashboard and construct the complete URL using the translated value saved in the "i18n.js" file of your React code:
It should generate the same result despite using a different image URL from the previous method:
One thing to take note is that it takes a longer time to load the images for the first time as the image generation process will only be triggered when the URL is ping-ed. That said, if you write a script to load the web pages containing such images automatically beforehand, it shouldn't affect user experience.
🐻 Bear Tips: You can refer to this tutorial to learn how to use a Simple/Signed URL in details.
Conclusion
Creating an internationalized website or application that serves content in multiple languages as an indie hacker or solopreneur can be easy by leveraging the automation capabilities of Bannerbear. With a few simple steps, you can easily create multilingual content that speaks directly to your global audience automatically. Simply sign up for a free trial and your website/application can be internationalized in a snap of a finger!