How to Automatically Take Website Screenshots on Different Devices using Serverless and Browserbear
Contents
In today's digital age, having a website is a necessity for any business or individual looking to establish an online presence. However, maintaining and monitoring a website can be a daunting task, especially when it comes to ensuring that it appears and functions correctly on various devices. One way to keep track of your website's appearance on different devices is by taking regular screenshots.
In this article, we will explore how to take scheduled website screenshots on different devices (desktop, tablet, and mobile) using Browserbear and Serverless, and walk you through the process of setting up the tools.
What is Browserbear
Browserbear is a scalable, cloud-based browser automation tool that helps you to automate any browser task. From automated website testing, scraping data, taking scheduled screenshots for archiving, to automating other repetitive browser tasks, you can do it with Browserbear.
Similar to Bannerbear, the featured automated image and video generation tool from the same company, you can easily create no-code automated workflows by integrating it with other apps like Google Sheets, Airtable, and more on Zapier. Besides that, you can also use the REST API to trigger tasks to run in the cloud and receive data from the completed tasks.
🐻 Bear Tips: You can read the details from Browserbear’s API Reference.
What is Serverless
Serverless is an all-in-one platform that helps you develop and deploy serverless functions on AWS Lambda with a single command. The term "serverless" refers to a cloud computing model where the cloud provider (in this case, AWS) manages the infrastructure and automatically provisions and scales the necessary resources, such as computing, storage, and networking, based on the application's needs.
With its convenience and the “pay-as-you-use” model, it is very easy to deploy and run a single function for any type of application or backend service in a short amount of time. Serverless makes it even easier—with the Serverless Framework, you can create AWS Lambda functions and define their trigger events in a simple YAML file. To deploy the functions, just run a single command and it will be deployed to the cloud.
There’s also a library of plugins that extend the functionality of the Serverless Framework. Not to mention that it provides documentation, tutorials, and community support to help you get started with serverless computing and build serverless applications too.
Pre-requisites
For this tutorial, we will use several tools and you will need to sign up for an account to use them:
- Browserbear - To take screenshots of a website on different devices
- AWS - To run your serverless function on AWS Lambda
- Serverless - To help you set up and deploy the serverless function to AWS Lambda easily
After creating an account for the tools above, you’re all set!
Creating a Browserbear Task
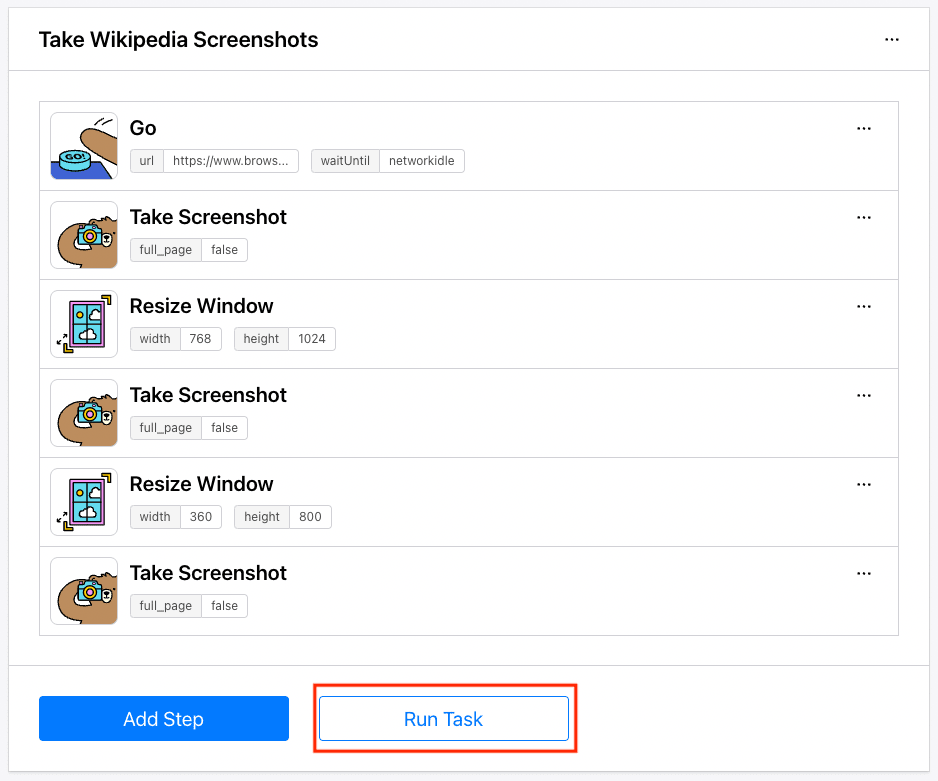
Creating an automated task in Browserbear is simple. A task consists of multiple steps that will perform different actions like “go”, “click”, “scroll”, etc. to do a job. You can add as many steps as you need and click the “Run Task” button to execute it.

Besides creating a task manually, there are also pre-made tasks that are ready for use in the Task Library.
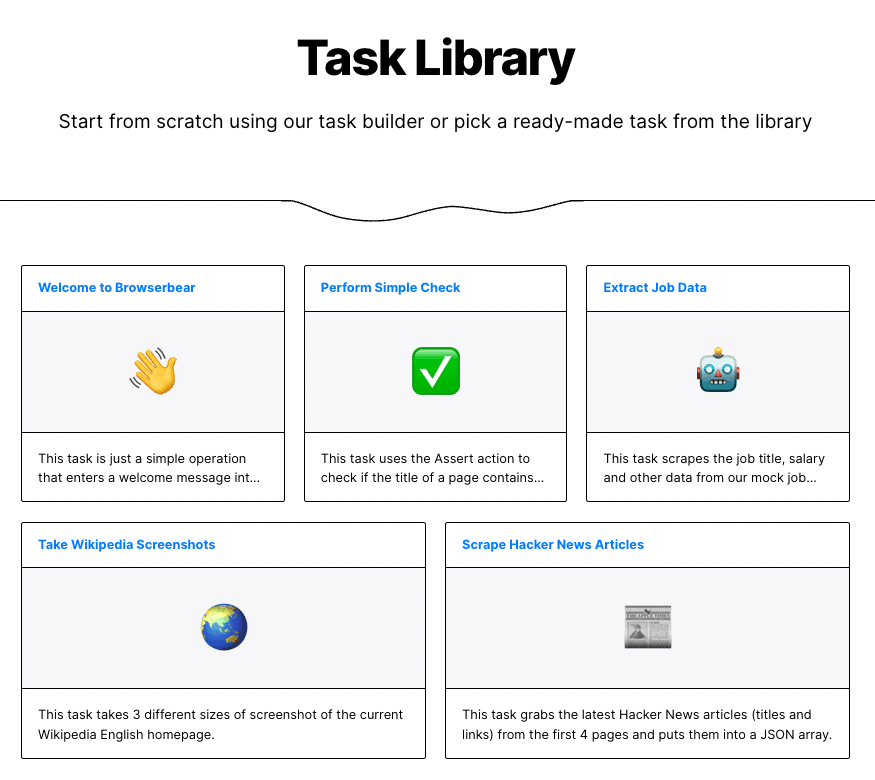
For this tutorial, we will use this pre-made screenshot task. Click on “Use This Task” to add the task to your account.
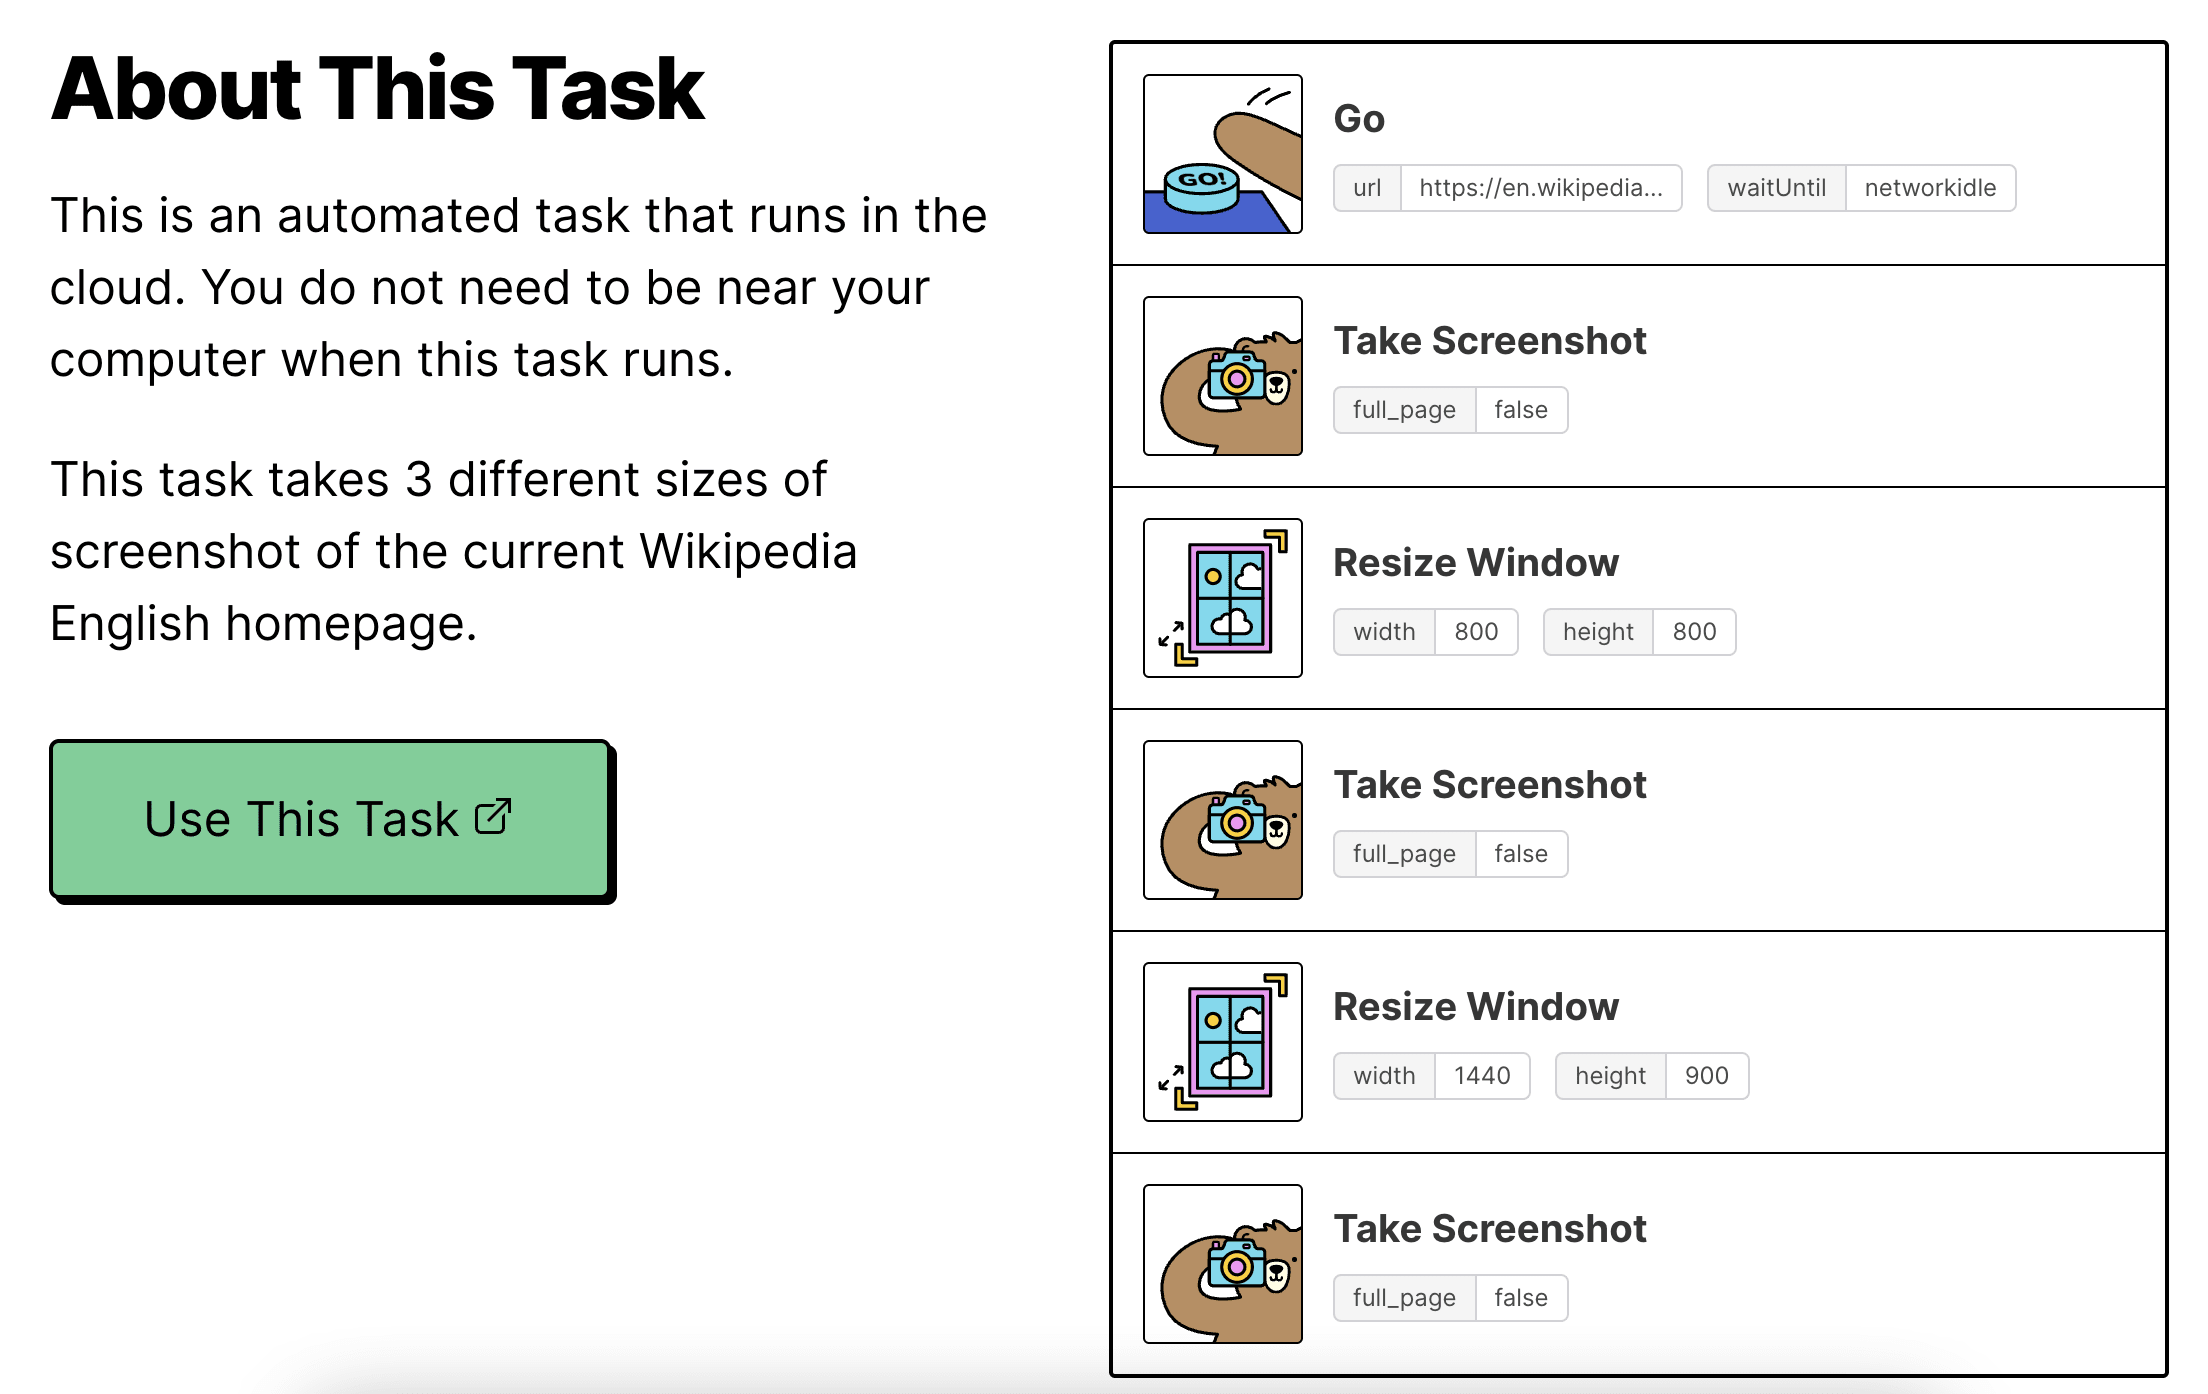
Next, modify the following steps:
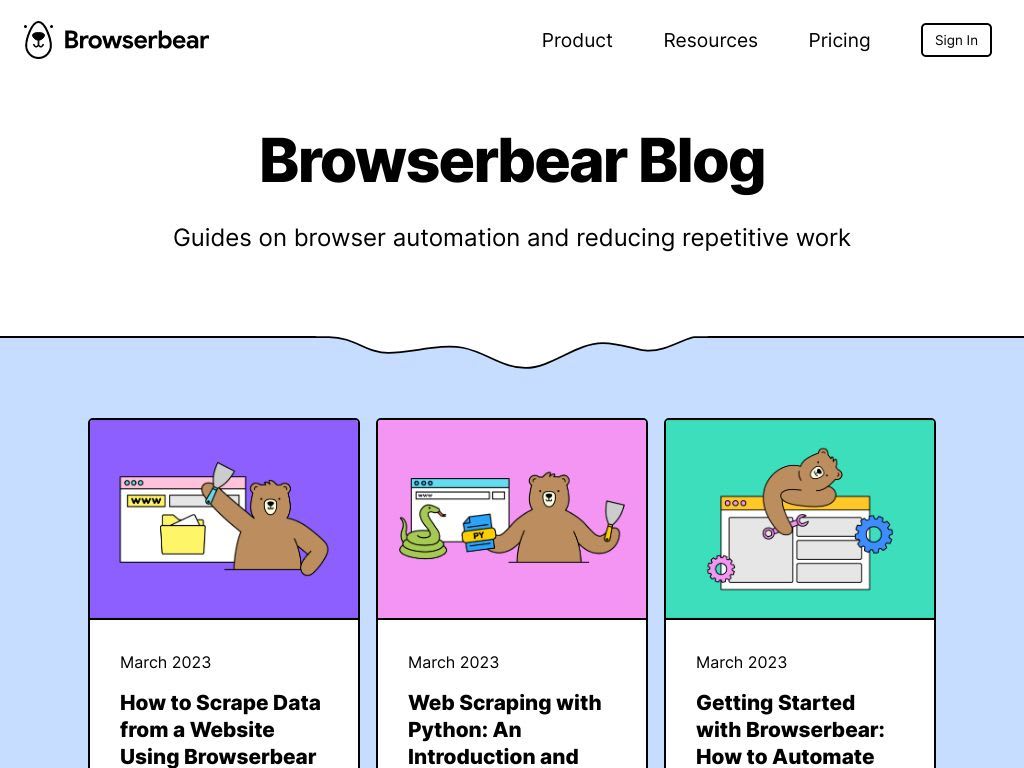
- Step 1 (Go) - Enter the URL of the website, eg. https://www.browserbear.com/blog/
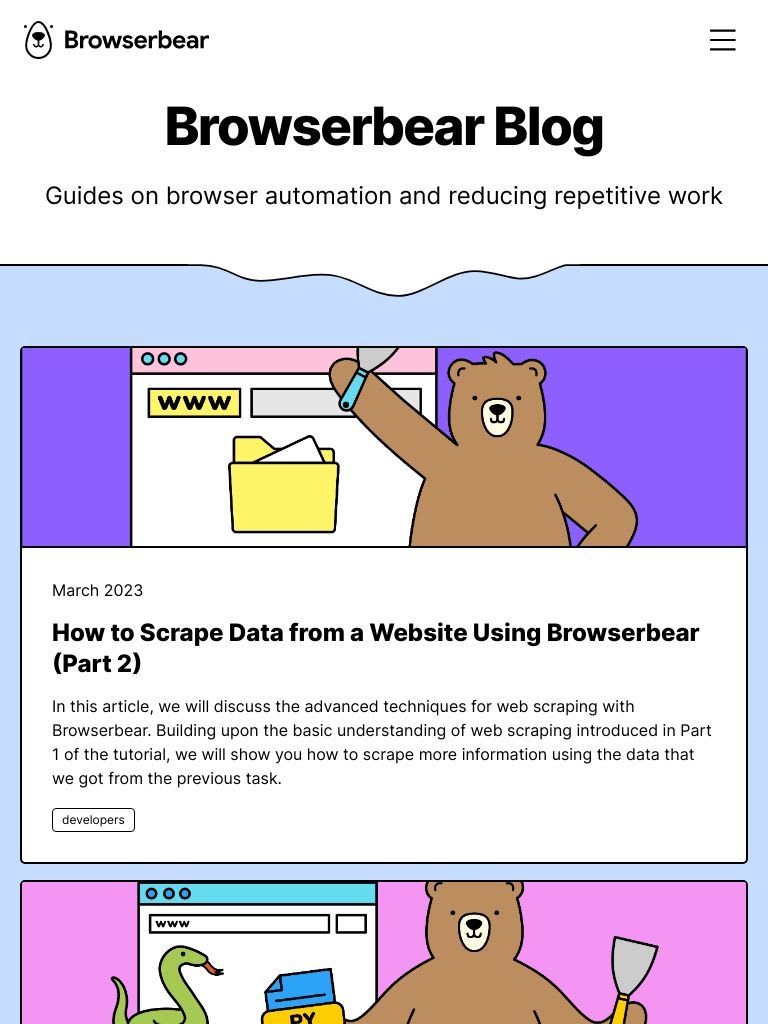
- Step 3 (Resize Window) - Set the width and height to 768x1024 pixels for tablet view (vertical)
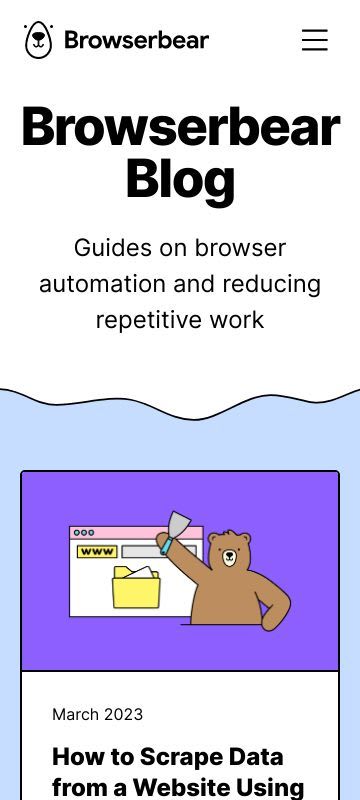
- Step 5 (Resize Window) - Set the width and height to 360x800 pixels for mobile view
By default, Browserbear will take screenshots in the resolution of 1024x768 pixels, which is the typical resolution of a tablet (refer to Statcounter GlobalStats). Since the resolution of a desktop has a similar aspect ratio, we will use the default screenshot.
Then, click “Run Task” to execute the task and check the result from the log.
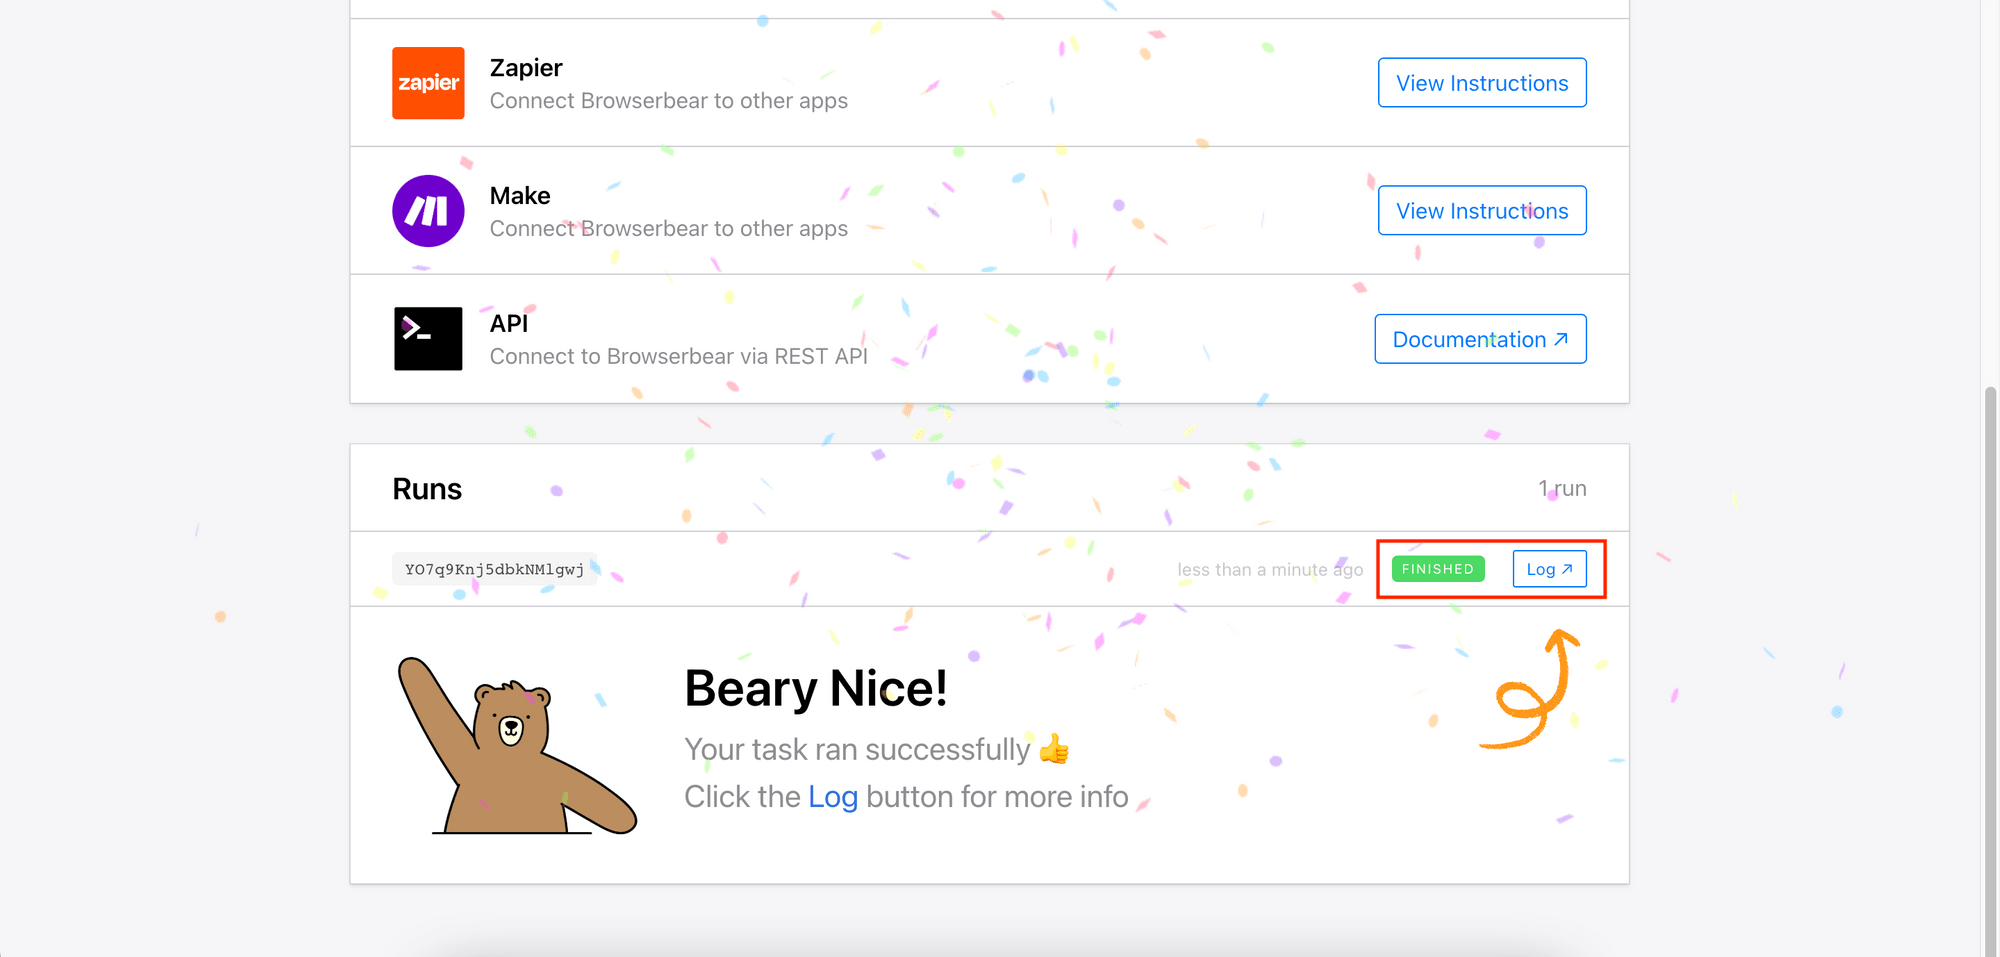
Congrats! Now that the task can be run successfully, we can set a schedule to run it automatically.
Browserbear has the option to set the task’s schedule to “once an hour”. This will run the screenshot task automatically every hour.
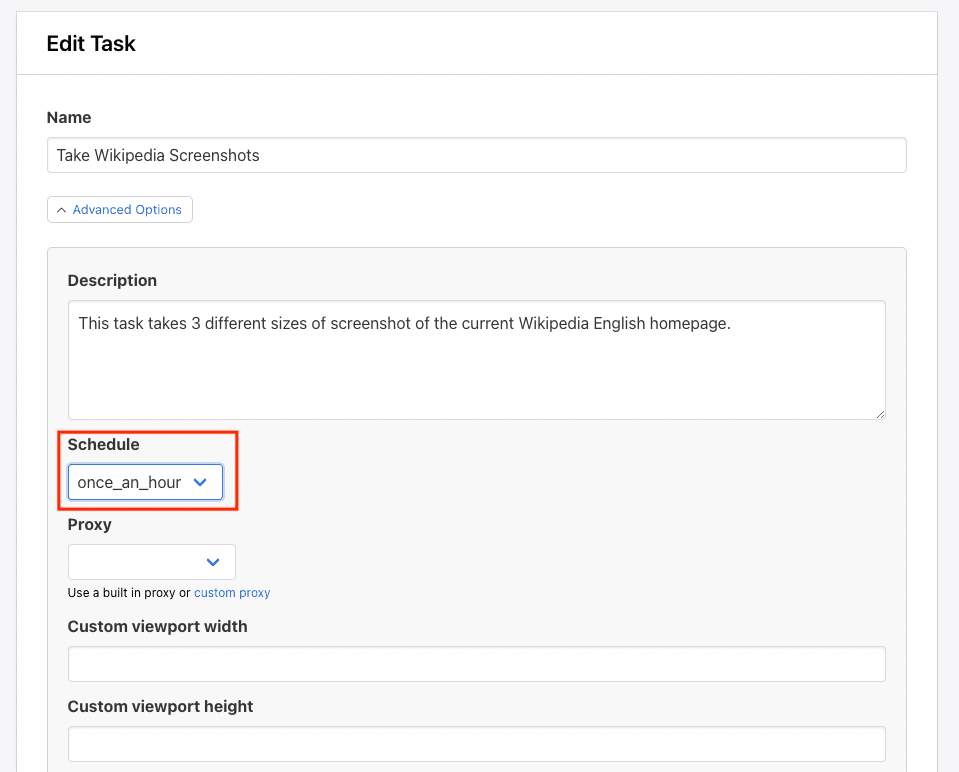
If you want to set a specific time or run it at a different time interval, you can deploy an AWS Lambda function using Serverless to call Browserbear’s API and trigger the task. Let’s see how to do it.
Deploying a Scheduled Cron using Serverless
Step 1. Create a Serverless Project
Follow the Getting Started guide to create a Serverless project from your terminal. For Step 2 (configure AWS credentials), follow the instructions in Using AWS Access Keys to connect your AWS and Serverless accounts.
The guides should provide clear instructions on how to set up a Serverless project but here are some extra notes that are particular to this tutorial:
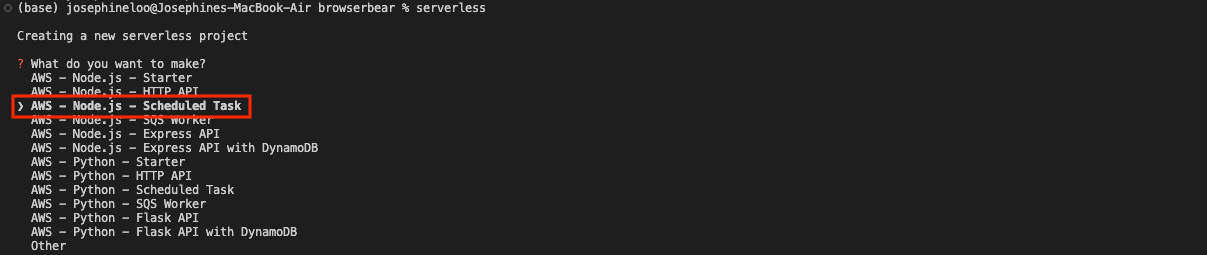
After running serverless in the terminal, choose “AWS - Node.js - Scheduled Task”. This will create a Serverless project using the cron job template.
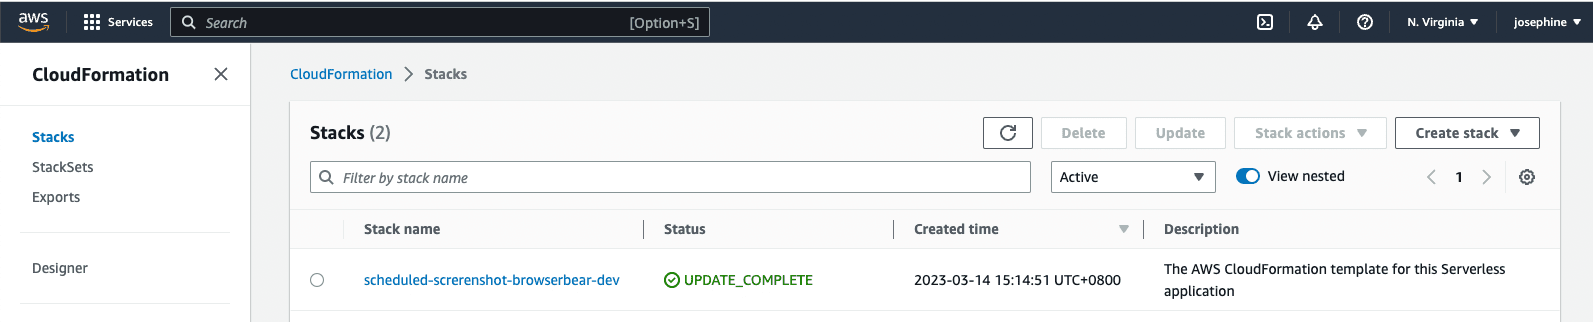
Follow the prompts that show up next and enter ‘Y’ to deploy the project. It should be deployed to your AWS account. You can validate it by checking your AWS Console, under CloudFormation > Stacks.
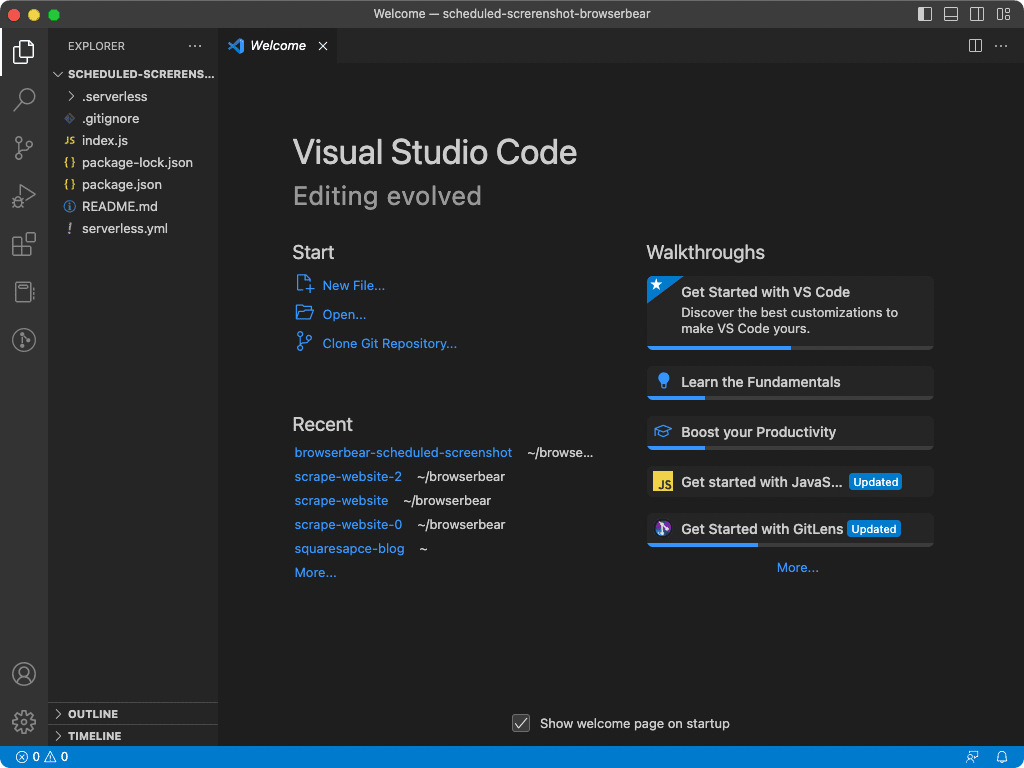
This is the file structure of the project:
Step 2. Configure the YAML File
The default YAML file defines two functions, which are rateHandler and cronHandler. Each function has a handler that points to the file and module containing the code, and also events that will trigger the function.
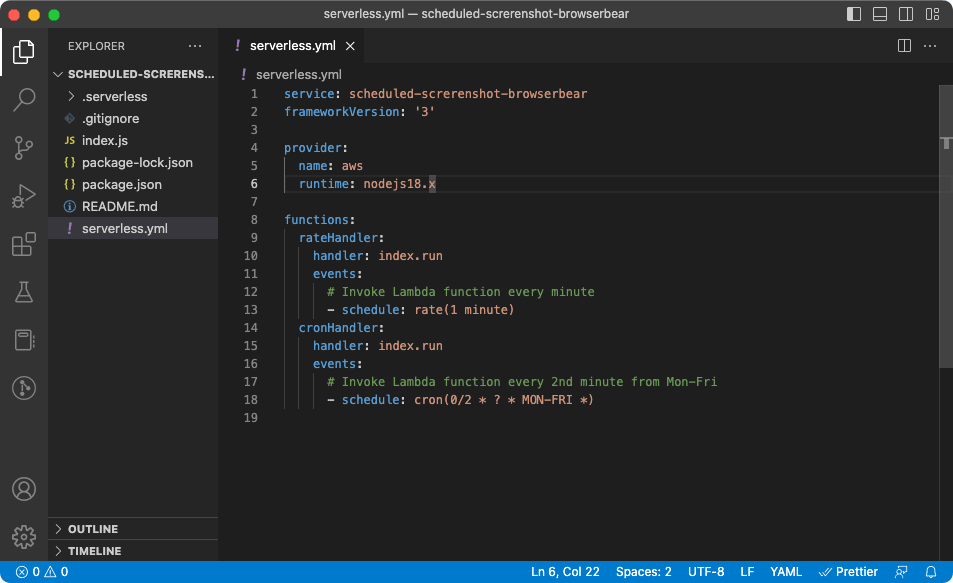
When the function is triggered, it will execute the code in index.js, as defined by handler: index.run.
We will set a schedule to trigger the screenshot task at 04:00 (UTC) every day. In serverless.yml, remove the redundant rateHandler function and change the schedule under cronHandler. Change the timeout to 30 seconds too, as the job will take more than the default value (6 seconds) to complete.
functions:
  cronHandler:
    handler: index.run
    timeout: 30 # in seconds, the default value is 6 seconds, maximum allowed is 30
    events:
      - schedule: cron(0 4 * * ? *) # Invoke Lambda function at 04:00 (UTC) every day.
🐻 Bear Tips: Refer to this guide from AWS to write cron expressions for different schedules.
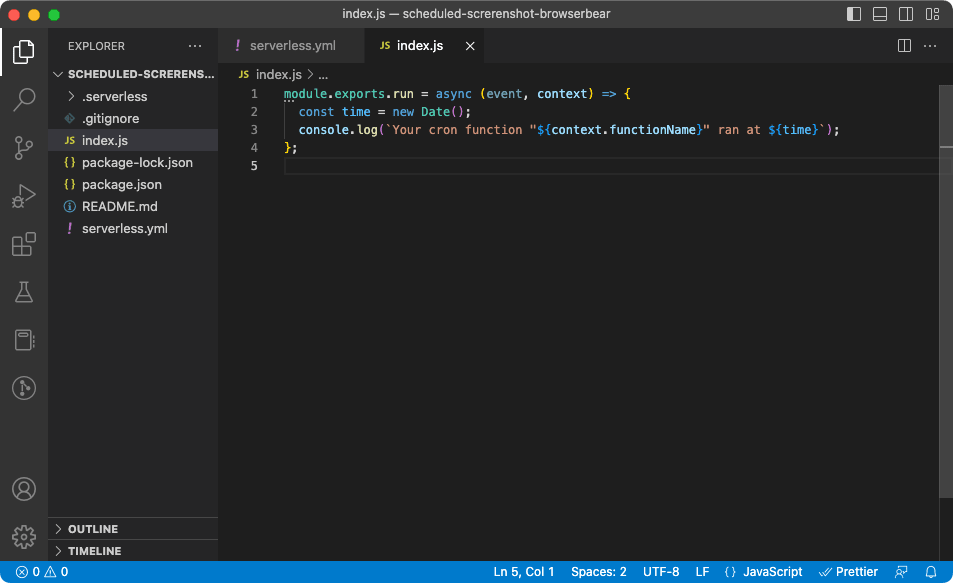
Step 3. Write the Function
We will need a function that will trigger the Browserbear task. In index.js, replace the original code with the code below:
const API_KEY = 'your_api_key';
const TASK_UID = 'your_task_id';
const TAKE_SCREENSHOT_STEP_ID = {
  DESKTOP: 'step_2_id',
  TABLET: 'step_4_id',
  MOBILE: 'step_6_id',
};

module.exports.run = async (event, context) => {
  const screenshotUrls = await triggerScreenshot();

  console.log(screenshotUrls);
  // {
  // desktop: 'https://media.browserbear.com/screenshots/50BZWqkKDyPnAPN8Kx/LgMD9Nvy9PGbAOo2x8/ea17a4b9d0b82afb46733c0aa12b0dce0e1f5080.jpg',
  // tablet: 'https://media.browserbear.com/screenshots/50BZWqkKDyPnAPN8Kx/m9E5gnJzaRnbPvDrwd/fdff18c6b6c5ef839ac96a7175235ce1ddd186b2.jpg',
  // mobile: 'https://media.browserbear.com/screenshots/50BZWqkKDyPnAPN8Kx/Xqdr1oWz7RwB3DEYG9/e63adddaef821fbc4dea4af87c40a7d5b569e411.jpg'
  // }

  // do other things with the screenshot URLs, eg. uploading to a server, use it for other tasks, etc.

  return {
    status: 200,
  };
};
Note: The API Key, task ID, and step IDs can be retrieved from your Browserbear dashboard.
It will call the triggerScreenshot function that will:
- Make a
POSTrequest to Browserbear to execute the task - Make
GETrequests to Browserbear to receive the task’s result (API polling) -
Return the task’s result (screenshot URLs)
async function triggerScreenshot() { return new Promise(async (resolve) => { const screenshotTask = await takeScreenshot();
  if (screenshotTask.status === 'running' && screenshotTask.uid) {

    console.log(`Task ${screenshotTask.uid} is running... Poll API to get the result`);

    const polling = setInterval(async () => {

      const screenshotResult = await getScreenshotResult(TASK_UID, screenshotTask.uid);

      if (screenshotResult.status === 'running') {

        console.log('Still running.....');

      } else if (screenshotResult.status === 'finished') {

        const screenshotUrls = {
          desktop: screenshotResult.outputs[`${TAKE_SCREENSHOT_STEP_ID.DESKTOP}_take_screenshot`],
          tablet: screenshotResult.outputs[`${TAKE_SCREENSHOT_STEP_ID.TABLET}_take_screenshot`],
          mobile: screenshotResult.outputs[`${TAKE_SCREENSHOT_STEP_ID.MOBILE}_take_screenshot`],
        };

        clearInterval(polling);
        resolve(screenshotUrl);
      }
    }, 1000);
  }
});   }
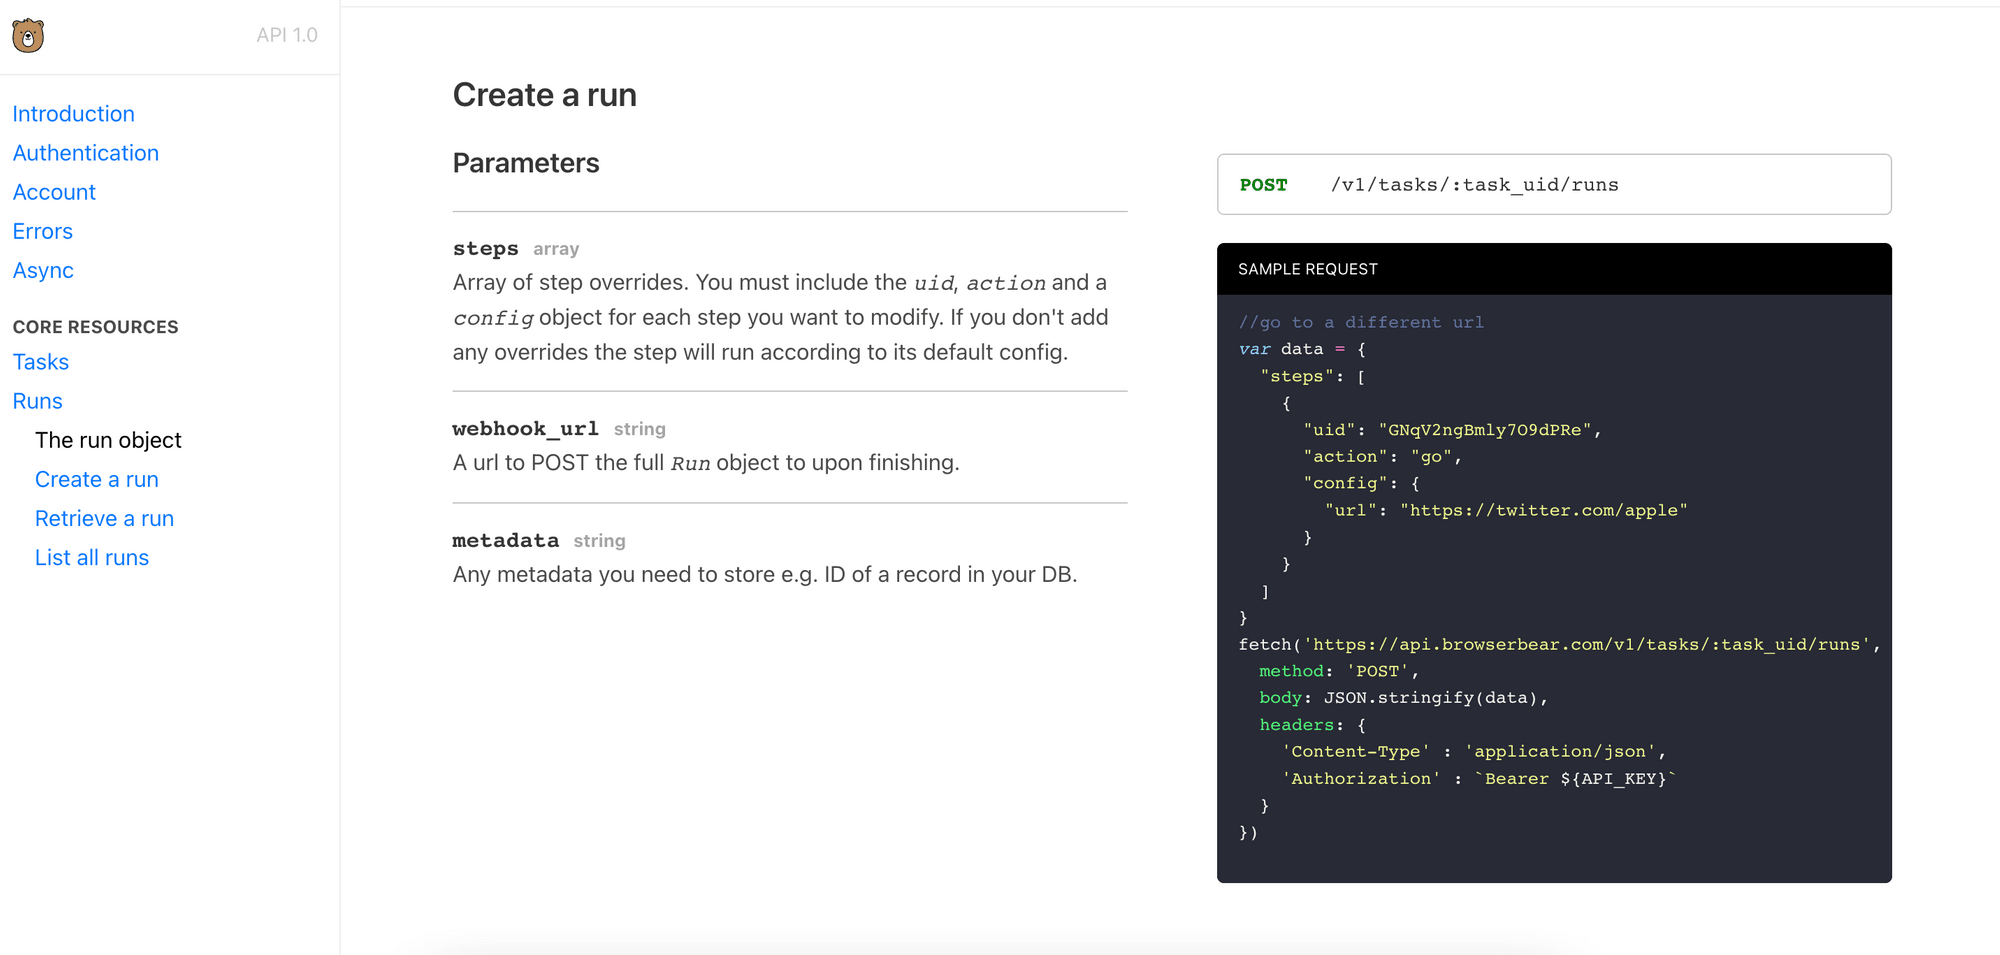
This function will make a POST request to Browserbear to trigger the task:
async function takeScreenshot() {

  const body = {
    // webhook_url: `${process.env.SCREENSHOT_HANDLER_URL}/screenshot-done`, // send the result to the webhook URL when the task has finished running, uncomment to use it
  };

  const res = await fetch(`https://api.browserbear.com/v1/tasks/${TASK_UID}/runs`, {
    method: 'POST',
    body: JSON.stringify(body),
    headers: {
      'Content-Type': 'application/json',
      Authorization: `Bearer ${API_KEY}`,
    },
  });

  return await res.json();
}
This function will make a GET request to Browserbear to query the result of the task:
async function getScreenshotResult(taskId, runId) {
  const res = await fetch(`https://api.browserbear.com/v1/tasks/${taskId}/runs/${runId}`, {
    method: 'GET',
    headers: {
      Authorization: `Bearer ${API_KEY}`,
    },
  });

  return await res.json();
}
The code above will receive the screenshot result via API polling. Alternatively, you can set up a webhook to receive the result when the task has done running.
In this case, you do not need call the getScreenshotResult function to make continuous GET requests to Browserbear’s API. Instead, create an endpoint that can be used as the webhook URL to receive the result.
In serverless.yml, add a new function named screenshotDoneHandler. Set its handler as index.onScreenshotDone and define the event that will trigger the function, which is a POST request to the /screenshot-done endpoint of the serverless function.
functions:
  cronHandler:
    handler: index.run
    timeout: 30 # in seconds, the default value is 6 seconds, maximum allowed is 30
    events:
      - schedule: cron(0 4 * * ? *) # Invoke Lambda function at 04:00 (UTC) every day.
  screenshotDoneHandler:
    handler: index.onScreenshotDone
    events:
      - httpApi:
          method: POST
          path: /screenshot-done
Add an environment variable named SCREENSHOT_HANDLER_URL to the serverless.yml file so that we can use the serverless function's URL in the index.js file.
provider:
  name: aws
  runtime: nodejs18.x
  environment:
    SCREENSHOT_HANDLER_URL: !Sub 'https://${HttpApi}.execute-api.${aws:region}.amazonaws.com'

async function takeScreenshot() {

  const body = {
    webhook_url: `${process.env.SCREENSHOT_HANDLER_URL}/screenshot-done`, // send the result to the webhook URL when the task has finished running, uncomment to use it
  };

 ...
}
In index.js, define the onScreenshotDone function which will be triggered when Browserbear sends the result to the webhook URL:
// for webhook
module.exports.onScreenshotDone = async (event, context) => {
  const body = JSON.parse(event.body);
  const screenshotUrls = {
    desktop: body.outputs[`${TAKE_SCREENSHOT_STEP_ID.DESKTOP}_take_screenshot`],
    tablet: body.outputs[`${TAKE_SCREENSHOT_STEP_ID.TABLET}_take_screenshot`],
    mobile: body.outputs[`${TAKE_SCREENSHOT_STEP_ID.MOBILE}_take_screenshot`],
  };

  console.log(screenshotUrls);
  // {
  // desktop: 'https://media.browserbear.com/screenshots/50BZWqkKDyPnAPN8Kx/LgMD9Nvy9PGbAOo2x8/ea17a4b9d0b82afb46733c0aa12b0dce0e1f5080.jpg',
  // tablet: 'https://media.browserbear.com/screenshots/50BZWqkKDyPnAPN8Kx/m9E5gnJzaRnbPvDrwd/fdff18c6b6c5ef839ac96a7175235ce1ddd186b2.jpg',
  // mobile: 'https://media.browserbear.com/screenshots/50BZWqkKDyPnAPN8Kx/Xqdr1oWz7RwB3DEYG9/e63adddaef821fbc4dea4af87c40a7d5b569e411.jpg'
  // }

  // do other things with the screenshot URLs, eg. uploading to a server, use it for other tasks, etc.

  return {
    statusCode: 200,
  };
};
P.S. Modify the code to do other things with the result received! 🤓
Step 4. Deploy the Serverless Function
Lastly, run serverless deploy in the terminal to deploy the code. It should trigger the screenshot task at the schedule defined and give you results like these screenshots:
Default/Desktop (1024x768 pixels)
Tablet (768x1024 pixels)
Mobile (360x800 pixels)
🐻 View the full code on GitHub.
Conclusion
Using tools like Browserbear and Serverless, you can schedule and take automated screenshots without needing to spend hours writing and deploying the automation. With Browserbear, you can automate any browser task, and with Serverless, you can deploy serverless functions on AWS Lambda quickly and easily.
With some modifications, you can also use the automation in this tutorial to:
- Create a website screenshot generator/service
- Create website mockups automatically (integrating Bannerbear)
Combining different tools, you can create an efficient and automated workflow and spend more time on other important tasks.