How to Automate Browser Actions Using Selenium
Contents
With the increasing amount of time people spend online and the growing complexity of web applications, browser automation has become an important tool for businesses and individuals who want to save time and increase productivity, including developers.
Browser automation can be used for a wide range of purposes, from web scraping and data mining to testing and debugging web applications. It allows you to perform repetitive tasks quickly and accurately without the need for human intervention. Moreover, it helps reduce errors and increase the efficiency of web-based processes.
There are many browser automation tools available and Selenium is one of the most popular ones used by developers. In this article, we will explore how to use Selenium to automate browsers.
What Can You Do with Browser Automation
Browser automation can significantly reduce the time and effort required for repetitive tasks. You can also use it to:
Test Applications
Automated tests can quickly and efficiently validate that your application works correctly across multiple browsers and platforms. You can run tests repeatedly and catch bugs that could break your application during the development process easily with browser automation.
Monitor Websites
Browser automation can be used to monitor websites for changes or errors to ensure that your site is always up and running. By using a scheduling tool such as cron-job.org to run your automation script at regular intervals, you can monitor the website over time and track changes.
Scrape Websites
Automated web scraping can be used to gather data from websites, which can be used for a variety of purposes, such as market research or lead generation. This can save a significant amount of time and effort compared to manual scraping especially when the amount of data is vast.
Enter Data
Browser automation can be particularly useful for tasks that involve entering the same data repeatedly, such as filling out a web form or entering data into a spreadsheet. Additionally, it can also help reduce errors and improve accuracy by ensuring that data is entered consistently and correctly.
What is Selenium
Selenium is a widely-used browser automation tool that has been around since 2004. It is mature and supports a wide range of web browsers and programming languages including non-mainstream ones like Haskell, Perl, Dart, and Pharo Smalltalk.
Selenium consists of Selenium WebDriver, Selenium IDE, and Selenium Grid. Each of them complements the other to carry out automated tests on different browsers and environments, with Selenium WebDriver being the core of the automated testing ecosystem. It is also highly extensible, with a large ecosystem of third-party plugins and frameworks that can enhance its functionality.
As Selenium is an open-source project, its growth is contributed by the support of the community. Besides efforts by individual contributors like programmers, designers, QA engineers, etc., the Selenium project is also sponsored by companies like BrowserStack, Lambdatest, Sauce Lab, and more.
How to Use Selenium for Browser Automation
The basic steps to use Selenium for browser automation in different programming languages are similar. We’ll use Nodej.s/JavaScript as an example:
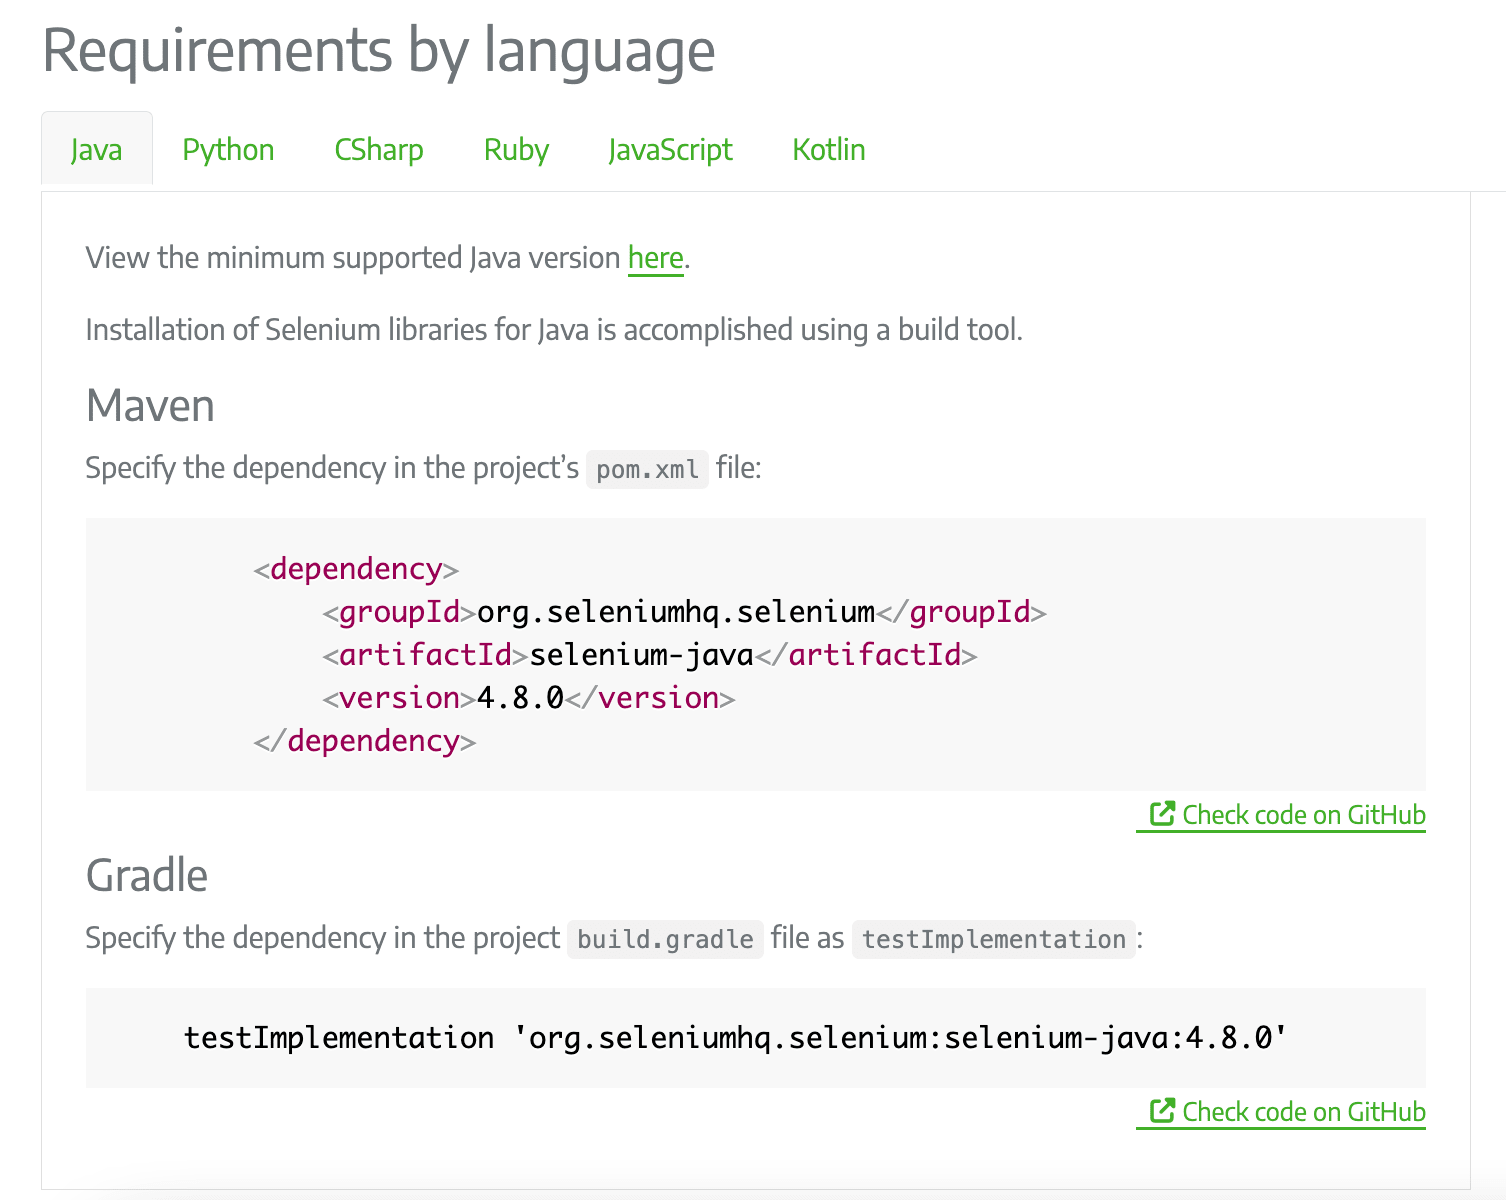
Step 1. Install the Selenium Library
After creating a new project, run the command below in the project directory to install the Selenium library:
npm install selenium-webdriver
The library is also available for other programming languages including Java, Python, C#, Ruby, JavaScript, and Kotlin. The instructions for installing the library for other programming languages are available on the Selenium website.
⚠️ Note: Despite the name of the library contains "webdriver", the web driver has to be installed separately.
Step 2. Install Browser Drivers
To use Selenium to automate the browsers, we need to install appropriate drivers for different browsers. Selenium currently supports all major browsers such as Chrome/Chromium, Firefox, Microsoft Edge, Safari, and Opera.
There are a few methods to install the drivers. The easiest method is to download them from the official Selenium website and configure Selenium to use the specified drivers using one of the options below:
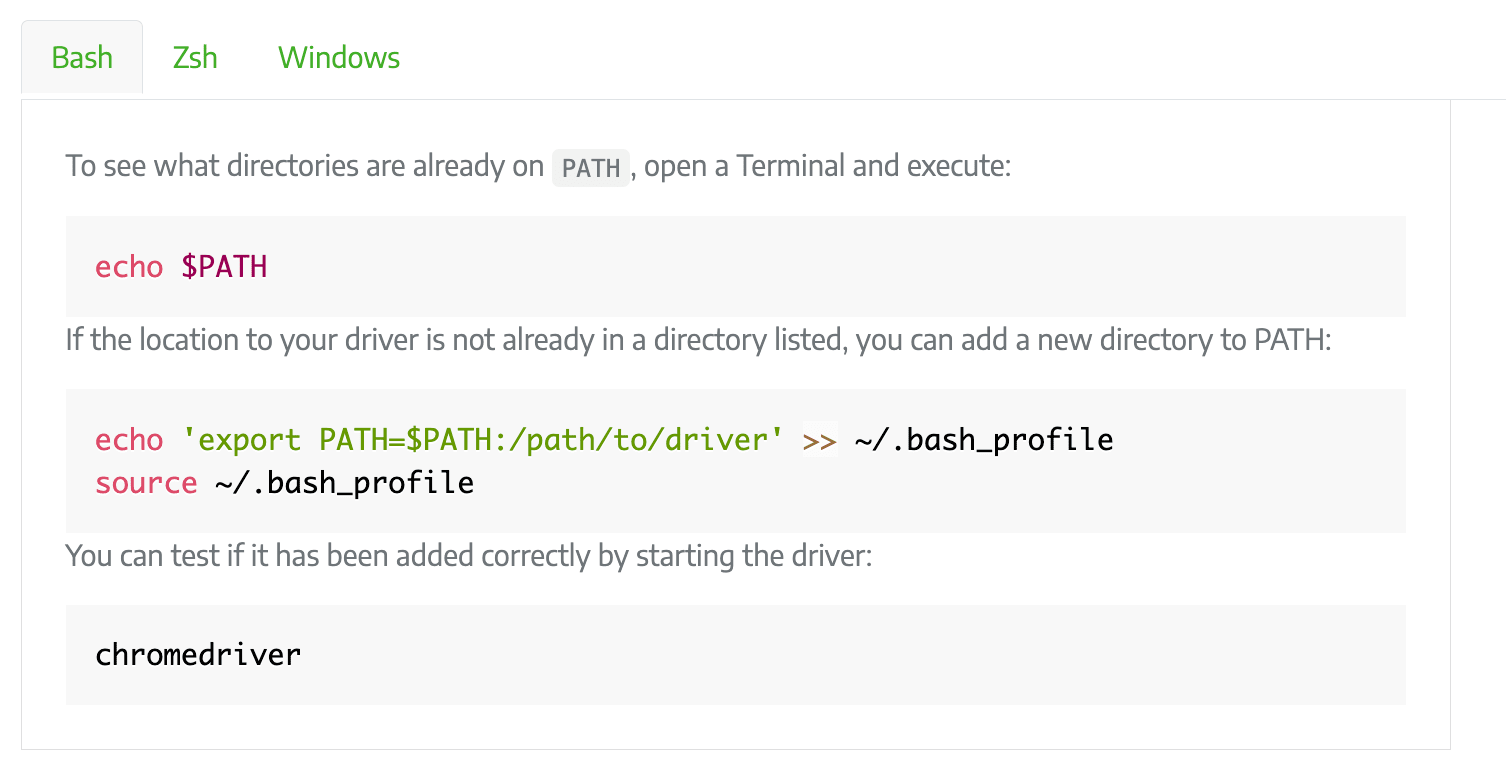
Option 1: Save the Driver Location in the PATH Environment Variable
You can place the drivers in a directory that is already listed in PATH or add the drivers’ location to PATH. Run the commands below in the Terminal or Command Prompt to save them to the PATH environment variable:
In your code, import the library and create a new instance of the driver:
const { Builder } = require('selenium-webdriver');

const driver = await new Builder().forBrowser('chrome').build();
Option 2: Specify the Driver Location in Your Code
You can also hardcode the driver’s location if you want to save the hassle of figuring out the environment variables on your system. However, this might make the code less flexible as you will need to change the code to use another browser.
In your code, import the library. Then, specify the location of the driver and create a new instance of the driver:
const {Builder} = require('selenium-webdriver');
const chrome = require('selenium-webdriver/chrome');

const service = new chrome.ServiceBuilder('/path/to/chromedriver');
const driver = new Builder().forBrowser('chrome').setChromeService(service).build();
For other programming languages, refer to the Selenium website.

Step 3. Write the Code
The basic flow when using Selenium to interact with the browser and perform various actions is as follows:
1-Navigate to a web page
await driver.get('https://www.browserbear.com/');
2-Wait for the page to load completely
Before interacting with an HTML element, we want to ensure that the page or the target element has been completely loaded. There are a few ways to wait for it, including:
a. Explicit Wait - waits for a specific condition to be met
let element = await driver.wait(until.elementLocated(By.css('p')),10000);

// Proceed with the code after the condition above is met
b. Implicit Wait - allows the driver to poll the DOM to find any element for a certain duration
// Apply timeout for 10 seconds
await driver.manage().setTimeouts( { implicit: 10000 } );
c. Fluent Wait - defines the maximum time to wait for a condition and the frequency to check it again
let element = await driver.wait(until.elementLocated(By.id('username')), 30000, 'Timed out after 30 seconds', 5000);

// Wait 30 seconds for an element to be present on the page
// Check its presence every 5 seconds
3-Find an HTML element
Then, get the target HTML element using one of the locator strategies below:
- Class name
- CSS selector
- ID
- Name
- Link text
- Partial link text
- Tag name
-
XPath
let textBox = await driver.findElement(By.name('text-box')); let button = await driver.findElement(By.css('button')); let input = await driver.findElement(By.xpath('//input[@value='f']'));
Read more about XPath here: What is XPath in Selenium.
4-Perform Actions
Interact with the HTML element with these actions:
- click
- send keys (text fields and content editable elements only)
- clear (text fields and content editable elements only)
- submit (form elements only)
-
select
await button.click();
5-End the session
After performing all actions, end the driver process. This will close the browser automatically.
await driver.quit();
Step 4. Run Your Code
After completing the code, you can run it by executing node index.js and see the browser automation in action.
🐻 Bear Tips: You can also run the browser automation in headless mode.
Other Selenium Alternatives
While Selenium is a popular choice for browser automation, it is not the only option. Browserbear is another powerful tool for automating browser actions. It offers a more user-friendly and intuitive interface than Selenium, making it easier to create and run automated browser tasks. Additionally, it is cloud-based, which means you can scale your automation as much as you need easily.
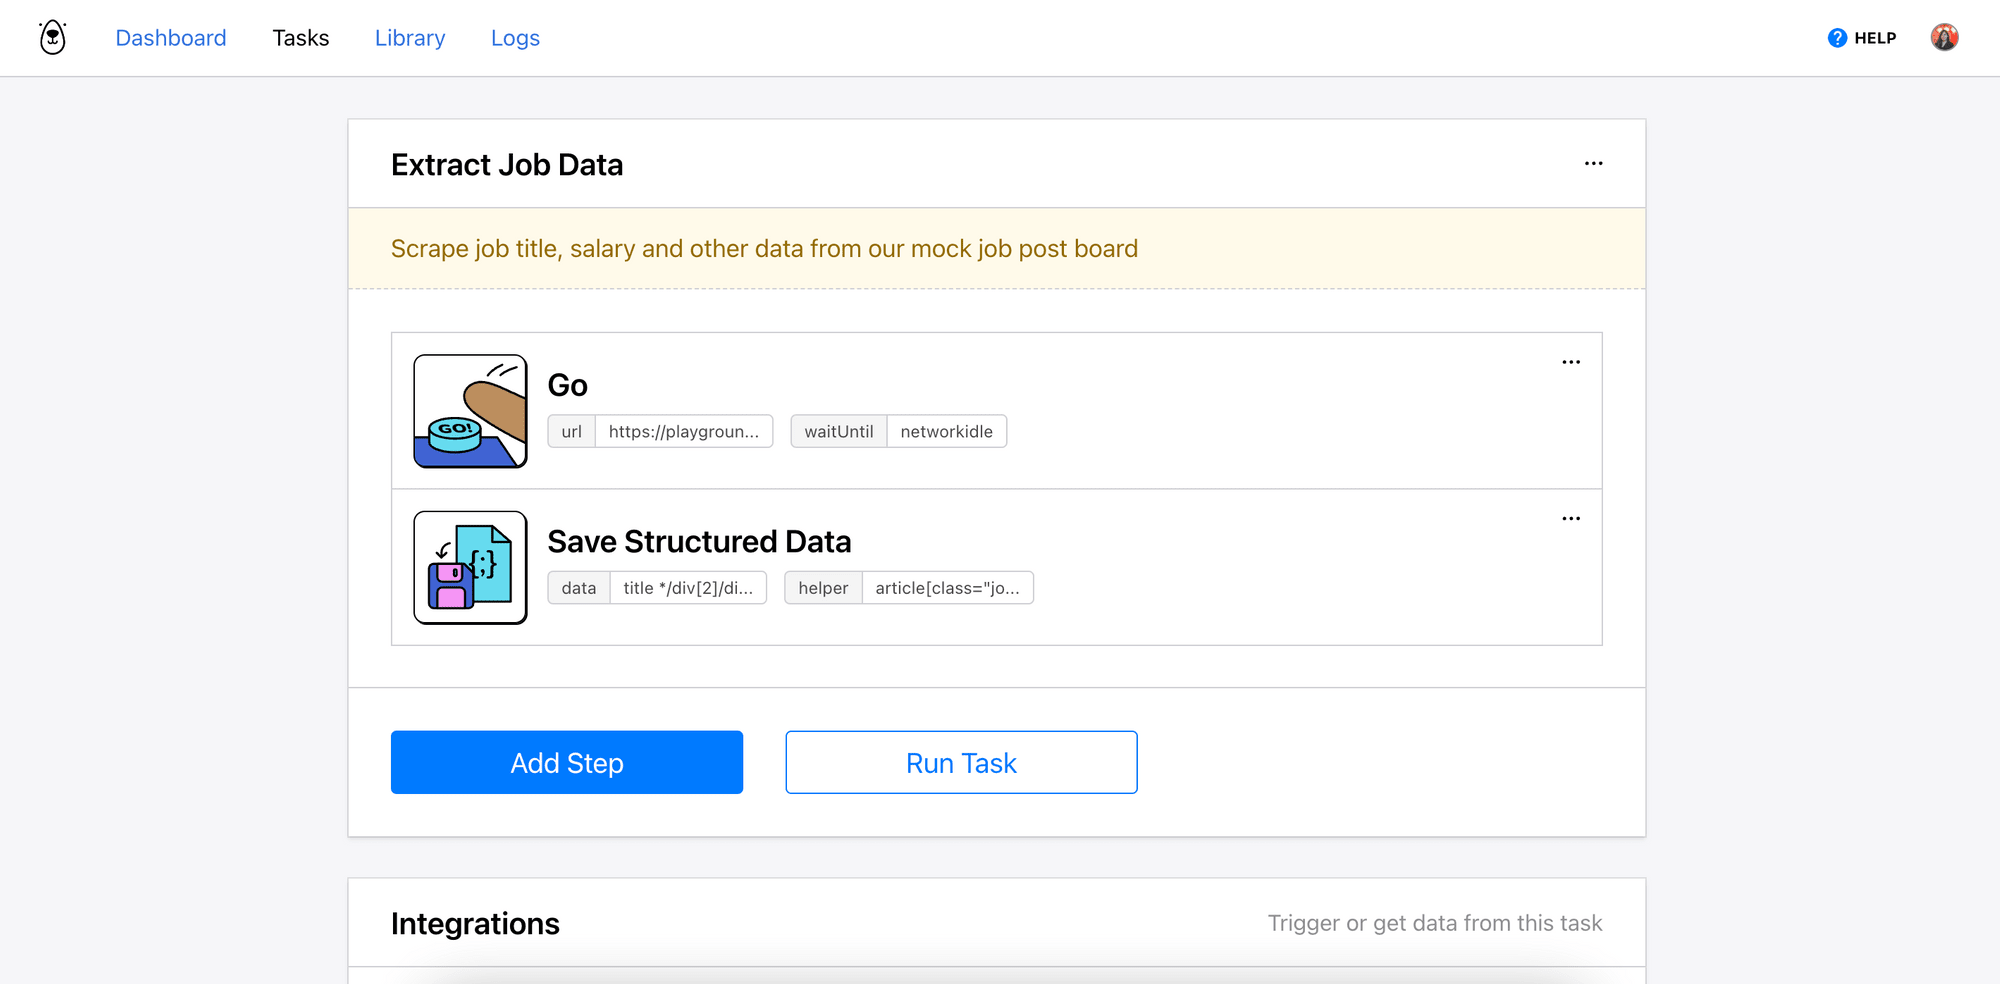
The image below shows an example of a Browserbear automation task that extracts job data from a job board.
You can duplicate it and other ready-made tasks from the Task Library to start automating browser actions immediately. To learn how to use Browserbear, read:
- Getting Started with Browserbear: How to Automate Browsers
- How to Scrape Data from a Website Using Browserbear
- How to Automatically Take Website Screenshots on Different Devices using Serverless and Browserbear
Conclusion
Browser automation is essential for anyone who wants to streamline their online activities and reduce the time and effort required to perform repetitive tasks on the web. Regardless of the tool chosen, the benefits of browser automation make it an indispensable tool for businesses and individuals who want to save time and increase productivity in today's fast-paced world.